
Experimenting with Kotlin, the Architecture Components & Material Design
Through my side project, CookMinute.
Let me give you some context. I have this side project, CookMinute, a French app helping people to eat better, which I started just after my MSD 4 years ago.
A lot of things have changed for Android developers since this dark and painful age.
This side project is being used by more and more people (40K today) from month to month, so I decided 5 months ago to entirely refactoring it, mainly because this project had those problems :
- Didn’t contain any Unit or Instrumented Tests ! 😱 Before each release, I proceeded to manual tests with my Samsung, following a 6 pages use-cases I’ve made. #DontJudgeMe
- UX & UI were… how can we say that… perfectible ?
- No real Architectural Pattern was implemented…
- A lot of third-party libraries used back then started to become unmaintained over time…
- The whole codebase was written in Java. Not bad, but I wanted to give Kotlin a chance!
YOLO, right ? 😅
As you can imagine, all updates were painful and time-consuming. So I took 5 months of this year to proceed to a massive refactoring, starting from scratch again, using only the Android SDK or Jake’s libs ! (see my build.gradle dependencies)
1. Exploring Material Design
A user interface is like a joke. if you have to explain it it’s not that good.
CookMinute’s UI was a terrible joke. To explain it to users, I even used to have a “question mark button” showing a dialog that described the different features, for each screen…
So I tried to take a look closer to Material Design principles, and this website helped me a lot : https://material.io/
For example, If you’re wondering what should be the recommended margins for your RecyclerView, there is an illustration for that :

And also, to help you with this “Pixel perfect” journey, I highly recommend that you download this app, which will provide you with some useful tools like a “Grid layout”. 📐
Material Design guidelines are really useful when you don’t know how to make your user interface. In my case, I tried to apply them every time I could.
1.1. Floating Action Button
Another essential thing I’ve learned with Material Design is the “Intentional principle”, that gives meaning to the user experience.
In my opinion, the best simple representation of this principle is the Floating Action Button component : it represents the primary action on a screen.

This simple button has truly helped me designing my app with one visible and relevant action by screen (when necessary). In CookMinute case, even if you don’t speak French, those FABs and their purpose should remain understandable ! 😃
Also, you may have noticed that I’ve always used the “Blue” color as “Secondary color” to clearly differentiate between main actions.
1.2. Animated Vector Drawable
Besides, with Android, you can add a little animation to FAB to make its purpose even more relevant, with the Animated Vector Drawable (aka “Shared transformation” in Material Design).

If you want to know more about AVD, I’ve written an article about it.
1.3. Transitions
The last thing, and maybe it’s the most important, is about animations (also called “Motion”). As an Android developer, you may have noticed that users love animations !
But you also have noticed that developing animations for an Android app is sometimes, time-consuming… 🥵 But it is worth it ! Really.
For this project, I chose to implement various animations. First one was the powerful Transitions.

This transition is pretty simple to implement. I’ve just created an extension that creates a TransitionSet composed of Fade & Slide transitions, before adding it to the setEnterTransition() method of the activity’s window :
Next, I called this extension from the Activity I wanted to animate (for example, SignInActivity & SignUpActivity).
Also don’t forget to start the Activity you want to animate with this line to enable the transitions :
startActivity(intent, ActivityOptions.makeSceneTransitionAnimation(this).toBundle())Pretty easy, isn’t it ? 😄
1.4. Shared Element
With the goal to improve navigation between recipes, I wanted to give a try to shared element transitions.
The main difficulty in my case was to add, during shared element transition, other animations (for example, TextViews sliding from bottom & FAB popping up) !
Lucky for me, there is an open-source app which already has implemented this case : Plaid of Nick Butcher. This app saved me a ton of time and was a huge inspiration !
Basically, all you have to do to implement a transition with a shared element is to define which component(s) you want to share between two Activities/Fragments.
In the previous example, it’s the recipe image. So when I start the detail Activity, I have to set it as the shared element transition explicitly.
Then, you only have to set the transitionName view’s property with the same name you used previously :
At this point, the transition animation worked pretty well ! 🙂 However, I still haven’t added others animations during this transition… To solve that, I created a style for the recipe detail activity, overriding the windowEnterTransition & windowReturnTransition attributes :
Actually, I did the same thing I’ve done programmatically with the previous extension method. However, the transition set is now built in XML only :
Did you notice the “Pop” transition ? It’s actually a pretty simple class that updates the view :
Finally, I applied the previous style of the desired activity inside the manifest :
1.5. Reveal Animations
In the CookMinute workflow, I sometimes had to “hide” temporarily some components and show them when needed.
So when you try to follow Material Design guidelines, one principle tells you to “express continuity”. And that’s what I tried to achieve here :

Like the Gmail app, I hid some options for them to be revealed when touching the FAB. To achieve this circular reveal, for this case and others, I created this simple utils method :
Then, I just had to call it anywhere I needed it… 👌
1.6. Bonus : Elevation
Elevation is the relative distance between two surfaces along the z-axis. In other words, it’s the superposition of two components (Screens, Dialogs, etc…).

For CookMinute, I simply used what Nick Butcher made for Plaid. This guy is brilliant.
Actually, he created a class that extends FrameLayout, ElasticDragDismissFrameLayout.
Because this class is a ViewGroup, it can override the methods that catch nested scrolls like onStartNestedScroll or onNestedScroll. From there, you can “easily” animate an “yTranslation” with the method setTranslationY() of View class.
Again, Nick, you’re a genius.
Finally, I just had to put a scrollable component (which is a RecyclerView) that matched both parent height & width inside this custom ViewGroup.
Combined with shared element transition, the result is pretty cool.
2. Exploring Architecture Components
As you already know, Android Jetpack was a huge disruption in the way we build Android apps, especially with Architecture Components.
Now, we can build more robust, testable and maintainable apps following proper guidelines and architecture. Finally ! 😍
I’ve already made an article about Architecture Components, so I will not re-explain it in details. CookMinute follows the same approach than this last one.
However, I would like to share with you how Architecture Components changed the way I think & implement a feature.
2.1. ViewModel + LiveData = ❤️
For example, let’s take the “Fetch comments for a recipe” feature in the activity CommentActivity.

Usually, with Architecture Components, I create one ViewModel by screen. This ViewModel contains all the features user can perform through the screen.
Each of those features is represented by a single RxJava stream which uses different utils objects injected by Dagger2. Also, the ViewModel communicate with the activity through LiveData objects.
So in CookMinute, it gives something like that (simplified version for greater clarity) :
As you can see, this ViewModel is pretty simple. All dependencies I needed are injected through its constructor, and I’ve got one stream, fetchCommentsForRecipe, that will be called by the Activity.
This stream will update three LiveData objects :
isLoading: Pretty obvious Boolean value.errorMessage: String value. Will be updated only if an error is happing inside the stream. Because I just wanted this LiveData to be consumed once, I wrapped it inside an Event class (thanks to Jose Alcérreca approach).comments: List of comments. Will be updated when stream finishes.
Also, note that the disposable is released when ViewModel is cleared (BaseViewModel).
Finally, I just had to observe those LiveData objects inside the Activity and update UI.
Pretty clean & effective isn’t it ? 😃
2.2. What about testing ?
Architecture Components have truly changed the way I used to think my tests, especially unit tests. For instance, if we want to unit test the previous stream, we just have to test the CommentViewModel.
As you can see, it’s surprisingly easy to unit test stream inside a ViewModel, mainly if you’re working with any dependencies injection framework like Dagger2.
If you want a full example of testing with Architecture Components, Kotlin, Dagger2 & MockWebServer, I’ve made an article about it. You can also check out the samples provided by Google.
2.3. Bonus : Firebase & Firestore
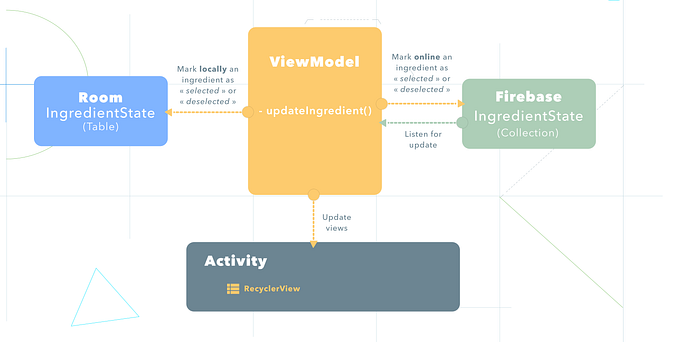
This has absolutely nothing to do with Architecture Components, but it’s pretty new and it helped me a lot to build a real-time feature. One request from my users was to have their shopping list updated in real-time, in each of their devices.

But actually, with Firebase & Firestore, it becomes soooooo easy !
You just have to “listen” to a Firestore document or collections, and update locally what you have to update (in my case, I update the Room Database). And as usual, the ViewModel is the central point.
3. Exploring Kotlin
Last thing I would like to share with you: a few quick tips about Kotlin. Besides, if you speak French, I created a full course about it for OpenClassrooms 🎓
Of course, there are so many things to tell about Kotlin (and so much already told), so I’ll be extremely brief !
3.1. Goodbye Butterknife 😢
Before, when I had to develop some Android app in Java, I used to use Butterknife to help me easily bind views. However, with Kotlin, this became more affordable.
For instance, you can use lambda for your View.OnClickListener :
this.button.setOnClickListener { /* Do whatever you want */ }Also, you can use “Synthetic Binding” or better, you can create some extensions and using lazy delegate to bind your views. This last one is exactly what JakeWharton did with those extensions :
3.2. Lambda & Extensions
Sometimes in Android, we had to add a lot of boilerplate code to achieve very basic stuff. For example, we all used the TextWatcher interface, especially with EditText, and re-implemented its three methods (even if we wanted only to use one !) through an anonymous class, every time...
With Kotlin, you can quickly improve this by creating once an extension with a lambda :
Next, you will just have to call this method every time you need to intercept an update for an EditText :
this.editText.afterTextChanged { /* Do whatever you want */ }Generally speaking, Kotlin really helped me to write more concise code in comparison with Java.
If you have read this far then you probably enjoyed this article and I really hope it helped or inspired you in any way 👌
What’s next ?
For now, I’m fixing some bugs in the new release during my free time. I’m almost thinking about making CookMinute open source inside a public repo on GitHub… but I still try to figure it out how and when 😅
PS : Thanks a lot to Amaël Sikel for spotting the typo 🙌

