Automating the Android Build and Release Process using Fastlane -Part 3
This is Part 3 of the blog series Automating the Android Build and Release Process using Fastlane. In case you haven’t read the 2 posts that precede this one, here are links to Part 1 and Part 2
GOAL: The goal of this article is to demonstrate how to add a CI service to your project and use Fastlane to not only upload an APK to the same QA slack channel (for your team to review the app internally) but also add Firebase App Distribution to the mix. 🛠
What is CI
Continuous integration is the practice that requires that every time somebody commits any change into source control, the entire application is built and a comprehensive set of automated tests is run against it. Crucially, if the build or test process fails, the development team stops whatever they are doing and fixes the problem immediately.
* The goal of continuous integration is that the software is in a working state all the time. *
CI Value Proposition
The teams that use continuous integration effectively are able to deliver software much faster, and with fewer bugs, than teams that do not. Bugs are caught much earlier in the delivery process when they are cheaper to fix, providing significant cost and time savings.
Selecting the CI service.
There are many CI services out there for you to work with. They all have different pros and cons.
Some include:
You can read this article for more information on the different CI Service offerings. https://hackernoon.com/top-ci-cd-tools-for-your-android-and-ios-projects-8d356b983b3b
Circle CI Setup
For the purpose of this blog post, we will be using Circle CI as it is the one I have used on numerous work-related & personal projects. We will use this Circle CI Android Guide to inform our process.
* NOTE: This process assumes that you are hosting your project on Github and that it is a public project. *
Step 1
We will start by generating the config.yml file that will run the jobs on CI. Create a .circleci folder in the root directory of your project and add the sample configuration file from Circle CI.
Step 2
- Go to the CircleCI web page & either Log In / Sign Up.
- Once you have successfully authenticated your account, select Add Projects on the left navigation pane.
- This will display all your projects available on Github and you can click the Set-Up Project button for the project you want to set up. In our case, it is named fastlane-droid.
Step 3
To finish, click Start building. This will add your project to CircleCI and make it listen to every change.
NOTE: The first build may fail. 😦 All you’ll need to do is push any changes you made from your branch and the build process will begin. The build will succeed. 🚀
FastFile & Config.yml file Setup
Here are the links to the completed Config file and Fastfile that we will be building in this blog post. I will be explaining the steps that led the files to this point.
Step 1
We will update the Fastfile by adding a unit test lane to it and adding the unit test job to the config.yml file.
* NOTE: We’ll leave Instrumented tests out for the next blog post. *
Step 2
If you remember from our previous blog posts(Part 1 & Part 2), we had slack integration built-in. We will now ensure that we add the slack deployment job right below the test_unit job in the config.yml file.
Step 3
Add the environment variables present in our local .env file to the environment variables on Circle CI.
On the Circle CI dashboard, go to Settings > Projects > Click on the “Settings icon” on your project > Environment Variables.
The main variables that we will add at this point are:
* ACCESS_TOKEN
* KEYSTORE_PATH
* KEY_ALIAS
* KEY_PASSWORD
* SLACK_URL
* STORE_PASSWORD
NOTE: We will add more variables as we go along with this blog post.

Step 4
We will add the decode_android_key reference to the config file that assists with encoding and decoding the keystore file.
Step 5
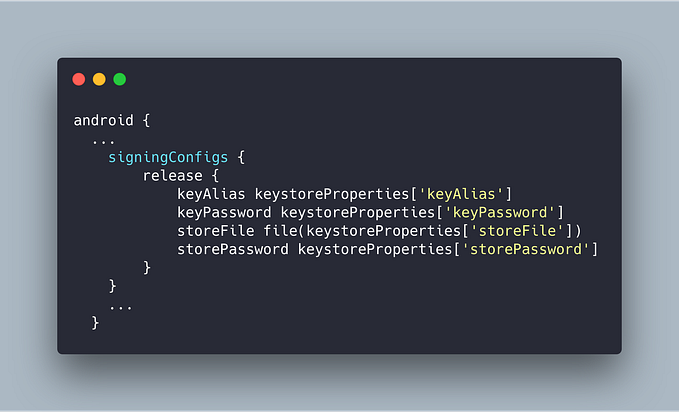
IMPORTANT: Add your keystore file to the root folder of your project locally and update the Fastfile to stop referencing the KEYSTORE_PATH from the .env file & reference it from the project root. Ensure keystore file is not committed to source control. (Update your .gitignore file)
In your Fastfile, update one of the properties in the slack_apk_build lane from
“android.injected.signing.store.file” => ENV[‘KEYSTORE_PATH’]to
“android.injected.signing.store.file” => “keystore.jks”Firebase App Distribution
Firebase App Distribution makes distributing your apps to testers painless. By getting your apps onto testers’ devices quickly, you can get feedback early and often.
In this section, we are going to leverage the power of Firebase App Distribution by adding it to the build and release process for our project.
NOTE: At the time of publishing this blog post, Firebase App Distribution was still in Beta.
Step 1
We will start by creating our Firebase project before we can leverage Firebase App Distribution.
NOTE: You can migrate your Fabric project to the Firebase with an intuitive user interface. In other cases, you’ll need to go to the Firebase console, where you’ll see the option to add a project.
You’ll be required to fill in some information and your Firebase project will be created. Our project is named Fastlane Droid

Step 2
The next step is to Get started by adding Firebase to your app. We achieve this through the dashboard.
If this is a new project, you should see the console display a screen similar to the one below, asking you to “Add an app to get started”.

If you already have an app & you’ve used some of Firebase’s features before, such as Crashlytics or Performance Monitor, you should see the console display a screen similar to the one below. This screen contains the app(s) currently added to your project.

Step 3
The Project Overview in the upper left corner is where you access your app(s).
Click on the settings icon and select Project Settings. Under the General tab you should see the screen below:

Once you access “Your Apps”, you’ll need to find the app(s) that you want to distribute and copy the App ID.
NOTE: To ensure that your app data is securely stored, you should add the App ID(s) value to your CircleCI Environment Variables.


For this project, we have both prod and mock flavors of the app.
We will need to generate a google-services.json file for both flavors of the app on the Firebase console and add them to the specific packages in the codebase.
NOTE: Each json file is unique for the specific flavors based on the SHA certificate fingerprints.
Step 4
It is best practice to never commit any secret keys to a public Git repository. Instead, you should store your encoded keys as CircleCI environment variables and decode them in your container when needed.
In this step, we will add an encrypted version of the prod google-services.json file as a Circle CI environment variable. Then, during a build, we will decrypt the variable back to the file and share it into relevant folders.
[a] Use base64 encryption to encrypt the google-services.json file. Navigate to the location of your json file in your terminal and run the command below:
base64 google-services.json
Copy the variable that is output and add it to Circle CI.

[b] Update the config.yml file with the command to decode the variable and add the google-services.json file to the project via CI. 👇
Step 5
We need to install firebase-tools.
The Firebase CLI is a utility used to administer Firebase projects by providing a variety of tools for managing, viewing, and deploying to Firebase projects. You can learn more about installing Firebase tools for your operation system here.
Step 6
After installing the CLI, you must authenticate.
We achieve this by signing into Firebase using our Google account. Run the following command in the terminal:
firebase login
Step 7
Next, we need to run commands to use the CLI with CI systems.
Start the sign-in process by running the following command in the terminal:
firebase login:ci
- Visit the URL provided in the terminal, then sign in using a Google account.
- Print a new refresh token. 👇
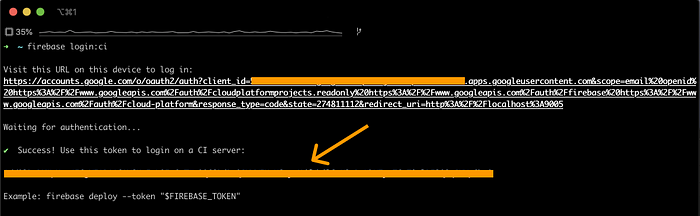
- Store the output token in a secure but accessible way in your CI system. 👇

For a detailed process, see this link.
Step 8
Next is a crucial step. Creation of the testers group.
Click on App Distribution, on the left-hand tab of your console. We can specify testers and divide them into groups under the “Testers & Groups” tab.
Create a new group where you’ll add testers. In our case, this group is android-qa. Without this, your testers will not be able to access the app for testing.

NOTE: We need to remember the test group alias as we will need this in the next step to set up and configure Fastlane. In our case, this alias is android-qa
Fastlane Setup
Step 1
We will start by adding App Distribution to your Fastlane configuration by running the following command from the root of your Android project in the terminal:
fastlane add_plugin firebase_app_distributionIf the command prompts you with an option, select Option 3: RubyGems.org.
NOTE: This command creates a Pluginfile in the fastlane folder.
Step 2
Next, we will add the App Distribution lane to the Fastfile. Define the lane distribute that publishes your app to Firebase.
NOTE: We use this lane (distribute) in the Circle CI config.yml file for a job named firebase_app_distribution.
Fastlane Gotchya’s
- In case you are having some problems with your Fastlane plugins, you can troubleshoot them using this resource.
- There were some problems early on with the Fastlane plugin for Firebase App Distribution. You can look through this thread to see whether you are encountering some of these problems.
- Ensure that you are using ruby version 2.5.5 to get the same results for the project.
Final Step
Now that we have successfully built the Firebase App Distribution set up. It is time to test it out.
NOTE: Before you test it out, ensure that both your config.yml file and Fastfile match these links.
- Make a change to your codebase, commit the change and push it to Github.
- This will trigger a build on Circle CI that builds your application and runs the tests.
- Once the build is successful, an apk should be distributed to both slack and the Firebase console.
Success! 🚀
Below is a video of the successful build process that results in the app being distributed to slack and your firebase tester group.
Next steps:
I plan on making another blog post that will incorporate topics like:
- Instrumented Tests in the build process.
- Automated App Distribution to the Play Console.
- Build Variants and Branching Techniques for Deployment to different environments.
Thank you for reading.
Here’s the link to the branch for this example on Github