Automating the Android Build and Release Process using Fastlane -Part 2
This is Part 2 of the blog series Automating the Android Build and Release Process using Fastlane. In case you haven’t read Part 1, here is the link to the post.
GOAL: The goal of this article is to demonstrate how to use Fastlane to upload an APK to a QA slack channel for your team to review the app internally
Let’s begin with some project housekeeping:
(1) Generating the SLACK URL & ACCESS TOKEN
In part one, we configured our incoming Webhook URL after installing an incoming webhook app in our workspace. Below are screenshots of the process you should go through:
(a) Create the Slack App:
Follow this link to create the slack app & associate it with your workspace. https://api.slack.com/apps

(b) Add features and functionality:
After app creation, we will select the Incoming Webhooks option & activate Incoming Webhooks.

You will also need to add the webhook to your workspace.
- Click the Add New Webhook to Workspace button at the bottom of the page & select the channel you want to post to.

👈 After successful creation, you should see the Webhook URL and the channel it has access to post to.
NOTE: We will add this Webhook URL to our Fastlane project shortly.
(c) OAuth & Permissions:
On the menu to the left of your screen, select the OAuth & Permissions option.
This will give you access to the OAuth Access Token that we will also use in our Fastlane project shortly.

💡 TIP: 💡One final thing we need to do is to select our Permission Scopes. * Without specifying the correct permission, we WON’T be able to successfully upload an APK to slack.
Scroll further down the OAuth & Permissions page until you see the Scopes section.
Select the Upload and modify files as user under the Files Scope and remember to save your changes. 👇

NOTE: You will be notified that you changed the permission scopes your app uses & prompted to reinstall your app for these changes to take effect. (If your app is listed in the Slack App Directory, you’ll need to resubmit it as well).
Just click on the link provided by the notification and reinstall your app.
🚀Success!! 🚀
And with this, we successfully created and configured our slack app to be used by Fastlane to upload an APK to a specific channel.
(2) Updating dotenv files
Thanks to the feedback I received from Andrew Lord regarding the use of .env file when working with environment variables, we will make some changes to the files we had used earlier in Part 1 of this blog series.
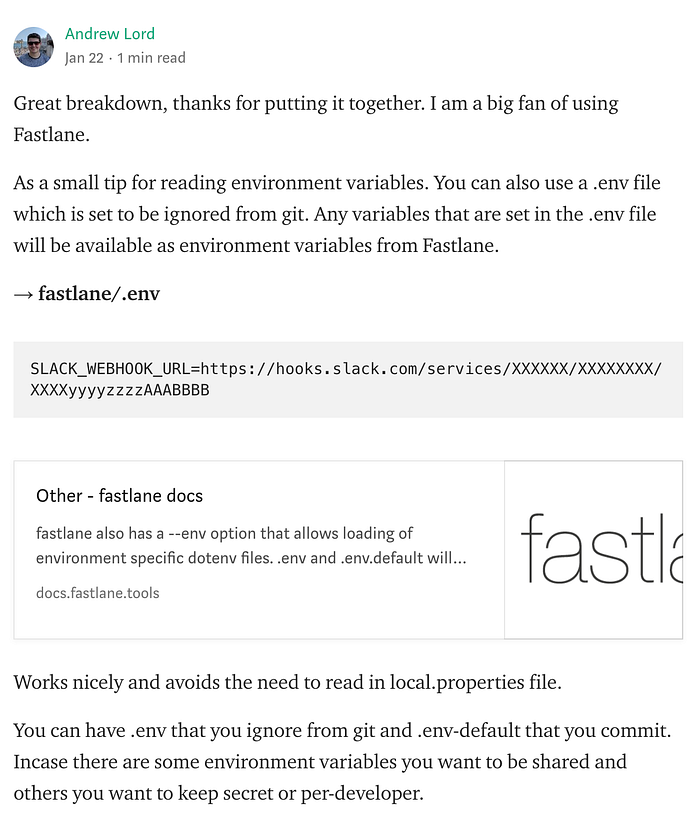
Move the .env.example into the fastlane/ directory and updates its default variables.
Create your own .env file in the fastlane/ directory & add the SLACK URL & ACCESS TOKEN we had acquired from the Generating the SLACK URL & ACCESS TOKEN section of this blog post.
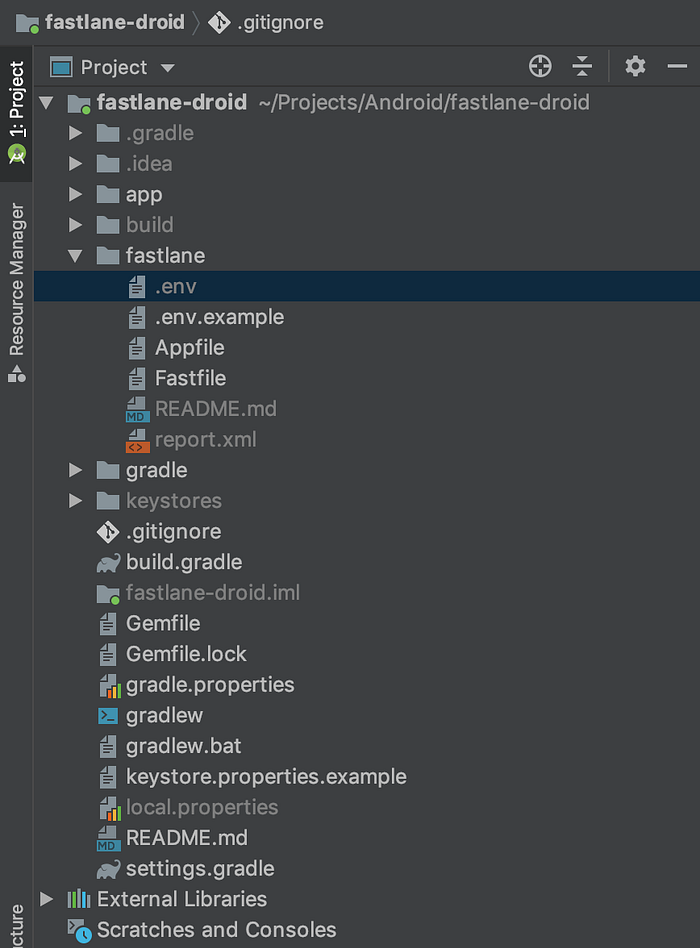
NOTE: Ensure that you add your .envfile to .gitignore to remove it from source control.
(3) Signing your release APKs using Gradle
We will focus on the gradle action. It offers all gradle related actions, including building and testing your Android app.
In our case, we will use the gradle action to build a signed release APK.
Let us begin with the gradle command that allows us to automatically sign and zipalign our app. We will need to change our Fastfile by adding the slack_apk_build lane:
As you can see above, we have some properties that are passed to the gradle task to assemble a release APK. The properties contain your private key info that will be used to sign your app.
💡 TIP: 💡If you don’t have a key generated yet, you need to create a new one by running the command below in the CLI of your IDE:
keytool -genkey -v -keystore fastlane_droid.jks -keyalg RSA -keysize 2048 -validity 10000 -alias key_aliasFollow the prompts to successfully generate the key.
NOTE: Remember to move this
keystorefile into yourkeystores/directory to remove it from source control.
💡 TIP: 💡It is good practice to avoid having your private key info values hardcoded in your code. Let’s modify our lane to use the Fastlane environment variables.
In the .envfile that we created earlier, let’s add our private key store information:
We now also need to update our slack_apk_buildlane in ourFastfile to leverage the environment variables:
(4) Upload APK to Slack
We are almost at the tail end of this article and we are going to create the upload_to_slack lane that is responsible for uploading the APK to slack.
We add this lane right beneath the slack_apk_buildlane:
The above lane does the following:
- Finds the file path to where the signed APK is output.
- Gets the file name
- Gets the access_token and channel name as variables.
- It then passes all the above as variables into the curl statement to upload the apk.
Below is the complete code of the updated Fastfile: ✅
NOTE: Remember to add the upload_to_slack lane into theslack_apk_buildlane and also add a slack action. (See lines 45–46 in the gist above) 👆
5. Let’s test it out: 🚀🚀
Got back to the terminal and run the command below:
bundle exec fastlane android slack_apk_build
This triggers theassembleRelease task that generates a signed APK & this APK is uploaded to slack with a message after the build is successful.
See GIF below:

Here’s a screenshot of the slack message:

Congratulations!
You have now successfully uploaded an APK to slack using Fastlane!
Next steps:
I plan on making a couple of follow up blog posts to this and incorporate topics like:
- Incorporate Fastlane into your CI pipeline.
- Distribute beta builds to testers using Beta by Fabric.
- Publish a new release to the Google Play Store
Thank you for reading.
Here’s the link to the branch for this example on Github