Android Jetpack: Android Slices Part-2 🍰

In the first part, I’ve explained the basics of Android Slice and how it works on the Android Application. We’ve seen the use-cases of Android Slices and just a very basic sample Slice. Let’s a recap of Android Slices, Android Slices are emitted by the android application which has implemented SliceProvider and has the correct URI implemented. In Android slice, there are two entities involved hosts and provider applications. Host application host the slice once it has been emitted by provider application. We’ve seen that how Google Search application on the android device can host any kind of slice from slice provider application. We’ve seen how android slice architecture works, how slice presenter and slice-provider communicates. Check out the first part if you’re interested to know about the basics.
In this part, we will play around with different types of android slices. Let’s try to understand the various Slice builders classes and see how they’re structured. In the first part, I’ve just added the simple Slice which shows hello world, that’s not enough !! 😃.
Types of Slices
Basic Slices
In the first part, I’ve shown that how you can create the very basic slice. Feel free to check out the first part again if you haven’t looked at it yet. It explains the basics, use cases, and high-level architecture. Here is the code which helps you to build the very basic Android Slice. Below are the few examples for basic slices which are built with RowBuilder and HeaderBuilder. I’ll talk in the section how you can build a slice with Slice Builders.


Interactive Slices:
Similar to notifications, you can handle clicks within your application Slice by attaching PendingIntents that are triggered on user interaction. The example below starts an Activity when you click on the slice row (entire slice). You can define more than one action on the Slice. We will check in the below section how we can achieve that. Even, you can input the actions from the slice, for eg. toggle wifi/bluetooth, increase/decrease the system volume, take custom input for your application.


Check the below examples for interactive slices with code. 👇
- Start an activity when user click on the slice (Simple Click Action on the Slice).
- Toggle Wifi (Toggle Slice).
- Change Brightness level (Input Range Slice).
- Check Current brightness level.
Dynamic Slices:
Suppose, you want to set a value from outside your application. For example, increment/decrement the counter. Increase/Decrease counter in your application from Slice. Check out this example which demonstrates that how you can achieve this with help of ContentResolver#notifyChange. When you take an action from the slice it triggers the BroadcastReceiver and updates the value in your application then calls ContentResolver#notifyChange which updates the Slice with the updated value.
Increment/Decrement a counter/value of your application from outside the application. 👇
Delayed content Slices
You should return a Slice as quickly as possible from SliceProvider#onBindSlice. Time-consuming calls can lead to display issues, such as flickering and abrupt resizing. If you have Slice content that cannot be loaded quickly, you can construct your Slice with null or placeholder content while noting in the builder that the content is loading. Once the content is ready to be displayed, call getContentResolver().notifyChange(sliceUri) using your Slice URI. This results in another call to SliceProvider#onBindSlice, where you can construct the Slice again with fresh content. Such a nice use-case !! 😃 😵
How to build Slices
In order to build the Slice object, you need to use the Slice Builders API. Slices are constructed by using SliceBuilders, specifically ListBuilder. ListBuilder allows you to add different items like, rows/headers/range/actions that are displayed in a list. Below are the different items/supported rows(HeaderBuilder, RowBuilder, RangeBuilder, GridRowBuiler, etc) which you can add in the ListBuilder. Keep in mind that below items/supported rows might be rendered differently based on the SliceView type. Below are the Slice View types.
- Shortcut: A shortcut is presented as an icon and a text label representing the main content or action associated with the slice.
- Small: The small format has a restricted height and can present a single
SliceItemor a limited collection of items. - Large: The large format displays multiple small templates in a list, if scrolling is not enabled (see
setScrollable(boolean)) the view will show as many items as it can comfortably fit.

Let’s code & understand how to construct different types of Slices with ListBuilder.
0. ListBuilder
A slice can be constructed with a ListBuilder. A ListBuilder is the parent of a Slice. ListBuilder allows you to construct a slice made up of items/rows of content. A list should have at least one row/item of content as well as a primary SliceAction. The supported row types that ListBuilder supports are discussed below.
- SliceAction
- ListBuilder.HeaderBuilder
- ListBuilder.RowBuilder
- GridRowBuilder
- ListBuilder.RangeBuilder and ListBuilder.InputRangeBuilder
- setSeeMoreAction
- setSeeMoreRow
1. SliceAction:
The main component of Slice is SliceAction. A list slice can have one or more actions associated with it. An action has:
- A
PendingIntent, which is the actual action wrapped by the object - An
IconCompatthe icon to display for this action. It could be any icon, toggle icon or custom toggle icon (with on/off feature). There are different state of these action icons:
Type of Icons:Custom/Default Toggle — to signify that this action is an on/off action icon and it has different checked flag as well to set/represent the status of the action.
Any Icon  —Show icon as an action.
- An
ListBuilder.ImageModethe mode the above icon should be displayed in.
Size of IconsICON_IMAGE: tiny size and tintable
SMALL_IMAGE: small size and non-tintable
LARGE_IMAGE: largest size and non-tintable
In the above Image3 you can observe that it has slice action with image icon, where pendingIntent=Open Activity, icon=open window icon and iconSize= ICON_IMAGE. Read more about SliceAction APIs at Android developers website.
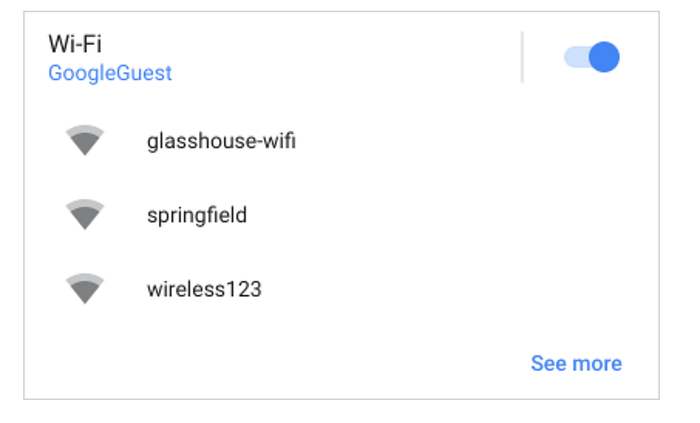
2. Header Item (ListBuilder.Header): In most cases, you should set a header for your Slice using a HeaderBuilder. It’s an optional thing, you can add a row directly without having a header. A header can have:
- Title
- Subtitle
- Summary subtitle: Unlike the
Rowa header also supports setting a summary description of the list contents usingsetSummary(CharSequence). This summary might be used when the rest of the list content is not shown (e.g. if SliceView presenting slice is configured toSliceView.MODE_SMALL). Please check the above-attached image-8 and you will understand the importance of summary. For ex: Summary is visible when slice type is Small but it’s not visible when type is large. - Primary action: any type of slice action (as described above).
Let’s see the example of the slice which contains the header.

private fun createHeaderSliceWithMoreActions(sliceUri: Uri): Slice? {
    return list(context, sliceUri, INFINITY) {
        header {
            title = "Header with 2 actions"
            subtitle = "Choose any action"
            summary = "Choose any action from two actions"
        }
        addAction(createActivityAction(Intent(Settings.ACTION_WIFI_SETTINGS), R.drawable.ic_wifi_24, SliceHints.ICON_IMAGE))
        addAction(createActivityAction(Intent(Settings.ACTION_BLUETOOTH_SETTINGS), R.drawable.ic_bluetooth_24, SliceHints.ICON_IMAGE))
    }
}
3. Row Item (ListBuilder.RowBuilder):
A row can be added as an item to ListBuilder. A row hasn’t summary unlike header. You have to add a primary action if you’re creating a slice otherwise it won’t create and give you the exception.
IllegalStateException: A slice requires a primary action; ensure one of your builders has called #setPrimaryAction with a valid SliceAction.- Title
- Subtitle
- Start item (TitleItem): SliceAction, Icon, or a timestamp, only one item is supported.
- End items: SliceAction, Icon, or a timestamp, can be more than one.
- Primary action
A slice with the combination of actions, header and row builder. Check the below code snippet.
The following slice is the output of the above code snippet.
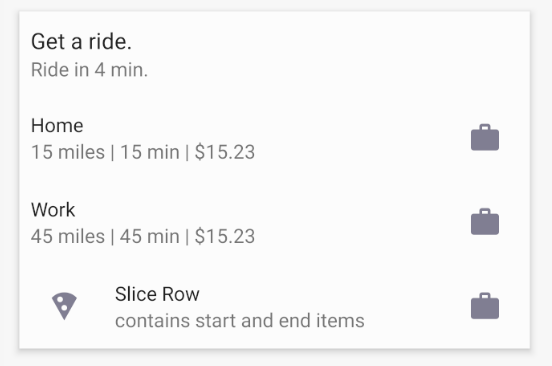
- First item: It’s header which has
title, subtitle and summary(only visible when slice type is small). - Second/third item: It’s row with
primaryAction, subTitle and title. - fourth item: It’s row with
titleItem/startItem, title, subTitle, primaryAction.
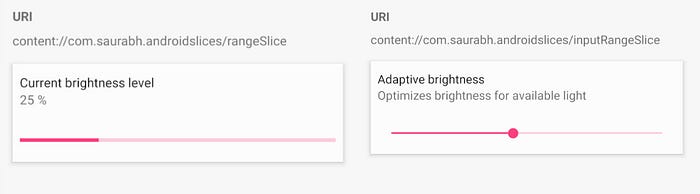
3. Range Item (ListBuilder.RangeBuilder):
With a RangeBuilder, you can create a row slice that contains either a progress bar or an input range, such as a slider. Progress and slider examples are shown in the image 5 above.
//region Range/InputRange Slices
private fun createRangeSlice(sliceUri: Uri): Slice? {
    return list(context, sliceUri, INFINITY) {
        range {
            title = "Current brightness level"
            subtitle = "25 %"
            max = 100
            value = 25
            primaryAction = createPrimaryOpenMainActivityAction()
        }
    }
}private fun createInputRangeSlice(sliceUri: Uri): Slice? {
    val toggleAction = createBrightnessAction()    return list(context, sliceUri, INFINITY) {
        inputRange {
            title = "Adaptive brightness"
            subtitle = "Optimizes brightness for available light"
            min = 0
            max = 100
            value = 45
            inputAction = createSettingsPendingIntent()
            // not working primary action.
            primaryAction = createPrimaryOpenMainActivityAction()
        }
    }
}
//endregion
4. Grid Item (ListBuilder.GridRowBuilder)
A grid row supports cells of vertically laid out content in a single row. Each cell can contain a combination of text and images and is constructed using a GridRowBuilder.CellBuilder.
A grid row can have:
- Image: A Grid Cell supports a couple of image types:
ListBuilder.ICON_IMAGE - icon images are expected to be tintable and are shown at a standard icon size.ListBuilder.SMALL_IMAGE - small images are not tinted and are shown at a small size.ListBuilder.LARGE_IMAGE - large images are not tinted and are shown as large as they can be, in a ImageView.ScaleType.CENTER_CROP
- Text: Two lines of text, a title and secondary text below the title.
- ContentIntent: Sets the action to be invoked if the user taps on this cell in the row.
- PrimaryAction: Sets the intent to send when the whole grid row is clicked. It works differently when SliceView type is different.
- SeeMoreAction: If all content in a grid row cannot be shown, a
see moretext may be displayed where the content is cut off. The action should take the user to an activity to see all of the content. - SeeMoreCell: It does the same thing what
SeeMoreActiondoes. But, It should only be used if you want to display a custom cell to indicate more content, consider usingsetSeeMoreAction(PendingIntent)otherwise.
Check the below slices which have GridRow and header items (code snippet).

4. SeeMore Row/Item
It’s an attribute of ListBuilder and it has the similar concept like ListBuilder.GridRowBuilder#SeeMoreAction and ListBuilder.GridRowBuilder#SeeMoreAction. The surface presenting your Slice template may not support scrolling within the template. In this case, some of your content might not be displayed. In that case, you can add a See more button to ensure that users have a way to see all the items in the list. You can add this button by using setSeeMoreAction/addSeeMoreAction:
- setSeeMoreAction: If all content in a slice cannot be shown, a
see moretext may be displayed where the content is cut off. The action should take the user to an activity to see all of the content - setSeeMoreRow: It does the same thing what
setSeeMoreActiondoes. But, It should only be used if you want to display a custom row to indicate more content, consider usingsetSeeMoreAction(PendingIntent)otherwise.
How to test/run the Slice
- You need SliceViewer tool installed on your device.
- Download and install the SliceViewer tool APK, download it from here and install it using the below command. SliceViewer tool displays the slices based on the content URI and you change the mode of slice as well.
adb install -r -t slice-viewer.apk
- Install your android application via command line or Android Studio whichever you prefer.
- Now, Run the following command to display the Slice. It’s the normal command to start the action intent with data URI. After running this command you can see your slice on SliceViewer screen. If it’s asking for the permission then give it because slice viewer tool requests the necessary permission to your application’s slice provider.
adb shell am start -a android.intent.action.VIEW -d slice-<content_uri_name>for eg. "content://com.saurabh.androidslices/basicRowSlice"
for eg. "content://com.saurabh.androidslices/trafficInfoSlice"
for eg. "content://com.saurabh.androidslices/gridRowSlice"
You can find all slices URIs here.
Github Sample Application code
Feel free to clone/fork this sample application and try to build some slices by yourself 👏 👏. Feel free contact me if you have any questions about the code. There are few problems with the Slice APIs which I faced and put comments in the code. I’ll try to get answer for those issues.
Resources & References
Thanks Doug Sigelbaum for the Slice Builders KTX tutorial.
Thank you for using your precious time to reading this article, If you liked the article, Clap your 👏👏 to say “thanks!” and help others find this article by sharing it. Also, you can follow me on Twitter or Medium !! Keep Learning 📚