Write an Android Studio Plugin Part 1: Creating a basic plugin
Back in October I talked about creating your own plugin for Android Studio at Droidcon UK 2018 to automate everything. There is a lot of stuff that I didn’t have time to cover so I thought I could write a series of blogs to go into more detail.

What are we going to do?
In this first part we are going to write a really basic plugin that is not really going to do an awful lot, but the important thing is that we will learn the basics of a plugin and what you need to create one. We will also create a new action that will show a popup with a message.
This is just the first part of a really long series of articles where I would go deeper and deeper and add more functionality to our plugin. All the code that you will see is in the repo shown below. As I progress, master will be updated with the latest code but I will also keep separated branches per each article. For this one you can always go back and check the branch Part1.
Step 1: Install IntelliJ IDEA CE
To create our plugin we are going to use IntelliJ IDEA Community Edition. The main reasons are because it’s free, it’s really easy to use and we can also take advantage of the gradle-intellij-plugin which is going to make our life much easier.
I will be using IntelliJ IDEA CE 2018.1.6 which is NOT the latest version of IntelliJ IDEA CE. The reason is because Android Studio 3.2.1 is based on this version of IntelliJ and I don’t want to use any new features that may not be compatible with Android Studio.
You can download IntelliJ IDEA CE 2018.1.6 from here: https://www.jetbrains.com/idea/download/previous.html
Step 2: Create a new plugin project
Just as a you would normally do, create a new project.

Select Gradle and IntelliJ Platform Plugin and the only thing left is decide which language are we going to use. In this case I’m going to go with Kotlin (Java).

After we do this, we need to define three attributes.
- GroupId —
groupIdof the new project. You can omit this field if you plan to deploy your project locally. - ArtifactId —
artifactIdthat is added as a name of your new project. - Version —
versionof the new project. By default, this field is specified automatically.
Because I don’t plan to publish this plugin I’ll just use myplugin as GroupId and ArtifactId. Use something accordingly to your needs here :).

On the next screen I’m not going to change anything and just leave the default options. If you want to learn more about this step, please go to https://www.jetbrains.com/help/idea/2018.1/gradle.html
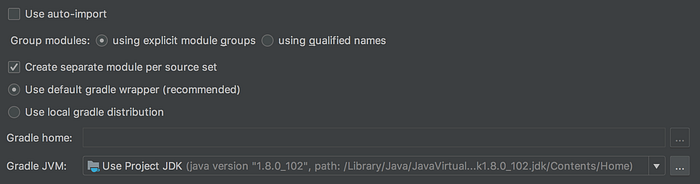
And finally the last step is just giving a name to our plugin.

Congratulations! You just created a new plugin, not just for Android Studio but for any other IDE that is based on IntelliJ. Although of course your plugin doesn’t really do anything yet.
Step 3: Gradle and plugin.xml
Now that we have created our project we are going to have a quick look at two files: plugin.xml and build.gradle.
Let’s start with plugin.xml. This is the file that will contain some metadata about our plugin and the place where we have to register the different elements of our plugin. We will have a deeper look at some of the sections inside this file once we need them in the future (spoiler alert: we will need this file a lot).
The other file is build.gradle, we are already familiar with it so I won’t explain what it does. This is the default build.gradle file that you will get (maybe with different versions).
Everything here looks really familiar because we are used to gradle in our Android projects. We will be coming back to this file when we start adding more dependencies and so on but for now I’m just going to focus on two things.
First of all you can see that our dependencies uses compile instead of implementation/api, the main reason is because the gradle-intellij-plugin doesn’t support implementation or api just yet. You can use kapt though if you need it for any kind of annotation processing (Dagger I’m looking at you). Like in any of your Android projects you can use any libraries that you want, just be careful with the libraries that you put here because this is NOT an Android project.
Secondly we have a new section called intellij. This is the place where we will add more attributes as we need them like plugin dependencies, etc. The only attribute that we have right now, version, it is specifying the version of the IDEA distribution that should be used as a dependency.
Before we move on, I’m going to add another attribute to the intellij section. Our plugin as we have it now it’s only debuggable on IntelliJ IDEA CE. If we want to debug the behaviour of our plugin right now, what’s going to happen is that a new instance of IntelliJ will spin up an we will have to do our debugging/testing there. We obviously want to test our plugin on Android Studio so to tell the gradle-intellij-plugin that we want to use Android Studio we have to add a new attribute.
And this is how our intellij section looks like now in our build.gradle file.
intellij {
    version '2018.1.6'
    alternativeIdePath '/Applications/Android Studio.app'
}
By using alternativeIdePath and pointing to our local installation of Android Studio we are telling the gradle-intellij-plugin to use Android Studio whenever we run our plugin or debug it instead of using the default IntelliJ IDE.
If you can’t wait for the other articles to see which other attributes you can use, then please head up to https://github.com/JetBrains/gradle-intellij-plugin for more information.
Step 4: Writing our first action
There are different elements that we can use in our plugin, we will see all of them in future articles but for now we will focus on the most commonly used, actions.
An action is basically what happens when you click on a toolbar or a menu item. As simple as that. Everything that you see on the images below are actions.


Actions allow us to add our own items to menus and toolbars on Android Studio. These actions are organized into groups, these groups can contain other groups and so on and so forth.
To create a new action we have to extend from AnAction and override the actionPerformed method.
Here we have created a simple action that will show a popup with a title and a message. The last thing that we have to do is add this action to our plugin.xml file.
Our actions must belong to a group so, first of all, I created a new group with the id MyPlugin.TopMenu. I also added that group to the MainMenu group which is the main toolbar that you can see on any IntelliJ IDE. I set the anchor as last so our group will be in the last position of that group. Finally I have added our action to the MyPlugin.TopMenu group so we can access it through there.
If you are wondering how did I know the MainMenu id existed, you can just command + click on the MainMenu id which will take you to a file named PlatformActions.xml containing the vast majority (there are more like VcsActions.xml) of the actions and groups within the IDE.
There are a lot of different things that we can do with actions and groups, like adding separators, or re-using groups or actions. I will explore them in a future article but for now you can check them out at http://www.jetbrains.org/intellij/sdk/docs/basics/action_system.html
Step 5: Run it

That’s it, we have just written a very simple plugin. We can now run it using the play button or debug it as well. This will create a new instance of Android Studio where our plugin will be installed. Another option is to run the buildPlugin gradle task which will generate a .jar file that you can then install as a plugin on Android Studio or any other IntelliJ IDE.
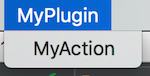
With the plugin installed and Android Studio running, you can now see on the main toolbar your new MyPlugin group which contains your MyAction.
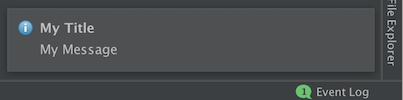
And after you click on MyAction a new popup message will show up with the title and message that you defined. Remember to enable Show balloons on your event log window, otherwise you won’t see a popup but a log event instead.
That was it for part number 1. On part number 2 we will have a look at how you can store data and save the state of your plugin using components. In the meantime if you have any questions, please reach out on Twitter or leave a comment.
If you want to watch the talk that I gave at Droidcon UK, please head to the link below.