What’s new in KotlinTest 3.2 and 3.3
As I write this, the team behind KotlinTest (of which I am lucky to be a part of) have just finished putting the final touches on the next major (or minor if you prefer semantic versioning) release of KotlinTest — version 3.3.
This is the second big release already in 2019 — coming shortly after the long awaited 3.2 — so I’d like to take a minute, just sit right there, to tell you about the new features that have been added in the last couple of releases.

Coroutines
Probably the first stand out feature is full support for coroutines directly in tests. For those of you who are familiar with coroutines, then you will know that you can always execute suspension functions inside of a runBlocking closure, but now these can be invoked directly in a test without any boilerplate.
For example, say we had a suspension function called fetchUser which performs a HTTP Get returning a User. Without resorting to blocking the test runner, this is simple to achieve.
Let’s say fetch user is defined like this.
suspend fun fetchUser(name: String): User {
  // using some http library
  performRequest("GET", "/users/$name")
  // rest of implementation of fetching users
}
Then we can test this as simply as:
class CoroutineExampleTest : StringSpec({

    "fetchUser should return name and id" {
      val user = fetchUser("sam")
      user.name shouldBe "sam"
      user.id shouldBe "123"
    }
}
The test will complete once the coroutine completes, and any errors in the coroutine will be correctly reported as a test failure. We don’t need to explicitly block.
In addition we can call methods like async directly in the test.
class CoroutineExampleTest2 : StringSpec({

    "concurrent fetch users" {
      val user1 = async { fetchUser("sam") }
      val user2 = async { fetchUser("leo") }
      user1.await()
      user2.await()
      user1.name shouldBe "sam"
      user2.name shouldBe "leo"
    }
}
Intellij Plugin
The second of the two stand out features is the new IntelliJ plugin available as part of version 3.3. The plugin is still in it’s infancy so it is a little basic, but it works. A full blog on the plugin is coming in the next few days so bear with me on that one!
The plugin can be found in the JetBrains plugin repository from inside the IDE. After you have installed this plugin, when you open up a test class, each individual test context has a run gutter icon as you can see in this screen shot of a StringSpec class from KotlinTest itself.

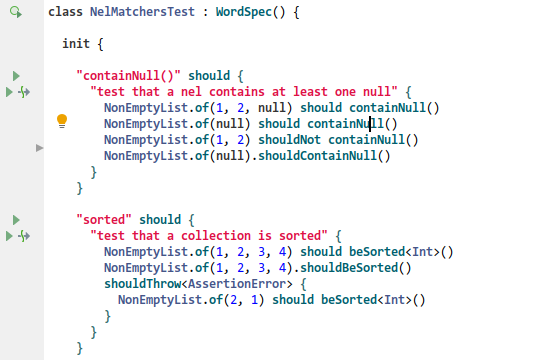
This works for all spec styles, including those with many nested test blocks — such as WordSpec as the following example shows. Running a container test will also execute any nested tests contained within it.
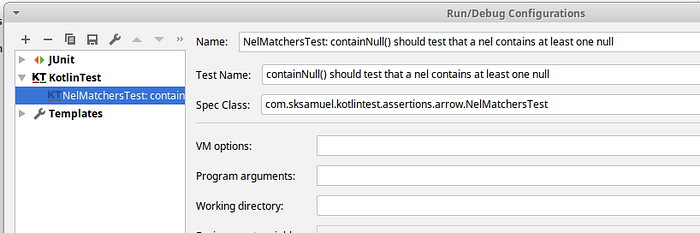
Clicking the run gutter icon will create a run configuration like the following. You can see the test name and spec class are set to that individual test.
Since this plugin is so new, there will undoubtedly be bugs, so please file issues at the kotlintest-intellij-plugin repository on GitHub.
Isolation Mode
For those of you coming from JUnit, you might be aware of the fact that JUnit uses a fresh instance of the test class for each test method. That is, if you define three tests inside a class file, three instances of the class will be instantiated, one for each of the test methods.
In KotlinTest the default behaviour has always been different — the same instance of the Spec class is used for all tests. In previous versions of KotlinTest you could control this by overriding a variable called instancePerTest. However in version 3.2+, this ability has been expanded to include new modes.
The new approach is to override a function in your Spec class called isolationMode() which returns a enum of type IsolationMode. This enum has three settings.
The first is IsolationMode.SingleInstance which is the same as the default behaviour — a single spec class is created and all tests are executed against that class. So fields defined in the class carry their value from one test to another.
Instance Per Test
The second mode is IsolationMode.InstancePerTest in which a new spec will be created for every test case, including container tests. In other words, every test “block” will be executed in it’s own spec. Let’s see an example.
class InstancePerTestExample : WordSpec() {

  override fun isolationMode() = IsolationMode.InstancePerTest

  init {
    "a" should {
      println("a")
      "b" {
        println("b")
      }
      "c" {
        println("c")
      }
    }
  }
}
In the above spec there are 3 test blocks — the container “a” and the leaf “b” and “c” blocks. When this is executed, the following will be printed:
a
a
b
a
c
The first “a” is output as that test block is executed in it’s own right. The second “a” is output as the test is executed again in a new instance, along with the “b” test. Then “a” is executed again as part of the “c” test.
InstancePerLeaf
The final mode is IsolationMode.InstancePerLeaf where a new spec will be created for every leaf test — so excluding container tests. In other words, container tests are only executed as part of the “path” to an outer test. An example should make this clear.
class InstancePerLeafExample : WordSpec() {

  override fun isolationMode() = IsolationMode.InstancePerLeaf

  init {
    "a" should {
      println("a")
      "b" {
        println("b")
      }
      "c" {
        println("c")
      }
    }
  }
}
In the above spec there are 3 test blocks as in the previous example — the container “a” and the leaf “b” and “c” blocks. When this is executed, the following will be printed:
a
b
a
c
The first “a” is output as part of the “path” to the leaf test “b”. The second “a” is output as part of the “path” to the leaf test “c”. “a” is never executed as a standalone test, as in the previous example.
Usually the standard behaviour is sufficient, and the easiest to understand when there are several levels of nesting. But the other modes can be very useful when you have detailed setup code and you want the test fixtures to be reset after each test ready for the next one.
Failed Tests Run First
If you have a large project, it can be quite annoying to see your build server running a full test cycle, only for a test to fail after 20 minutes — the same test you were convinced you had fixed locally.
You can reduce the impact somewhat by running tests in parallel (see previous article) but in KotlinTest 3.2 or 3.3 it is possible to execute any specs that failed on the last run before ones that passed last time.
Of course, this feature requires the ability to write state — in this case a file containing the failed spec names.
All tests are run as normal, just the order is tweaked to run the last set of failed specs first, with the assumption that the most likely failure point is the tests that failed last time.
To activate this feature, you override the specExecutionOrder function in your project config to return an instance of FailureFirstSpecExecutionOrder. By default this function returns an instance that orders spec’s lexicographically.
As a side note, you can even run Specs in a random order as RandomSpecExecutionOrder is another possible value.
For example:
object ProjectConfig : AbstractProjectConfig() {
  override fun specExecutionOrder()= FailureFirstSpecExecutionOrder
}
Project config is a bit unusual in the way you set it up, so read the docs if you’re not already familiar.
If the tests are executed in a fresh environment — say a clean VM on every commit like in Travis or CircleCI — then this feature will not have any effect as KotlinTest will not be able to locate the output file containing the previous state. But for running in something like a Gitlab runner, this feature can be an easy win.
Multi-line String Comparisons
When a test compares a string to another, a failure is reported with a nice “diff’ in IntelliJ. This works by providing both strings — the expected and actual values — and the IDE works out the difference and shows what’s what in a helpful dialog.
However in a console environment, or when a large string is involved, this breaks down somewhat. For example if there was a difference on line 2, and on line 200, the typical output will just show you lines 2–200 even though all the lines in between might be identical.
KotlinTest 3.2 improves on this behaviour by splitting the strings into separate change-sets and outputs each change-set separately with a summary.
For example, let’s compare two two large strings containing Star Trek quotes.
The first string is as follows:
val a =
"""Our neural pathways have become accustomed to your sensory input.
   Mr. Crusher, ready a collision course with the Klingon ship.
   A lot of things can change in ten years, Admiral.
   Take the ship into the Neutral Zone
   Some days you get the bear, and some days the bear gets you."""
And the second string is like this:
val b =
"""Our neural pathways have become accustomed to your sensory input.
   Mr. Crusher, ready a collision course with the Borg ship.
   A lot of things can change in twelve years, Admiral.
   Take the ship into the Neutral Zone
   Besides, you look good in a dress.
   Some days you get the bear, and some days the bear gets you."""
Now if you look closely, you can see that on line two I’ve changed Klingon to Borg, and on line three ten has become twelve. Finally, the 5th line in the second string doesn’t appear in the first string at all.
Executing a test that compares these strings gives very useful change-set information like this:
expected: [Change at line 1] "Our neural pathways have become accustomed to your sensory input.
   Mr. Crusher, ready a collision course with the Klingon ship.
   A lot of things can change in ten years, Admiral.[Deletion at line 4]    Take the ship into the Neutral Zone
   Some days you get the bear, and some days the bear gets you." but was: [Change at line 1] "Our neural pathways have become accustomed to your sensory input.
   Mr. Crusher, ready a collision course with the Borg ship.
   A lot of things can change in twelve years, Admiral.[Deletion at line 4]    Take the ship into the Neutral Zone
   Besides, you look good in a dress.
   Some days you get the bear, and some days the bear gets you.
As you can see, the output includes both the expected and actual values, the line number where the change was detected; an action string such as change/deletion/insertion, and a snippet of the change. Certainly a lot better than outputting the entire blob.
This behaviour can be disabled by setting the system property kotlintest.assertions.multi-line-diff to simple.
Note: This feature will only activate if the string is sufficiently large — over 50 lines by default.
Assert Softly
One of the neat features that was added into KotlinTest in version 3.2 was a feature inspired from other great JVM assertion libraries — soft assertions.
A soft assertion is a way of combining together one or more assertions such that an error in one does not stop the test immediately. Instead the test continues and all and any errors are collected together and thrown as one composite error.
For example, the following would clearly fail at each stage:
val location = "Chicago"
location.shouldBeEmpty()
location.shouldBeLowerCase()
location.shouldBeNull()
By default only the first assertion would be reached — as the error would immediately propagate and fail the test. This is usually perfectly fine — fail the test as soon as something goes wrong.
The error would look like this:
java.lang.AssertionError: Chicago should be emptyBut sometimes you might want the test framework to plough through collecting all the errors before exiting. Surrounding the assertions with assertSoftly is the way to achieve this:
val location = "Chicago"
assertSoftly {
  location.shouldBeEmpty()
  location.shouldBeLowerCase()
  location.shouldBeNull()
}
Then the error message looks like this:
io.kotlintest.tables.MultiAssertionError:
The following 3 assertions failed:
1) Chicago should be empty
 at com.sksamuel.kotlintest.assertions.A$1$1.invoke(Test.kt:46)
2) Chicago should be lower case
 at com.sksamuel.kotlintest.assertions.A$1$1.invoke(Test.kt:47)
3) Expected value to be null, but was not-null.
 at com.sksamuel.kotlintest.assertions.A$1$1.invoke(Test.kt:48)
You can even enable soft assertions for every single test automatically, by setting the value of globalAssertSoftly to true in your project config. Alternatively you can set the system property kotlintest.assertions.global-assert-softly to true.
Then you no longer need to manually wrap your assertion blocks in the assertSoftly closure.
Easier Migration from JUnit
Many users of KotlinTest tell us they migrated from JUnit — including most of the committers. This makes sense, if you’re moving from Java to Kotlin, then the dominant test framework in Java is JUnit, so it’s not a surprise that you have most of your tests written that way.
KotlinTest has always tried to make it easy to upgrade with the inclusion of AnnotationSpec This allows you to define tests using @Test annotations in the same way that JUnit does, so most of your code can stay untouched.
In KotlinTest 3.2 we’ve gone a step further and included support for the following JUnit style annotations — @BeforeEach, @Before, @AfterEach, and@After. The semantics are the same as JUnit, but with different fully qualified class names (ie, io.kotlintest.specs.BeforeEach vs org.junit.BeforeEach).
This means upgrading a test from JUnit to KotlinTest is now as simple as changing the test class to extend AnnotationSpec and updating a couple of imports. Then over time, you can decide to migrate to one of the more expressive KotlinTest styles.
Reworked Test Listeners
What’s a framework without the ability to extend it? As Shakespeare famously once wrote:
An extension! An extension! My kingdom for an extension!
KotlinTest has always had powerful extensions and listeners available but in 3.2 onward these listeners have been extended with new methods to make them even more powerful.
Notably, the beforeTest, afterTest, beforeSpec, afterSpec methods and so on, now receive the full instance that is under test. Therefore your own logic has access to all the same information that the KotlinTest engine does itself — such as the test closure, the spec instance, and so on.
In a future article, I will cover some of the extensions that are available by default with KotlinTest as well as some of the most popular third party extensions.
Thanks for reading. As always, please star the project on GitHub if you feel it’s useful to you.