Updating UI using state management in Jetpack compose
It’s time for a Shift!

This post is a continuation of the article TimerApp — Part 1 in which we created a timer selection screen in Jetpack Compose. If you haven’t read it and want to have a look, please read here.
Alright, here is what we’re going to achieve:
We’ll be selecting a time whenever a user presses a number key. Following points to be watch out for while developing this
- Every number is added from the extreme right which is right bit of seconds.
- Adding numbers will shift existing entered numbers towards left by one place.
- Once the hour’s left bit is occupied/filled then no more entries will be accepted.
- Entering even a single number will change the color of the time display from Gray to Blue and deleting all numbers will change it from Blue to Gray.
- Double zero key will add two zeroes only if space is available for both the zeros otherwise nothing will happen.
PS: I’ll not be covering the keypad design and callbacks. For those details please refer here.
Step 1 — Setting up the base composable
So as we see that our basic UI element here will be the two zeroes text and the time unit text and repeating them thrice will give us our time display. So let’s name it as TimeDisplayUnit whose constructor contains
@Composable
fun TimeDisplayUnit(
    time: TimeUnit = TimeUnit(),
    unit: String,
    textColor: Color = GRAY_TEXT
)
time: TimeUnit — This is a data class which contains our two digits namely left and right one
data class TimeUnit(
    val leftDigit: Int = 0,
    val rightDigit: Int = 0,
)
unit: String — Name of the time unit to be displayed i.e s for seconds and so on.
textColor: Color — Color for the text in time display unit composable.
Step 2 — Creating the time state class
Now we’ll create a data class TimeData which will hold our data for the selected time.
Here we’ve three helper functions which we’ll discuss later in the article. So the data class is self explanatory. It holds time units for hours, mins and secs.
Step 3 — Create state in view model and pass to UI
var timeState = mutableStateOf(TimeData())We created a time state of TimeData. We update this state inside our view model and observe this state in our composable.
val timeState by remember {
    viewModel.timeState
}....
Box {
   TimeDisplay(
    time = timeState,
   )
} ....
TimeDisplay is our composable which contain three time display units.
So now we’ve our state passed to our display units.
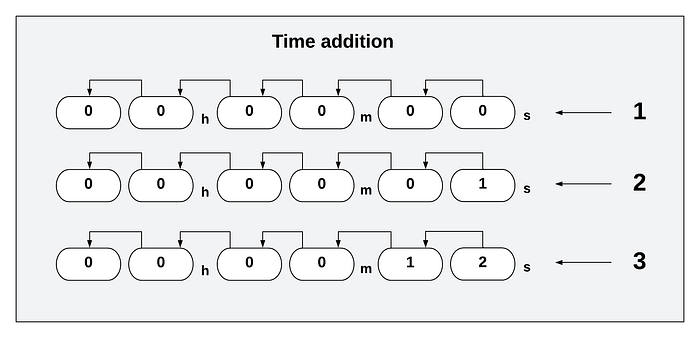
Step 4 — Logic for shifting numbers to left
To accommodate new numbers correctly and shifting them to left require some logic. Here we simply shifts each number to its adjacent number and so on as depicted in the diagram below. The only catch here is that we need to start shifting from hours digit.
Here is the code for the above logic
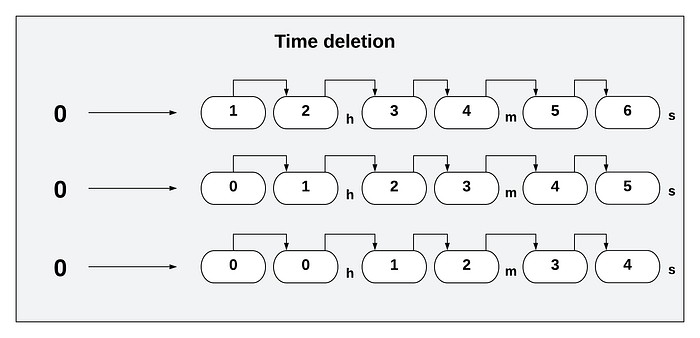
Step 5 — Logic for deleting numbers
This function is the reverse of what we did in step 4. We simply start shifting from second’s digit first and appends a zero on the hours left digit.
Here is the code for the above logic
Step 6 — Handling the edge cases
We need to prevent over filling and empty deletion. For this now refer to the three functions we created in our TimeData class. In case of deletion we first check if the data is empty then we simply return. In case of addition we check if data is full then also return.
Now we consider data is full when hours left digit is greater than zero and data is empty when all the digits are zero.
That’s it! Now if you run the app, you’ll find the numbers are shifting left and right correctly and following our constraints. Well! that was easy.
We’ve successfully managed our time data state and updated the UI accordingly.
For full source code of the timer app, refer the below repo.
To understand about the approach, please read below link
That’s all for now. Hope it’ll help!
Until next time..
Cheers!

