Unidirectional data flow on Android using Kotlin: The blog post (part 1).
Last year I gave a talk at some conferences called “Unidirectional data flow on Android using Kotlin”. In this talk I went through the whole process of how we can follow a unidirectional data flow approach on Android, taking the learnings from Redux and Flux and also using Kotlin as our programming language.
I already released all the content I created for the talk, you can have a look at the slides and code.
If you attended one of my talks, you probably realised (as I did) that this was a pretty “hardcore” topic for just 30 to 40 min talk, so I thought that it would be nice to write about it so I could cover what I explained in the talk, so you can read it at your own pace, reread when something is not clear, etc.
Since there is quite a lot of information, I’m going to divide the talk in a blog post series, this first one, will be the longest where I will cover the main idea, components, how they work together and examples. We won’t see any code, just explanations, and diagrams. Ready? There I go!
Unidirectional?
First, we have to have clear what unidirectional means, I think an image is more valid than 1000 words:

As you can see in the image we have some states, we start in A and we always follow the same direction till we end up again in A. We can not go for instance from A to D if the direction we should follow is A → B → C → D → A.
Flux and Redux
Our approach is based on these two unidirectional architectures created by Facebook. I’m not going to explain here how they work, since the documentation is really good, and I prefer to focus in our approach, but I encourage you to read the official documentation (Flux, Redux).
Main idea
As Flux and Redux, our approach is based on an immutable state that represents the state of our app.
Wait! state? what’s a state? the state represents the state of our app, the core information. For instance, in the sample app that I created for this talk/blog post, that is a simple item list app, the state is a collection of items.
In your app, the state will represent the main core information you have to handle.
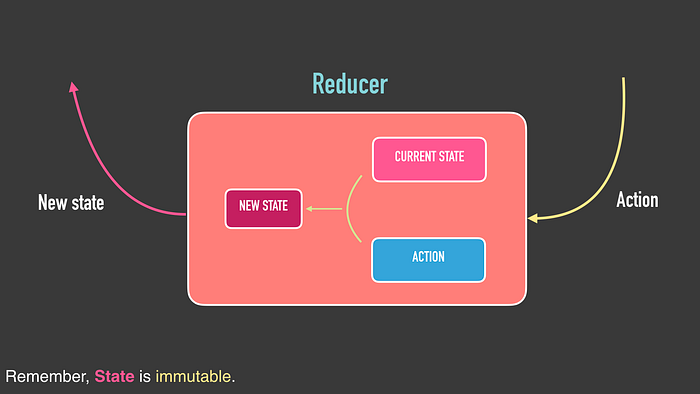
Ok, the state is immutable, then how we can modify the state? we have actions that define the intention of what we want to do, these actions are dispatched and when handled, reduced together with the current state in our reducer, we create then a new state that will be dispatched and used by the view to render itself with the new state’s data.
Oh wow! many things in this paragraph, right? ok, we are going to go one by one 😉
Components
We have different components that are decoupled from each other so they work on a single responsibility basis. We are going now to explain them independently, and later we will see how they work together in a diagram.
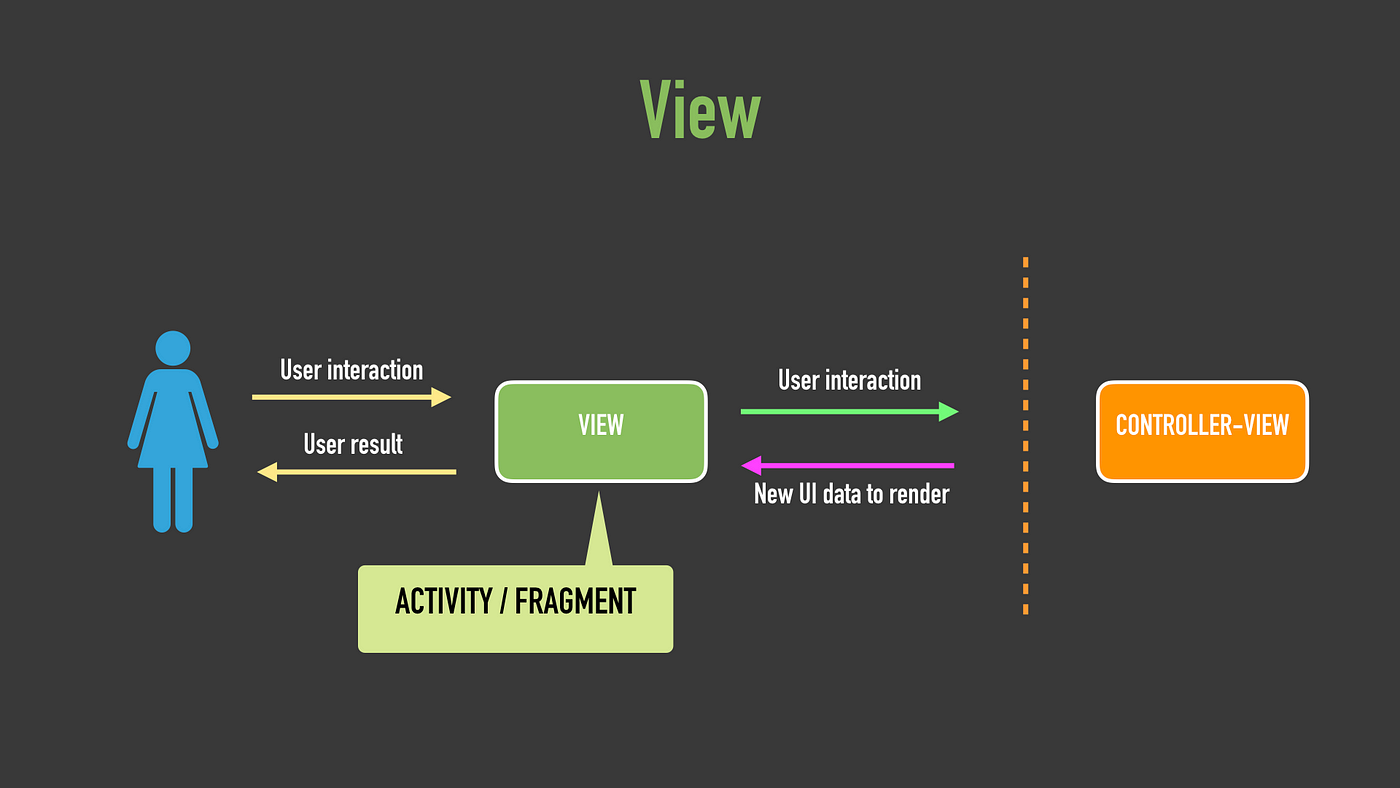
View
Is our UI, what the user sees, in terms of the Android framework, Views are Activities and Fragments where we have the UI/UX code.
The user interacts with the View, and when that happens, the whole process of the unidirectional data flow starts.
Each View, remember, Activity and Fragments, have an associated ControllerView (we will see this in a moment) that will help us to decouple our view logic from our business logic.
The View will get data back from an interaction, once that we get the data back, we will use it then to render the UI with the new information, so the user can now see and use it.
As you can imagine then, the view is the starting/ending point of our flow.
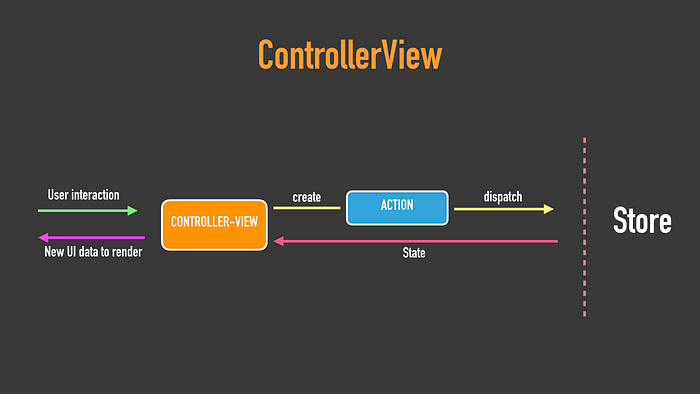
ControllerView
We are on Android, and we want to separate concerns between UI/UX and business logic, we also want to deal with the activity/fragment lifecycle; the ControllerView helps us with these tasks. If you are used to MVP this ControllerView acts similar to the presenter.
How does it work? The ControllerView is in a relation of 1 to 1 with Activities and Fragments, it means that:
- If we have Activity A we will have a ControllerView A for this Activity.
- If we have Activity A and Activity B we will have ControllerView A and ControllerView B, one per Activity.
The same happens with Fragments (although is up to you if in an Activity that contains Fragments you want to have ControllerViews for the Activity, Fragments or both).
ControllerView is going to be invoked by the View when the user interacts with it. So the view will call its associated ControllerView that will handle what the user wants to do.
As a response to the user interaction in the View, the ContollerView is going to create an Action, this action will be then dispatched to the Store, and as a black box, after the action is processed, a new state will be triggered and handled by the ControllerView. The ControllerView then will call to its associated View that will use this new information to render itself.
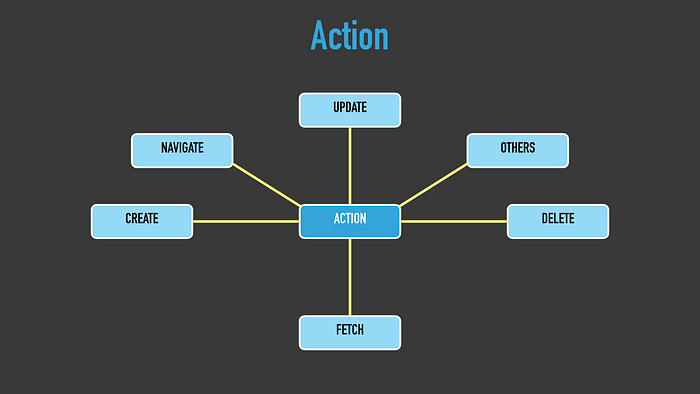
Action
An Action says what we want to do. For instance, in our items list app when we want to create a new item, we have an action that indicates that, if we want to delete an item we have an action for that, if we want to update an item, we have an action for that too, and so on.
Actions usually have a verb as a suffix and then a meaningful name, for instance, CreateItemAction, DeleteItemAction, UpdateItemWithColorAction, etc. all are valid action names.
Actions can have parameters if needed, for instance, in the case of the item creation, this action would have an id, text and color. If we want to delete an item this action would have just an id so we know which item should be deleted.
In our approach, since we use Kotlin, actions are immutable classes so they can not be changed once they have been created.
Store
The store is our core component. If you are coming from clean architecture learnings, the store is the domain, our core, where our business logic resides.
The store basically acts as a black box. The store has the state of the app, when we have an action, the store takes this action, applies it to the current state and returns a new state.
The store can also send actions to other components called side effects, these components (we will see them later) will take an action, do something with it and can or not return a new action to the store.
The key component inside of the store is the reducer.
Reducer
This component has access to the immutable state of the app. It takes an action and applies it to the current state so it can create a new state that will be dispatched then to the ControllerViews.
Imagine that we have our state with an empty list of items, we receive then CreateItemAction(id = 0, text=”first note”, color=BLUE), our reducer then will take the current empty state and will apply the action, since the state is immutable, what the reducer will do is to create a new state given the information of the current state plus the information of the given action, so finally, our new state will have now a list with one element.
The same happens then with any other action, we will apply it to the current state, and generate a new one, given the current state and the action information.
Side effect
Side effects are the way to enrich our architecture.
As we have seen, right now we have just the store as our core component that has the app state, we have never talked about physical persistence nor DB, the app state lives just in memory (volatile), so once that we kill the app, we will lose the state information, and when we’ll start the app again, the state will be initialised to its default init value, in our case would be an empty list of items.
But 99% of the time we probably want that our app has in disk persistence using a DB, and/or we want to add a network layer so we can sync our data to the cloud. This is done by side effects.
Side effects are independent components that are listening to actions, these actions are always dispatched by the store after we have reduced an action and created a new state. Side effects will take then the action and will do something with it, once that they have done what they need to do, they can dispatch or not (it’s optional) a new action as a result of its operation.
For instance, as in the previous case we’ve seen in the reducer, we can have a CreateItemAction, this action is reduced so we have a new state; the store then dispatches that action to the side effects. Imagine now that we have a side effect for persistence (DB), our side effect will handle that action and will insert the item into the DB, once that has finished it can dispatch or not a new action saying its result, in our case, after we create an item, is not needed.
But imagine that instead CreateItemAction we have FetchItemsAction, the side effect will handle this action, will get the items from its DB, and once that we have the items it will create a new action ItemsLoadedAction(items) that will be dispatched to the store, the store then will do again the same reduce flow and will dispatch a new state that has all the items fetched from the DB to the ControllerViews.

We can have n number of side effects, even zero if we don’t need them.
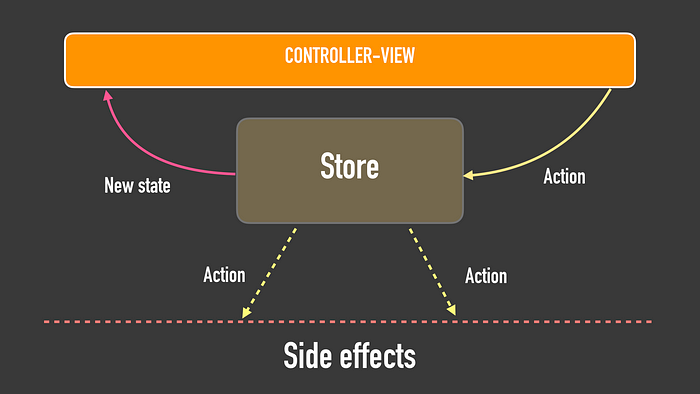
Everything together
Now that we have seen all main components one by one, we can see how they work together:
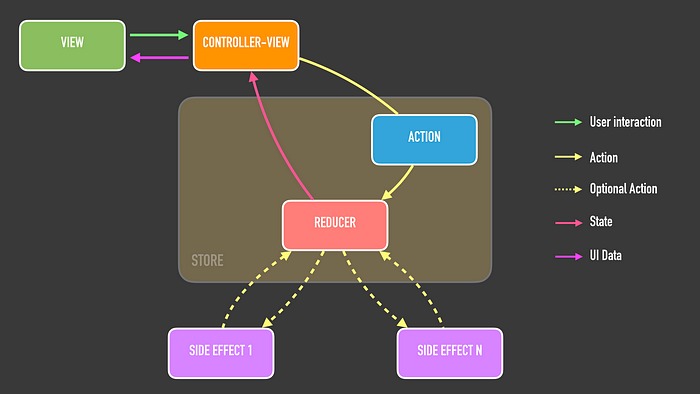
Here we can see how the process, that is started in the View ends in the View, how the View interacts with its ControllerView, how the ControllerView creates and dispatches an Action, how the action is handled by the Reducer in the Store creating then a new State, and how the new state is dispatched to the ControllerView so it can take the needed information to give it to its associated view so it can render itself.
We also see how the store dispatches actions to the Side effects and how they can dispatch, as well, new actions to back to the Store.
Use cases (examples):
1. We want to create a new item.
- The user interacts with the View. Taps on a button so he/she wants to create a new item.
- The View talks to its ControllerView so the ControllerView creates an Action that represents what the user wants to do (CreateItemAction(id = 1, text= “this is an item”, color = BLUE), and dispatches this action to the Store.
- The Store will handle this action, and will use its Reducer.
- The Reducer will take the current state (if it’s created from scratch, it will be an empty list of items) and will reduce the action together with it.
- The result will be a new state with the previous content plus the new item.
The new state will be then dispatched to the ControllerView so it can handle it. - Once the ControllerView has handled the state, it will take the information its view needs (the list of items), so the view will be able to render itself.
In the meantime, after the store has dispatched the new state, the store itself will dispatch the action (CreateItemAction) to the side effects. - Side effects will then handle that action, the persistence side effect will take the action and will insert the item, given the action metadata, into the DB, once it has finished, the side effect finishes since it doesn’t want to create and dispatch any other action as a result of the operation.
2. We want to fetch items.
- The user interacts with the View. Opens the app so we have to populate the list of items and show them to him/her.
- The View talks to its ControllerView so the ControllerView creates an Action that represents what the user wants to do (FetchItemsAction), and dispatches this action to the Store.
- The Store will handle this action, and will use its Reducer.
- The Reducer will take the current state (if it’s created from scratch it will be an empty list of items) and will reduce the action together with it.
- The result will be a new state with the content of the current state, since this action doesn’t change the state by definition.
The new state will be then dispatched to the ControllerView so it can handle it. - Once the ControllerView has handled the state, it will take the information its view needs (the list of items) so the view will be able to render itself.
In this use case, the important thing is in the side effect, in the meantime after the store has dispatched the new state, the store itself will dispatch the action to the side effects. - Side effects will then handle that action, the persistence side effect will take the action and will access the DB fetching all items from it.
Once it has finished and it has all items, it will create a new action (ItemsLoadedAction(items)) with all items, this new action will be then dispatched and the store will handle it. - The store then will use its reducer to apply the action to the current state. In this case, the reducer will take all items coming from ItemsLoadedAction and will create a new state with those items.
- Once the store has a new state, it will dispatch the new state to the ControllerView so the ControllerView can handle it.
- The ControllerView will give the new item collection to its view so the view will be able to render itself with the new information.
We, of course, have many other use cases: update, delete, navigate, etc. but for understanding what I explained, the above ones are enough.
There are other important topics that I’m not covering here, since I wanted, with this first blog post, just to explain the overall architecture and its components.
Other important parts are data models, dependencies, threading, and testing that will be covered later. We’ll see also some Kotlin code snippets where we can see how this language can help us.
Again, you can have a look at the slides and the sample KUnidirectional app where you will see what I’ve explained here and more.
Questions? thoughts? ideas? improvements? problems? I will be glad to hear from you. 😄
Thanks to my friend and colleague Antonio J. Consuegra for his feedback on this article.

