Understanding Camera2 API from callbacks(Part 2)

In the previous article, I explained how the preview and rendering work when the camera is launched with Camera2 API. Now we go to the next step, taking a photo.
Once again, here’s the sample project I made for this series of article. It’s forked from https://github.com/googlesamples/android-Camera2Basic
2 things you need to understand
There are 2 things you should know before we dive into the photo capture process.
(1) Capturing is all about the interaction between CaptureSession.capture() and CameraCaptureSession.CaptureCallback
To capture an image from the camera device, we have to request multiple Camera states — Lock Focus, wait for Auto Exposure and Flash, etc — against the camera device. We do that by calling captureSession.capture.
captureSession.capture always requires CaptureRequest, CameraCaptureSession.CaptureCallback, backgroundHandler as arguments. In CaptureRequest.Builder, we need to set:
- The template types, which are the usecases for this request. For example, TEMPLATE_PREVIEW for requesting a camera preview or TEMPLATE_RECORD for recording.
- The request value. In the example code above,
CaptureRequest.CONTROL_AE_PRECAPTURE_TRIGGERis set to request Auto Exposure. - The target Surface View
- Camera mode setting for Auto Exposure or Auto Focus.
Auto Focus or Auto Exposure mode should be added based on what this camera device supports. We can check that with charasterisctics class.
As I mentioned, CameraCaptureSession.CaptureCallback receives results from captureSession.capture.
(2) The current Camera State should be managed by yourself
CameraCaptureSession.CaptureCallback returns focus and the exposure state through CaptureResult. CaptureResult is key-value stores, so you can get the value like
val afState = result.get(CaptureResult.CONTROL_AF_STATE)
val aeState = result.get(CaptureResult.CONTROL_AE_STATE)
Results must be checked according to requests you make with captureSession.capture(). For example, when you request for Auto Focus lock(CaptureRequest.CONTROL_AF_TRIGGER) then you have to check the result by accessing CaptureResult.CONTROL_AF_STATE key. Thus you need to store the current Camera State by yourself and keep track of what you are requesting.
This is the confusing part and making Camera2 API usage difficult. Back in the days when we used Camera1 API, interface was so simple, we just had to wait for an image result. Camera2 API gave us a power to control the low layer settings but now it’s very hard to understand at the first glance.
Exploring photo capture process
The diagram below represents the change of Camera State while taking a picture. Let me explain one by one.
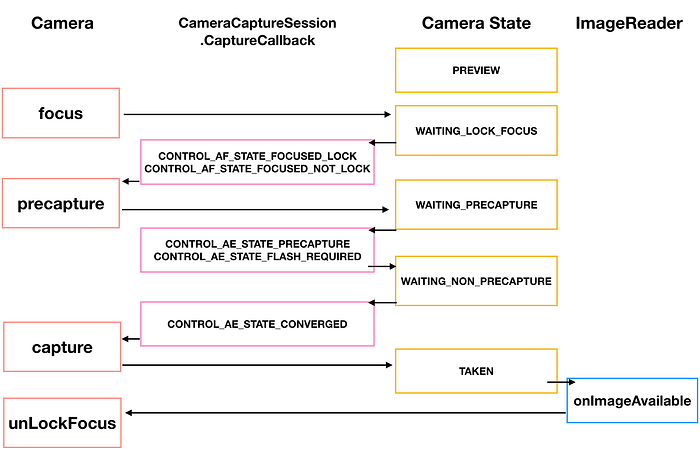
Lock focus
The first step, we need to lock focus of the camera to capture a clear still image.
And then at the callback, we verify focus is locked or not. Ideally, Auto Focus should lock the camera successfully, but sometimes it fails. In this case, we can still go to the next step as long as the focus is locked (you can re-trigger the request if you want).
Precapture
Precapture is the phase where Auto Exposure is triggered. In Auto Exposure, the camera device makes all the decisions to take an image such as exposure time, auto white balance, and light metering. Sometimes flash is required to get a good result.
Once Precapture is triggered, the camera device will acquire all values needed to take a good quality photo. While in precapturing the state will be in CONTROL_AE_STATE_PRECAPTURE. After precapturing completes, the state will transition to CONTROL_AE_STATE_CONVERGED, meaning all data is gathered and ready to take a still image. Sometimes the callback returns CONTROL_AE_STATE_FLASH_REQUIRED, which means flash is required for a better quality.
Note that CONTROL_AE_STATE_PRECAPTURE is a transient state and we might not see it in the process. When I run the Camera Sample on the emulator, only CONTROL_AE_STATE_CONVERGED was called.
Capture
Capturing a still picture is almost as same as other processes — we use cameraDevice.createCaptureRequest.imageReader.surface is added as a target so that ImageReader can receive an image result as a callback.
Wait, what is ImageReader?
Yep, I did not explain this intentionally. ImageReader is a class that allows us to access image data rendered on SurfaceView with a selected image format.
Usually, we initialize ImageReader when the camera device starts and set OnImageAvailableListener callback when we take a picture.
CameraSessions is running on the worker thread for Camera. We post the image to the message queue to handle the image within the same thread.
I won’t go too much into the image handling in this post, but you can refer to the sample project and see how I store the image.
Unlock focus(Retaking a picture)
If we want to retake a picture again. We can unlock focus by calling open() method again, unlocking cameraDevice lock.
What’ next?
In this article, I went through the basic process of capturing an image with Camera2 API. But there’s more about this API. I’m going to write about the topics below soon.
- How do we add Auto Exposure settings?
- How do we implement tap to focus?
- How do we add effects on Preview with OpenGL?
Also here’s a link to the talk I gave at DroidCon San Francisco 2018. I explained a little more about Camera2 API in detail
Thank you for reading this article!