Automating UI change verification with Android Compose Screenshot Testing — Part 1
Introduction
When working on UI changes, Android developers typically modify the UI, create a pull request on GitHub and manually upload before-and-after screenshots to compare the changes. If a ‘before’ screenshot wasn’t taken earlier, they have to switch back to the parent branch, take a screenshot, and then return to the current branch. Additionally, each PR requires manually creating a Markdown table and embedding images to document the UI changes.

While this process isn’t overly time-consuming, it’s not entirely efficient either. Fortunately, we can automate parts of it using Android Compose Screenshot Testing. This two-part guide will introduce Compose Screenshot Testing in the first part and explain how to automate it with GitHub Actions in the second part.
Setting up screenshot testing in Jetpack Compose
To implement screenshot testing, follow these steps:
1. Add Dependencies to the Version Catalog (libs.versions.toml)
Add the following lines to your libs.versions.toml file:
[versions]
agp = "8.5.0-beta01"
kotlin = "1.9.20"
...
screenshot = "0.0.1-alpha07" # <- add this

[libraries]
# Add this if it's not already present
androidx-compose-ui-tooling = { group = "androidx.compose.ui", name = "ui-tooling"}

[plugins]
...
# add this
screenshot = { id = "com.android.compose.screenshot", version.ref = "screenshot"}
2. Update Module-Level build.gradle.kts
Modify your module-level build.gradle.kts as follows:
plugins {
    ...
    alias(libs.plugins.screenshot)
}

dependencies {
  screenshotTestImplementation(libs.androidx.compose.ui.tooling)
}
3. Enable Screenshot Testing in gradle.properties
Add the following line to your gradle.properties file:
android.experimental.enableScreenshotTest=true4. Configure build.gradle.kts
Update the android block in build.gradle.kts to include:
android {
    ...
    composeOptions {
        kotlinCompilerExtensionVersion = "1.5.4"
    }
    experimentalProperties["android.experimental.enableScreenshotTest"] = true
}
If you’re using Kotlin 2.0.0 or higher, you don’t need to specify kotlinCompilerExtensionVeresion.
Creating and Running Screenshot Tests
With the setup complete, you need to create a screenshotTest directry under the src folder of each module where you want to run screenshot tests.

Once the directory is ready, define a standard Compose preview function for screenshot testing:
class PopularMovieItemScreenShots {

    @OptIn(ExperimentalSharedTransitionApi::class)
    @Preview(
        showBackground = true
    )
    @Composable
    fun PopularMovieItemScreenShotPreview() {
        val samplePopularMovie = PopularMovie(
            id = 1,
            title = "Joker: Folie à Deux (2024)",
            originalTitle = "Joker: Folie à Deux (2024)",
            voteAverage = 8.54,
            voteCount = 145,
            popularityScore = 0.0,
            overView = "",
            posterImageUrl = "",
            backDropImageUrl = ""
        )
        FridayMovieTheme {
            SharedTransitionLayout {
                AnimatedContent(
                    targetState = 100,
                    label = ""
                ) { _ ->
                    PopularMovieItem(
                        modifier = Modifier.width(100.dp),
                        animatedVisibilityScope = this,
                        movie = samplePopularMovie,
                        onClick = { _, _, _ -> }
                    )
                }
            }
        }
    }
}
Running screenshot tests
In unit testing, we compare the expected value with the actual result. Similarly, screenshot testing consists of two key operations:
- Updating the expected screenshot
- Validating the screenshot against expectations
Updating expected screenshots
To update the expected screenshots for all modules, run:
./gradlew updateDebugScreenshotTestTo update screenshots for a specific module, use:
./gradlew {:module:}update{Variant}ScreenshotTestFor example, to update the Demo variant screenshots in the feature:home module:
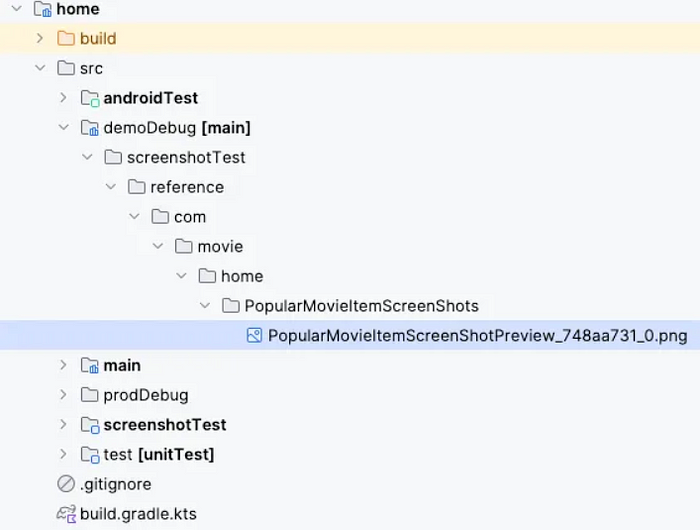
./gradlew :feature:home:updateDemoScreenshotTestThe updated images are stored in the src/ directory, structured according to the variant.
Validating screenshots
Once the expected screenshots are updated, you need to validate them.
To validate all modules:
./gradlew validateDebugScreenshotTestTo validate a specific module:
./gradlew {:module:}validate{Variant}ScreenshotTestFor example, to validate the Demo variant screenshots in the feature:home module:
./gradlew :feature:home:validateDemoScreenshotTestViewing the results
Validation results are saved in the following directory:
{:module:}/build/outputs/screenshotTest-results/preview/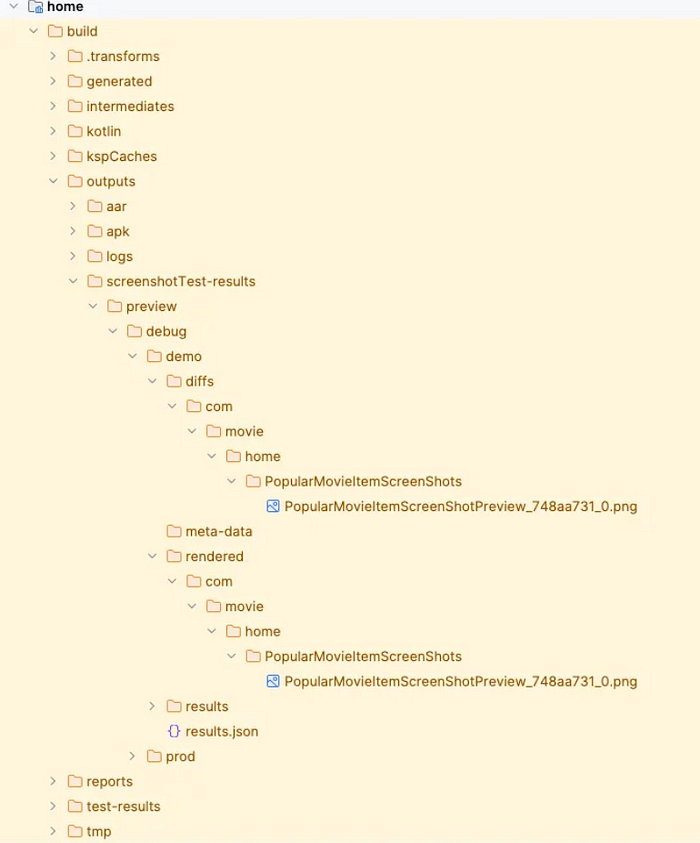
The folder contains:
diff/– Highlights differences between reference and actual imagesrendered/– Displays the actual preview output
Additionally, an HTML report is generated at:
build/reports/screenshotTest/preview/This report provides a visual comparison of reference and actual images, allowing developers to detect even subtle UI changes that might not be obvious to the human eye.

Conclusion
This wraps up Part 1 of the guide to Android Compose Screenshot Testing. In Part 2, we’ll explore how to automate this process using GitHub Actions.
You can find the complete code in this project.