RecyclerView Anti-Patterns
RecyclerView, in Android development, is a very useful first-party library which replaces traditional ListView. Over my career, I have seen some anti-patterns of RecyclerView and misunderstandings of its adapter concept. Having recently reviewed a piece of code in relation to that and gone through a detailed explanation with one of my juniors, I decided to share this knowledge since I believe it's a concept every Android developer should understand.
The Stone Age
To grasp what’s RecyclerView is doing underneath the hood, we have to first understand how to implement this without it. You probably might have seen this code if you have ever written something that extends BaseAdapter. For example, a custom Spinner Adapter. Let's look at this implementation of an Adapter that shows a single TextView.
This is a working solution, but do you know what’s wrong here? We are inflating the view every single time. This has a huge performance impact when scrolling the ListView. To optimize this, we have to look into the code of Adapter interface, specifically the getView method. You will see that convertView parameter is nullable, and the comment states:
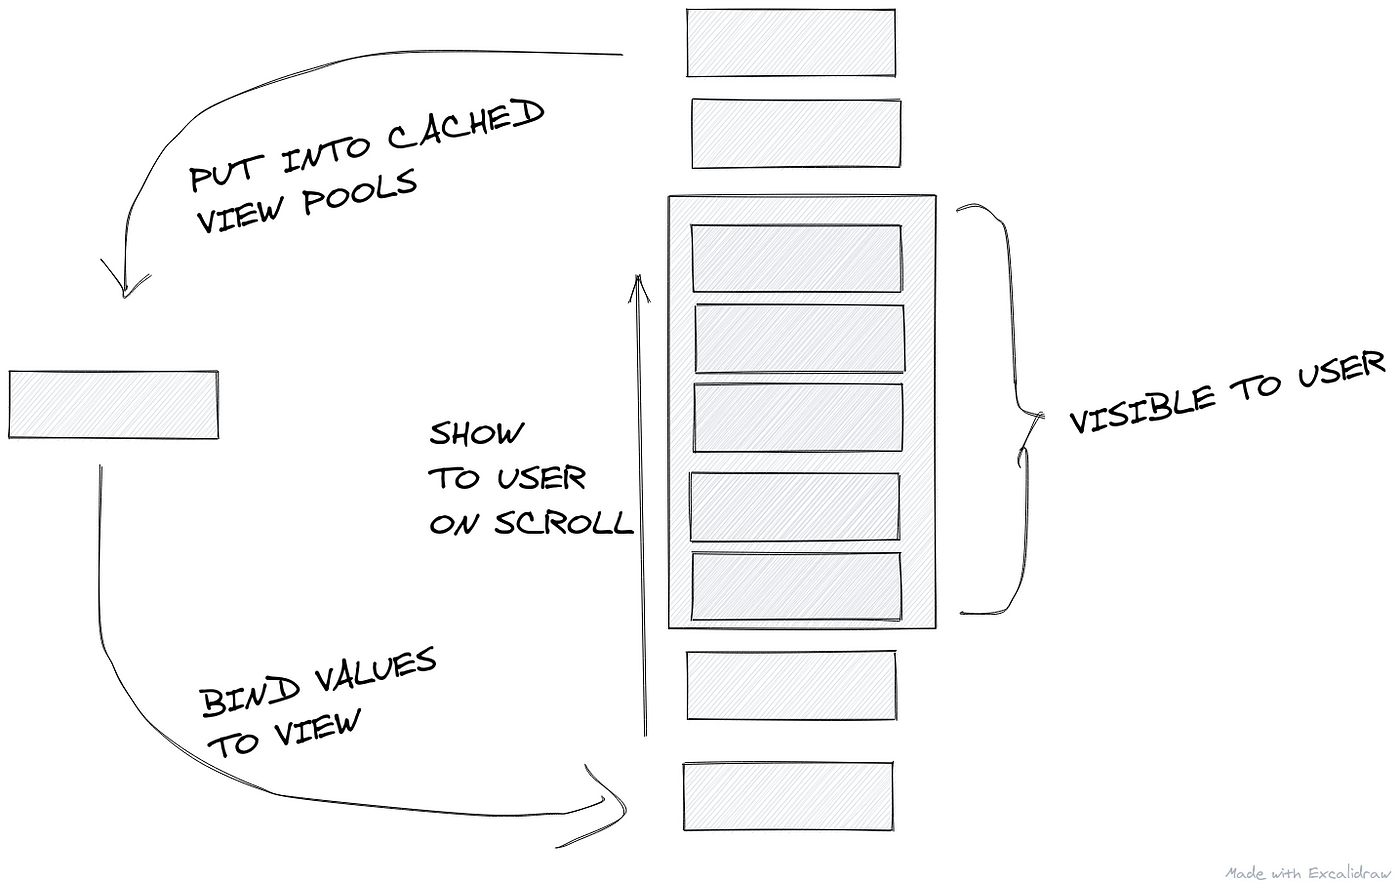
The old view to reuse, if possible. Note: You should check that this view is non-null and of an appropriate type before using. If it is not possible to convert this view to display the correct data, this method can create a new view.It said “the old view to reuse”. The adapter reuses the view that is outside of the user’s screen instead of inflating/or recreating the whole view. This results in a smoother scrolling experience for the users.
We want to optimize our code as well to preserve this recycling behavior of Adapter. We do this by checking if the convertView is null or not, and only inflate the view from scratch if it's null. If it's not null, that means we're receiving a recycled view and there isn't a need to inflate it again.
val itemView : Viewif (convertView == null) {
    itemView = LayoutInflater.from(parent.context).inflate(R.layout.item, parent, false)
} else {
    itemView = convertView
}
We now only inflate if the view is not recycled, that is, on creating it for the first time. A full code would be:
Wait a sec, we can optimize it further. Currently, we’re still doing findViewById for every single item. We can do better than this, let's execute this piece of code only the first time after view inflation. This is where we use ViewHolder pattern. We first create a class that holds the references to the views.
inner class ViewHolder {
  lateinit var tvText : TextView
}
We will then use the setTag function of View; On first time creation, we will create a new ViewHolder object, and assign the item view's tag to this ViewHolder. The next time the view is being reused, we will just pull this tag back out and type cast it into our ViewHolder. Voila, now we are doing findViewById only once on first time inflation.
We can make the code more error prone by passing the findViewById logic into ViewHolder and making our tvText an immutable variab
inner class ViewHolder(val itemView: View) {
    val tvText : TextView = itemView.findViewById(R.id.textView)
}//In getView, use as follows:
viewHolder = ViewHolder(itemView)
This way, our code won’t throw an error if we forget to assign tvText. Now we got an optimized Adapter that recycles the view and prevents inflation, which also reuses the view without executing findViewById again and again. But it's wasn't really easy to write all these codes just to get the optimization benefit. Imagine every time we want to have a ListView, having to rewrite this logic over and over again, this would quickly become a boilerplate. So, we want to write an abstract class to make this easier for us.
This abstract class that we wrote is just a small fraction of what RecyclerView.Adapter does. RecyclerView handle all of these boilerplate code we're having to write for ListView adapters. Of course, RecyclerView does more than that, but we are not going to explore those today.
The Bronze Age
If we know this concept, then I can go on to explain some of the anti-patterns of RecyclerView. The first one is where we are not recycling the view fully. For example, let’s take a look into this code:
Notice anything that we could recycle here as well? The answer is the OnClickListener that is being used. Currently, we're setting a new listener every single time, What if we could transfer it inside ViewHolder initialization or onto onCreateView, then it will only be executed one time and will be recycled for later use. Instead of returning the whole data class back onto the callback, we will return only the position of ViewHolder. For the logic to pull the data out from the position, we will offload it onto the adapter.
inner class MyViewHolder(
    itemView: View,
    private val onTextViewTextClicked: (position: Int) -> Unit
) : RecyclerView.ViewHolder(itemView) {
    val tvText: TextView = itemView.findViewById(R.id.textView)    init {
        tvText.setOnClickListener {
            onTextViewTextClicked(adapterPosition)
        }
    }}
Instead of exposing the itemList to the caller and letting the caller uses with itemList[index], we will encapsulate the logic inside the adapter. Our adapter has reference to the item list, which we can use to convert the adapterPosition into the data at that position. With this, we will expose another callback and return the data back onto the caller.
This way, our OnItemClickListener is being recycled and the logic is still encapsulated inside the adapter.
The second anti-pattern is having logic inside the adapter. The adapter and ViewHolder should do the job of showing ViewHolders to the user and not anything else. The logic should be offloaded to the caller. The following would be an example of a code that has logic inside of the adapter.
Say in the future, we want to reuse the same UI, but with different interactions on clicking an item. We can’t reuse our adapter anymore since the logic is coupled inside of it. And that is why we should be one step ahead, and exposes these with a callback/an interface. If we’re using multiple interfaces/callbacks for multiple views, we can write a more descriptive code so whoever manages your code later thanks you:
The Golden Age
The third anti-pattern is the changing the state of the view directly inside the ViewHolder. For example, let's look into a ViewHolder that changes the state of a CheckBox
override fun onBindViewHolder(holder: MyViewHolder, position: Int) {
    //Note: checkbox clickable is set to false to control the logic ourselves
    holder.itemView.setOnClickListener {
        //Toggle
        holder.checkBox.isChecked = holder.checkBox.isChecked.not()
    }
}
If we do this, and populate our list with say 100 items, then check the first two or three items and scroll down, we will see that other positions are checked even though we have never clicked that position. This is once again because the view is being recycled. When a view with a checked state gets recycled, it stays that way. Thus, We must always remember to rebind the state of the view in onBindViewHolder. And we solve this by adding an isChecked variable set to false on our data class
data class Data(
    val text: String,
    val isChecked: Boolean = false
)
In our onBind method, we rebind this value
override fun onBindViewHolder(holder: MyViewHolder, position: Int) {
    holder.checkBox.isChecked = itemList[position].isChecked
    holder.itemView.setOnClickListener {
        holder.checkBox.isChecked = holder.checkBox.isChecked.not()
    }
}
Let’s test again, populate data, we checked some, scroll down, it seems fine. But when we scroll back up, all of our checked states are gone! This is because the isChecked inside the data class never changes, and it stays as false. When we scroll the RecyclerView, onBind method is executed to rebind data back into recycled view, and here, the checked state got replaced with false. To solve this, we changed our adapter to this code
This could solve the issue of recycled states. We then added a database to our app and when the user clicks on the “Save” button, we will persist which items are checked onto database, so we make our itemList a public variable so that other class can access it, for example, fragment calling saveToDb(adapter.itemList) on pressing Save. And then users wanted a function to unselect and select all at once. So we add two more functions: unSelectAll and selectAll inside adapter.
fun unselectAll() {
    itemList.map {  data->
        data.copy(isChecked = false)
    }
    notifyDataSetChanged()
}fun selectAll() {
    itemList.map { data ->
        data.copy(isChecked = true)
    }
    notifyDataSetChanged()
}
We will then improve the logic by notifying only if the state is different
fun unselectAll() {
    itemList.mapIndexed { position, data ->
        if (data.isChecked) {
            notifyItemChanged(position)
            data.copy(isChecked = false)
        }
    }
}fun selectAll() {
    itemList.mapIndexed { position, data ->
        if (!data.isChecked) {
            notifyItemChanged(position)
            data.copy(isChecked = true)
        }
    }
}
If we look at our adapter code now, you would see that it’s starting to do too much. What if we add pagination that goes both ways, what if we later add the ability to remove an item/hide an item and much much more? The adapter job should be to bind ViewHolder, and not to control the state of the data. Moreover, our bindView is now holding logics too! Remember, we should be making our adapter as abstract as possible. One way to abstract this is to offload these select, unselect, add, remove whatever logic onto our presenter/ViewModel, and make the adapter only accept a fresh list every time the callers want to update the items. After refactoring, our adapter now looks like the code below, it's reusable, it doesn't hold any logic, itemList is set to an immutable list to prevent changing state inside of it. The only way to update the state now is to pass a new fresh list.
But now our adapter is not notifying item changes well enough. We don’t want to rebind the whole list every time a position is updated. What if we could differentiate when to notify for addition, removal, changed.
What I have written is just a very simple diffing method. In reality, we have to take into consideration of cases where the same item is moved to another position because a new item is added in between. The implementation above is also inefficient because we are diffing inside the main thread, if we have 100 items, that means we are looping 100 times in the main thread.
To solve this boilerplate and to make diffing easier, ListAdapter came into play, ListAdapter is not an adapter for ListView, but a rather an extension of RecylerView.Adapter. ListAdapter constructor either accept DiffUtil.ItemCallBack or a AsyncDifferConfig. For most case, passing the former one will be enough. In our case,
if the areItemsTheSame return true, I will proceed to check with areContentsTheSame. If the item is the same and the content is the same, that means it's not changed. If the item is the same and the content is different, it means the item is changed. However, if the item is different, it could be one the following: added, removed, or position is changed. It hides all of this diffing method underneath the hood. Plus, all of this diffing is done in a background thread. Just submit the new list into submitList and it will handle all the boilerplate logic for you. You can check the diffing logic inside AsyncListDiffer if you're interested. In most cases, try to use ListAdapter more as it enforces you to keep your state inside your ViewModel/Presenter. Plus, you get the advantage of letting the library do all the work for you.
I hope by now, you have a broader understanding of how these APIs has been developed over time starting from an ArrayAdapter into ListAdapter. If you haven't tried out ListAdapter, I suggest you do so, you will have to rethink a lot of stuff you have done before and by doing so, I assure you your code quality will be improved a lot.