Modularization of Android Applications in 2021

Splitting a monolithic Android-application code base into modules is not a new theme, and this way of code organizing is becoming more common. Even our colleague had already published a couple of articles about best practices for working with modules when we first started the division.
We have gained more experience, and we want to share the conclusions and tips that we had arrived at by the beginning of the 2021 year. Therefore, this article can be useful both for those who are just considering about separation and for those who have begun the process.
With this article, I would like to start a cycle of three articles relating to Android app modularization. In this one, I will show you the common reasons for splitting an application into modules and a general overview of modules structure.
In the future articles I and my colleague describe two approaches to modules gluing. Links will appear here once the articles are published.
Developers usually start to think about using multi-modularity to shorten build time. However, that was not the key reason for us. In addition to the build speed, multi-modularity also leads to a stricter architecture and the ability to reuse features among projects.
It is also worth remembering that multi-modularity is not a silver bullet and it can have negative consequences, with increased project configuration time among these. To avoid this, some even try to replace the Gradle build system with something more productive at the configuration stage, such as Buck or Bazel. You can learn more about this problem and how to solve it from workmates whose projects include more than 300 modules.
We now have only about 27 modules, including 18 feature modules. To begin with, I will tell you about our project before module extraction. There were already three modules at that point. The reason for that was an attempt at supporting Android Wear. At that time, a common module, a module with an application for watches and a monolithic module of the main application for smartphones were allocated.
When we started extracting the first modules, we only used Java, which means that there was no useful internal access modifier. Each feature module was divided into two: api + impl. This gave a more explicit contract to external users. This initial concept is described in more detail in articles by Eugene Matsyuk [part 1], [part 2].
It was released two years ago, quite well organized, and describes in detail how to connect modules with Dagger and how to organize the process of modules extraction without full refactoring. Therefore, if you have not seen it yet, I suggest you read it, and I will try not to replicate its contents. But since then, Kotlin has appeared in the project, and we have identified points for optimization — these led to a new solution, which this article addresses.
Main reasons for using multi-modularity
Before describing our approach, I will list the problems that multi-modularity helps to solve.
First, build speed. A mobile app is no longer a thin client that solves one specific user problem. Instead, there is a tendency to turn into superapps. If you leave all the code in one module, and all the dependencies in one AppComponent, build time (including the work of KAPT) will dramatically increase.
Also, let us not forget that multi-modularity is not the only solution, and it is worth periodically updating the Gradle and Android Gradle Plugin versions, turning on various optimization configs, as well as updating the hardware.
Second, architecture. Most developers have learned to break an application into layers one way or another. However, such architectures do not help the separation of the individual features and the conservation of their contract. This can both result in unexpected side effects and bugs in the application, and prevent the possible extraction of features for sharing of code among projects.
With the evolution of Kotlin Multiplatform, these can be quite unexpected projects for you. It also would be desirable to more explicitly manage the lifetime of features that are not needed for the entire duration of the application.
Third, code reuse among projects. This item partially overlaps with the previous one. Instead of discussing the readiness of existing features for extraction, here is a discussion of developing new features to be ready for reuse in neighboring projects. So it was with us, and it was this reason that led to a new approach.
A separate module — or a set of modules, as in our case — is only one solution. You can also extract a common feature into the library and upload it to the internal Maven repository. However, it will then have to be maintained separately from the main application code, which requires additional work.
The module can be connected as a Git submodule from another repository or even stored in a single monorepo. But even with this approach, it was important to consider technology stack differences and make feature-modules more decoupled.
Contracts and the structure of modules
Let us start with the general concept of modules that we came up with. All application modules can be divided into four categories:
- App-module: a remnant of the monolith that binds all modules together and has dependencies on Feature modules.
- Feature-module: a module containing a specific feature, isolated from the rest in accordance with business logic. In general, it includes all the layers of your architecture, but it can also be tiny, without any part of the layers, for example, when it is a purely UI feature or, conversely, a feature without a UI. A Feature-module can only have dependencies on the API of other Feature-modules or on Core-modules. The dependence of one Feature-module on the API of another can be quite controversial when the API and the implementation of the feature are combined into one module. Developers may forget to use
internalfor all classes that are not part of the API, which can cause these to “leak“ to other Feature-modules. On the other hand, frequent changes in the implementation of this feature will lead to the reassembly of all dependent modules. To solve these problems, you may consider splitting the feature-implementation and feature-API on which others depend into two modules. An example of such a split will be provided below. - Core-module: a module containing auxiliary code required for several Feature modules. This can be a logger or useful wrappers over the libraries used or other utilities. Core-modules do not depend on anything except for the module-injector.
- Module-injector: the main difference from the structure proposed in Eugene’s articles. The module contains base abstractions for infrastructure functionality only, which helps to glue modules together. Therefore, they all depend on it.
The second difference is that the API and Impl are glued in Feature-modules, if they are not used by other Feature-modules and there is no problem of regularly leaking implementation details. This is made possible by internal visibility in Kotlin.
It is also useful to have separate Example-modules for features of the application, which are essentially App-modules. These also provide dependencies (usually mocks) for a specific feature and allow you to develop one in isolation, without having to rebuild the entire application. This saves a lot of time and the developer’s nerves during development.
Schematically, this structure can be represented as shown below.
Module-Injector
Let us start with a module that all other modules are aware of. We repeat briefly the main principles of splitting an application into modules:
- A module should be responsible for a particular feature of the application. Sometimes a single feature can be split into modules by abstraction layer (data, domain, etc.)
- A module should have a distinct interface, i.e. moving classes to another module and using these as if they are still in the original module is nonsense. UI-kit modules, with independent Views and resources, or pure utility modules, are the exception to this rule.
- Module interfaces should not depend on a particular DI framework. For example, a module interface should not contain Dagger annotations like
@Component,@Subcomponent, etc. Also, in the context of Dagger, each module should have its own dependent graph, but only usual interface should be visible outside of the module. And sometimes, we can hear from Android developers that Dagger subcomponents are evil and Android Injection is evil.
It follows from bullet points 2 and 3 above that we should think about how to glue modules. In other words, how to use the interface which is provided from another module? How to provide the interface to other modules? And besides, we do not want to depend on a particular DI-framework.
We would like to present the approach which corresponds to the requirements above: the “Component Holder” pattern.
What is Component Holder? Let us start with the following glossary.
FeatureApi: an interface that is provided by a module externally and contains particular interfaces to be used by other modules. The FeatureAPI does not contain methods that do any work. It contains only getters (or “val” properties in terms of Kotlin) for other interfaces. For example, the interface PurchaseFeatureApi (for particular classes see example below).
Module’s API: a set of particular interfaces to be used by other modules, i.e. these are interfaces that can be obtained from the FeatureApi. For example, the interface PurchaseFeatureApi can have getters for the interfaces PurchaseProcessor, PurchaseStatusProvider, etc.
FeatureDependencies: an interface that is provided by a module externally and contains particular interfaces to be used by this module. Like a FeatureApi FeatureDependencies it should not contain methods that do any work. It contains only getters (or “val” properties in terms of Kotlin) for other interfaces. For example, the interface PurchaseFeatureDependencies.
Module’s dependencies: a set of particular interfaces to be used by this module. That us, these are interfaces that can be obtained from FeatureDependencies. For example, the interface PurchaseFeatureDependencies can have getters for the interfaces PurchaseGooglePlayRepository, PurchaseAmazonStoreRepository, PurchaseSettingsRepository, etc.
ComponentHolder: a global object (singleton) that can be used to get the reference to theFeatureApi and to provide dependencies to the module by FeatureDependencies.
In each Feature-module you need to implement the interfaces: ComponentHolder, FeatureApi and FeatureDependencies, and create other interfaces included in the Module's API and dependencies.
All other content, except for classes used in the interface, of Feature-modules can be marked with the internal modifier since other modules should not be aware of it.
To illustrate the use of this technique, I did not come up with anything new, but simply took an example of the application from Eugene’s article, forked it, translated it to Kotlin — how would I not do this in 2021? — and applied the module-injector. Now it looks like this. In the same repository, you can restore the entire transformation path by commit.
In order not to encourage you to go into the repository right now, I will tell you that this application is a simplified model of ours. It has two dedicated features: the scanner and anti-theft, which use the feature of internal purchases. At the same time, the scanner and anti-theft have their own UI, and they can exist in isolation, but purchases do not.
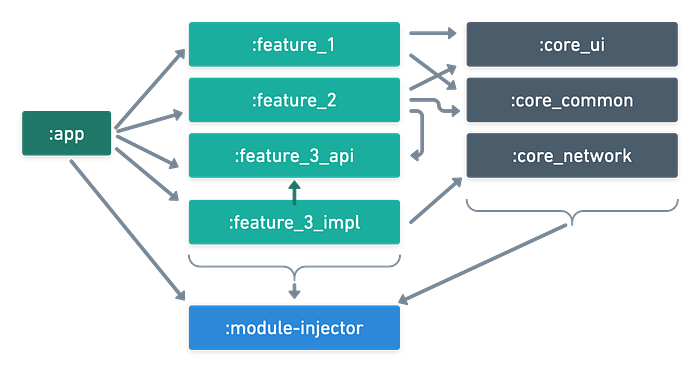
These features are allocated in Feature-modules and use a common database, code for requests to the network, and some utilities that are taken out in Core-modules. To make it clearer, I will show the scheme of this example in modules:

Here you can see an example of a purchase feature that the other two Feature-modules should be aware of. Therefore, the feature is divided into two Feature modules: :feature_purchase_api and :feature_purchase_impl. The API module is not aware of any other modules except the :module-injector. The scanner and anti-theft feature-modules are only aware of the API module.
As mentioned above, this separation allows one to explicitly highlight the contract features. At the same time, changing the implementation of this contract will not lead to the reassembly of all the features that depend on it, which will also have a positive impact on the build time of the application.
Here we will stop to leave the implementation details of ComponentHolder for the next two articles.
They are: