Modern Android development with Kotlin Part 4

It is really hard to find one project that covers all the things that are new in Android Development, so I decided to write one.
0. Android Studio 3 Part 1
1. Kotlin language Part 1
2. Build Variants Part 1
3. ConstraintLayout Part 1
4. Data binding library Part 1
5. MVVM architecture + repository pattern + Android Manager Wrappers Part 2
6. RxJava2 and how it helps us in architecture Part 3
7. Dagger 2.14.1, what is Dependency Injection, why you should use it.
8. Retrofit (with Rx Java2)
9. Room (with Rx Java2)
What is Dependency Injection 💉 ?
Let’s take a look at our GitRepoRepository class:
We can say that our GitRepoRepository class depends on three objects: netManager, localDataSource, and remoteDataSource. Data sources are initialized in GitRepoRepository while netManager is provided through the constructor. In other words, we injected netManager to GitRepoRepository.
Dependency Injection is a really simple concept: Say what you need and someone else will be responsible to provide it.
Let’s see where we construct our GitRepoRepository class ( cmd + B for Mac, alt + B for Windows):

As you can see, GitRepoRepository is constructed in MainViewModel. Also, NetManager is constructed there. Should they be injected to ViewModel too? Yes. GitRepoRepository instance should be provided to ViewModel cause GitRepoRepository can be used in other ViewModels. On other hand, we are sure that only one instance of NetManager should be made for the whole application. Let’s provide it through constructor. We would expect to have something like this:
If you can recall, we didn’t create MainViewModel in our MainActivity. We asked ViewModelProviders for it:
As it was already said, ViewModelProvider will create new ViewModel or return existing one. Now we have to put GitRepoRepository as a parameter. How to do that?
We need to make special Factory class for MainViewModel cause we cannot use standard one:
So, now we can put parameters when we want to construct it:
Wait, we still didn’t solve the problem. Should we make an instance of MainViewModelFactory in the activity? No. It should be injected there. Let’s make Injection class that will have methods that provide the instances that we need:
Now, we can inject it from this class to MainActivity.kt :
So, now our Activity does not know about repositories that comes from Data layer of the application. This organization of the code helps us a lot, especially with the testing of the app. This way we separate UI logic from business logic.
We can apply more Dependency injection concept inside Injection.kt :
Each class now has its own method that provides the instance. If you take a look better, all those methods return new instances every time when we call them. Should it be like that? Should we make new instance of NetManager each time when we need it in some Repository class? No. We need only single instance of NetManager per application. We can say that NetManager should be a singleton.
In software engineering, the singleton pattern is a software design pattern that restricts the instantiation of a class to one object.
Let’s implement it:
This way we ensure that we have only one instance per app. In other words, we can say that NetManager instance has Application scope.
Let’s see a dependency graph:
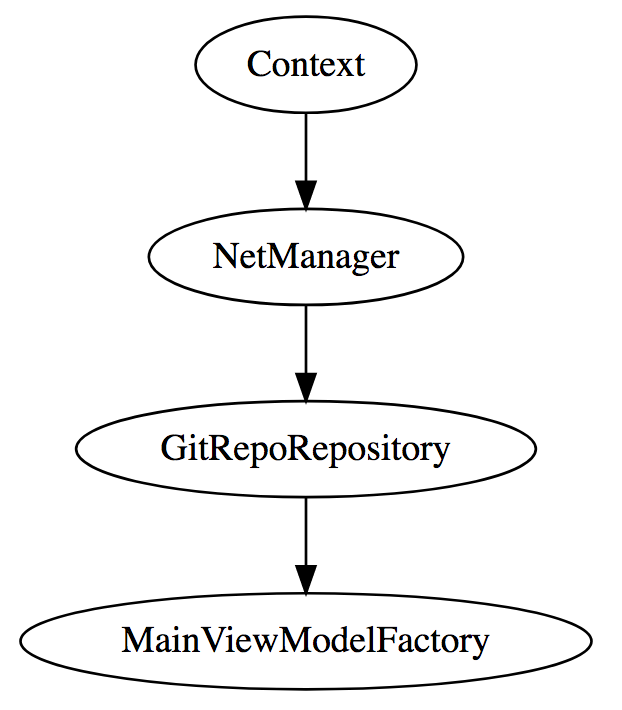
Why should we use Dagger?
If you take a look into Injection, you can see that we will need a lot of work if we have a lot of dependencies in the graph. Dagger helps us to manage our dependencies and their scopes in the easy way.
Let’s import dagger:
To use Dagger, we need to have application class that extends DaggerApplication class. Let’s make ModernApplication:
As it extends DaggerApplication(), it needs implementation for applicationInjector() method that should return an implementation of AndroidInjector. I will cover AndroidInjector later.
Don’t forget to register it in AndroidManifest.xml file:
First, create AppModule dagger module. Modules are classes that have functions with @Provides annotation. We say for those methods that they are providers cause they provide instances. To make some class as a module, we need to annotate that class with @Module annotation. These annotations help Dagger to make and validate the graph. Our AppModule will have just a function that provides Application context:
Let’s now make a component:
A Component is an interface where we specify from which modules instances should be injected in which classes. In this case we specify AppModule and AndroidSupportInjectionModule.
AndroidSupportInjectionModule is the module that helps us to inject instances into Android ecosystem classes such are: Activities, Fragments, Services, BroadcastReceivers or ContentProviders.
Cause we want to use our component to inject into those classes our AppComponent has to extend AndroidInjector<T>. For T we use our ModernApplication class. If you open AndroidInjector interface you can see it has:
abstract class Builder<T> implements AndroidInjector.Factory<T> {
    @Override
    public final AndroidInjector<T> create(T instance) { ... }
    public abstract void seedInstance(T instance);
    ...
  }
}
Builder class that has two methods: create(T instance) for the creation of the AndroidInjector and seedInsance(T instance) that will provide that instance. In our case, we will create AndroidInjector that has an instance of the ModernApplication and it will provide that instance where it is needed.
To specify type of our instance, we need to add:
@Component.Builder
abstract class Builder : AndroidInjector.Builder<ModernApplication>()
to our AppComponent.
To summarize:
- We have the AppComponent, the main component of the app that extends AndroidInjector
- When we want to build our Component, we will need to use an instance of ModernApplication class as argument.
- The instance of ModernApplication will be provided to all other @Provides methods in moduls used in AppComponent. For example, instance of ModernApplication will be provided to providesContext(application: ModernApplication) method in AppModule.
Now, we should Make Project .

When it is finished, some new classes will be autogenerated by Dagger. For our AppComponent, Dagger will make DaggerAppComponent class.
Let’s go back to ModernApplication and create the main component of the application. That created component should be returned in applicationInjector() method.
Now we finished with the standard configuration that is needed for Dagger.
As we want to inject instances into MainActivity class we need to make MainActivityModule.
@ContributesAndroidInjector annotation helps Dagger to wire up what is needed so we can inject instances in the specified activity.
If you go back to our activity, you can see that we injected MainViewModelProvider using Injection class. So, we will need provider method in our MainActivityModule that will provide MainViewModelProvider :
But what will provide GitRepoRepository to providesMainViewModelFactoty() method?
There are two options: We can make provider method for it and return the new instance or we can use @Inject annotated constructor for it.
Let’s go back to our GitRepoRepository and annotate its constructor with @Inject annotation:
Cause our GitRepoRepository needs NetManager instance, let’s do the same for NetManager:
We use @Singleton annotation to set the scope of the NetManager. Also, NetManager needs applicationContext. There is a method in AppModule that provides it.
Don’t forget to add MainActivityModule to list of modules in AppComponent.kt:
Finally, we need to inject it to our MainActivity. To enable Dagger to work there, our MainActivity needs to extend DaggerAppCompatActivity.
To inject MainViewModelFactory instance we need to use @Inject annotation.
Important: mainViewModelFactory variable must be public.
That’s it.
There is no need for injection from Injection class anymore:
mainViewModelFactory = Injection.provideMainViewModelFactory(applicationContext)Actually, we can delete Injection class cause we are using Dagger now.
Step by step
- We want to inject MainViewModelFactory to MainActivity
- To make Dagger work in MainActivity, MainActivity has to extend DaggerAppCompatActivity
- we need to annotate mainViewModelFactory with @Inject annotation
- Dagger searches for module that has a method with @ContributesAndroidInjector annotation that returns MainActivity.
- Dagger searches for the provider or @Inject annotated constructor that returns the MainViewModelFactory instance.
- provideMainViewModelFactory() returns that instance, but to make it, it needs the GitRepoRepository instance
- Dagger searches for the provider or @Inject annotated constructor that returns the GitRepoRepository instance.
- the GitRepoRepository class has a constructor with @Inject annotation. But that constructor needs the NetManager instance.
- Dagger searches for the provider or @Inject annotated constructor that returns the NetManager instance.
- NetManager class has a constructor with @Inject annotation. But that constructor needs the Application Context instance.
- Dagger searches for the provider that returns Application Context instance.
- AppModule has provider method that returns application context. But that constructor needs ModernApplication instance.
- AndroidInjector has that provider.
That’s how it works.
There is a better, automated way to provide ViewModelFactory
The problem: For each ViewModel that has arguments we need to make ViewModelFactory class. In the Tivi application source code from Chris Banes, I found really nice way to automate this.
Create ViewModelKey.kt :
Let’s make DaggerAwareViewModelFactory:
Create ViewModelBuilder module:
Add ViewModelBuilder to AppComponent:
Add @Inject in class MainViewModel:
From now, we just need to bind it to the module for Activity:
There is no need for MainViewModelFactory provider. Actually, there is no need for MainViewModelFactory.kt at all, so you can delete it.
Finally, change it in MainActivity.kt so we have ViewModel.Factory type instead of MainViewModelFactory:
Thanks to Chris Banes for this wonderful solution.
I hope you like this article. Follow me for more. In the next part, we will get real repositories from GitHub using Retrofit. In another one, we will save them locally using Room so our app can work offline.
I am also thinking about to write more parts where I will explain how we can test our UI layer using Espresso or our Data layer using Unit tests. Probably there will be one more about continues delivery using Fastlane, Circle.ci, and Fabric.
Thank you all for reading! 😊