Migrating from Dagger2 to Koin
Simplicity is the soul of efficiency

Recently, I created for fun a full project (backend/frontend + android app) written only with Kotlin: NoBullshit (you can read the related article right there).
However, the first release was using Dagger2 for dependency injection on the Android app: Not a very Kotlin way for this project…
So I decided to migrate it to Koin, a pragmatic lightweight dependency injection framework written in pure Kotlin and get a feel for what Koin is all about.
Installing Koin
I started adding the Koin dependency like below :
That’s it. Pretty light compared to Dagger2. Because Koin doesn’t use the annotation processing, you don’t have to use the kapt compiler plugin and worry about it.
1. Creating Module
For the NoBullshit Android application, I only had a single & simple Dagger2 module providing Firestore datasource :
Now, the Koin equivalent :
No need to create a class for your module. Instead, I used the top level feature of Kotlin.
Thus, the Dagger “Module” annotation is replaced by the Koin “module” function. Inside this function, I provided the exact same dependencies. However, there are three interesting functions here :
- factory(): A factory component declaration is a definition that will give you a new instance each time you ask for this definition. It’s the equivalent of the Dagger2 Provides annotation.
- single(): Declaring a singleton component means that Koin container will keep a unique instance of your declared component. It’s the equivalent of the Dagger2 Singleton annotation.
- get(): In order to resolve an instance in a Koin module, just use the
get()function to the requested needed component instance. It’s the equivalent of putting parameters in each method that provide a dependency in Dagger2.
2. Creating Component
With Dagger2, because I wanted to follow the best practices for Android, my component looked like this :
This was huge. The equivalent, with Koin :
Koin doesn’t require you to create a proper interface to define your component like Dagger 2.
For Koin, a component is actually a list of Module.
That’s it.
3. Starting Koin
In order to initialize properly Dagger2 in Android, you should have created a lot of stuff, especially if you wanted to inject dependencies from the Application class. The first setup was painful…
With Koin, this has become as simple as that:
Then, you just have to call the desired dependency using delegation through the method by inject() in order to lazily evaluated instance from Koin container:
This clarity and readability have truly convinced me. Actually, this simplicity makes me think of one Clean Code’s famous rule:
Clean code focuses on making code more readable so it can be easily maintained and allow us to be more productive.
4. What about testing?
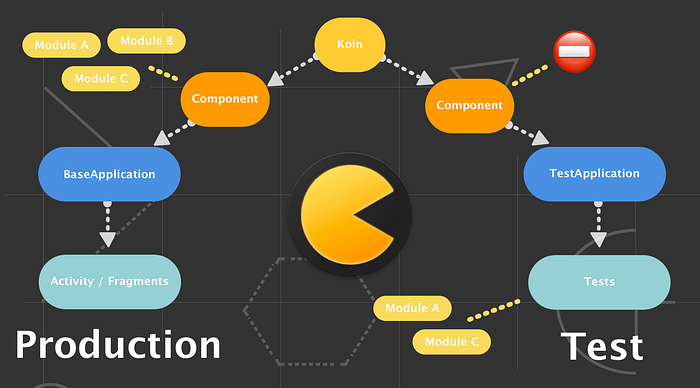
The above architecture represents the way I test with Koin. During tests, instead of using the module for production, I chose to define my own modules for each test.
To achieve that, I created first a test Application to prevent any module initialization:
Then, I created a custom test module to define the dependencies :
This module is now using some mocked object (thanks to Mockk.io) and custom query response for the Firestore DAO.
Finally, I just had to tell Koin to inject this module before each instrumented test with the method loadKoinModules():
This approach fits perfectly well with my needs, but there are different others approaches than this one, as you can see here.
Koin was really a good surprise for me, especially due to its simplicity and readability. I loved the way modules are created and the easiness for testing.
This project being pretty small, I could not compare which one between Dagger2 and Koin is the most powerful and which one to choose. BTW, there is a lot of debate about it...
However, If you’re starting a new Android Kotlin project, you should definitely consider it and give it a chance/try.