Marathon, Chapter 2
In this chapter, I’ll explain how Marathon test runner is implemented and what are the basic concepts that are used.
For the previous chapter see Chapter 1.
Helicopter view
Marathon test runner is written in Kotlin with extensive use of coroutines. Test runner consists of several Gradle modules. The main execution logic can be visualised as the following diagram:

The main logical part of the runner is the core module. It contains most of the platform-independent code. During the initialisation phase, Marathon initialises all the core component first and then proceeds to platform dependent initialisation. This platform-dependent code is extract into a gradle module and is called vendor implementation, such as vendor-android and vendor-ios.
Vendor modules

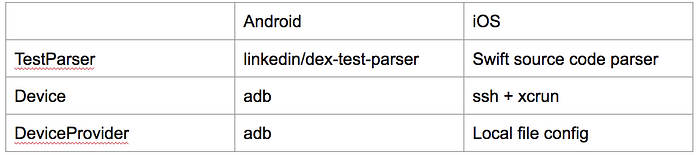
Each vendor implementation has to implement three main interfaces:
Device
This is the abstraction of the test execution unit:
You need to provide some meta information about the execution unit such as OS, serial and model. The lifecycle of the device is started with prepare call to initialise the device for test execution for example installing the application package. Next, execute will be called to run specific tests passed as testBatch parameter. Finally, dispose will be called to clean-up after the device is not needed anymore.
DeviceProvider
This is the abstraction of how Marathon gets the execution units for running tests:
This entity is reactive, so first initialize is called with the vendor configuration as a parameter. Then after everything is ready, DeviceProvider implementation sends events via the Channel signalling that an execution unit is either connected or disconnected. After test execution is finished clean-up happens in terminate.
TestParser
This component should simply return the list of all the tests that are available for execution
The implementation can, for example, parse the binary output of the application or the source code.
Of course, the real implementation of any vendor will be a bit more complicated because you’ll want to separate the package installation logic from the Device implementation.
Right now Marathon has three vendor implementations: vendor-android, vendor-ios and vendor-test.
Vendor-test module is used for integration testing of marathon itself in order to mock specific behaviours of vendor module.
Marathon concepts
During the design phase, a list of use-cases was created to understand how the test runner might be used. This lead to a list of concepts that Marathon needed to support. You already know about the vendor concepts such as Device, DeviceProvider and TestParser. Let’s look at some more.
Batch
Most of the testing frameworks implement some form of grouping of tests together into one single execution. Marathon calls this group of tests a batch. The trade-off here is stability vs performance. If you execute each test separately, then you reduce the risk of facing side effects such as shared test state. On the other hand, you have a problem of performance: each test execution command typically takes some time before the actual execution starts. It may be cleaning the application state or reinstall of the application package. In the end Marathon leaves the choice in your hands: you can either have every test in it’s own batch to increase the stability or you can group tests together to improve the performance.
Shard
One of the use-cases that Marathon needed to support was fixing flakiness of a specific test. Suppose a developer was tasked with reducing the flakiness of a test. In order to understand if something changed with the success rate of this test, this developer might need to execute the test hundreds of times if not a thousand. One approach would be of course to run the same test runner command multiple times, but we wanted to go further than this. Meet the shard: it basically just stores a list of tests, but notice that it’s actually a List and not a Set. This means that the shard can have the same test multiple times. In this case our developer can instruct the runner only to execute this specific test and multiply it in the queue 1,000 times. Problem solved!
Device Pool
Most likely you want your test runner to be as fast as possible. This means that you need to group whatever execution units you connect to test runner into some group. This group of devices is called device pool. In a simple scenario where you want to execute tests in parallel on all of the connected devices you create only one device pool, this one is called omni pool. But what if you want to separate your devices into sub pools and execute all the tests in each sub pool? This can happen for example if you execute a regression testing by Operating System version: you want to execute all your tests in parallel on all devices with Android O, Android N and Android P. To do this, you instruct the runner to separate all execution units into pools by OS version, and then you’ll get multiple reports for each pool.
Initialisation
Now that we know the concepts behind Marathon let’s see how the test execution happens, starting with initialisation.
First, Marathon initialises the device pools. Out of the box several strategies are supported such as:
Omni
All connected devices are merged into one group. This is the default mode
ABI
Devices are grouped by their ABI, e.g. x86 and mips.
Manufacturer
Devices are grouped by manufacturer, e.g. Samsung and Yota.
Model
Devices are grouped by model name, e.g. LG-D855 and SM-N950F.
OS version
Devices are grouped by OS version, e.g. 24 and 25.
After the device pool init each pool is processed by sharding logic:
Flakiness strategy
After the sharding logic we go through parallelising retries of tests. We store all of the previous test executions which gives us the success rate of each test and an ability to pre-create necessary retries and execute them in parallel.
Reactive adjustments
After initialisation, Marathon reacts to all the possible changes during the test run: test success/failure, device connected/disconnected, etc. Each time there is a change the following updates happen:
- Tests are sorted according to configuration
For example you can sort the tests by the X percentile of their duration:
- Tests are batched
For example if you want to execute each test separately in an isolated batch:
- Retries are added if flakiness strategy didn’t help
For example if you don’t want any retries on top of the predicted ones:
This reactive approach is implemented using the Actor pattern, namely QueueActor, DeviceActor and DevicePoolActor. Each actor can receive and send messages:
DevicePoolActor, for example, responds to events from scheduler, device and queue and also notifies queue about test results
Reports generation
After the execution of the tests, several reports are generated. Reports are separated into gradle modules.
Currently we have a Tracker abstraction for implementing various reports that need to collect the test run data:
Each test is tracked via the state machine transitions which I’ll talk about in the next chapter. The Tracker abstraction receives information about everything that happens to each test and also each device that was connected in real-time. Most report generators one way or another implement these callbacks by extending the Tracker interface and gathering the necessary data.
Here is a list of reports that Marathon is able to generate currently:
Generic
This report allows you to filter by test status, search for a specific test and check the screen recording if it’s available. You also have access to the execution unit’s log and durations of tests.
Timeline
This report is mainly tailored for infrastructure engineers but can be also helpful for developers.

It allows you to visually understand what happened during the run. For example, you can notice some abnormalities with device initialisation or that a particular device fails all the tests.
Allure
Allure is an open-source test report which has some excellent benefits namely grouping the tests by Epic/Feature/Team and grouping your tests by the problem your tests are having.

For example, it groups all the exceptions that failed the tests for some reason, and you can quickly find the main problems in your code.
Another good part about Allure is that it allows you to see all the retries of the test instead of only the last attempt that mattered in terms of tests passing or failing. This means that you can look at all the retries and possibly analyse the behaviour from screen recording.
Marathon creates the test data that Allure CLI or other distribution can use to generate the html report.
Test report customization
It’s quite easy to implement your own report by extending the Tracker interface. Unfortunately the data that is required for each report is quite unique, that’s why we’re planning to simplify the collection of metrics even further, so stay tuned.
What’s next
This wraps up the basic concepts and overview of Marathon module structure. Next, I will explain a few different things about test metrics: how they are stored, how you can create your own reports, and how real-time reports can help you improve your testing experience.