Learn with code: Jetpack Compose — Playing Media (Part 3)
Learn to integrate ExoPlayer with Jetpack Compose

This is part of a multi-part series about learning to use Jetpack Compose through code. This part of the series will be focusing on building the game videos screen and also covering the test cases for this screen.
Other articles in this series:
Note: All the videos and game data in the article are taken from the awesome RAWG API.
Dissecting the videos screen

The first half of the screen has the video player which in our case is ExoPlayer and the second half of the screen has the video playlist. The video title is overlapped on the video player and we are also indicating the current playing video in our playlist. Let’s code!
Column and weight
We can use the weight modifier available to the children of Column to segregate our screen into two equal halves.
Size the element’s height proportional to its
weightrelative to other weighted sibling elements in theColumn.Whenfillis true, the element will be forced to occupy the whole height allocated to it.
I have given the background colours for top and bottom half as black and grey to illustrate the screen segregation.
Previewing the composable now gives the following screen:

Now that we have our segregation ready, let’s move on to the interesting part and start designing our first half which is the video player!
Video Player — ExoPlayer
At the time of writing, ExoPlayers’ PlayerView is a traditional android view. To inflate a traditional android view in our composable we can make use of AndroidView.
For our video player, we can simply create an instance of SimpleExoPlayer and pass it to our PlayerView.
We also need to release the SimpleExoPlayer when it is no longer needed. To handle this we can wrap our AndroidView inside a DisposableEffect.
Now that we know what we want, let’s code!
Now that we have created the UI for our video player, let’s start playing the game videos!
First we need to create a playlist. To do this, we need a list of MediaItem. Once we have that, we simply need to provide these MediaItems to our SimpleExoPlayer.
I will explain why we are setting MediaMetadata for our MediaItem shortly. Let’s go ahead and preview and see what we got so far.
We are able to play our videos but we are not displaying the current video title as of now.
Video title
We need to display the current video title and also hide the title once it is shown. To do this we can add a listener to our SimpleExoPlayer and listen to the callbacks.
Whenever a new MediaItem starts playing in the playlist, we can get this callback in onMediaItemTransition.
If we want to hide the video title after the video plays for sometime we can do that by listening to the onEvents callback as this callback will be triggered every time the player state changes.
From the compose side of things, to animate the appearance and disappearance we can make use of AnimatedVisibility.
Note: At the time of writing, AnimatedVisibility is experimental and may change in the future and be different as described in this article.
As you can see, initially setting our MediaItem with MediaMetadata helped us to get the video title of the current playing video.
Running the app now will give the following result:

Now that we have our video player setup, let’s move onto displaying the game videos playlist.
Videos playlist
As you would have already guessed, we can make use of LazyColumn for the displaying the playlist.
LazyColum is a vertically scrolling list that only composes and lays out the currently visible items.
Let’s design our VideoItem now.
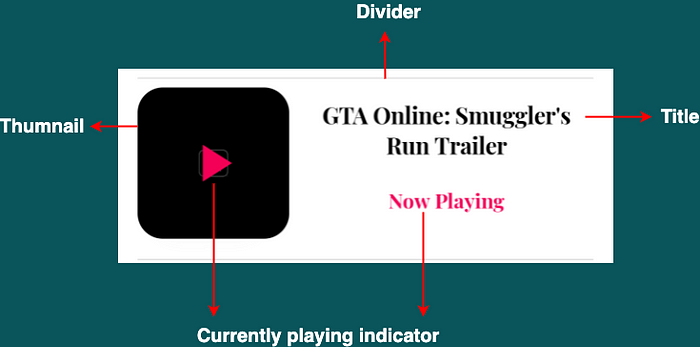
Here, the Now Playing text and the Play Image should only be displayed for the current playing item.
Previewing the screen now gives the following result:

We have almost reached our desired state. First, we need to know which item is currently playing. Also, once we click on an item we need to start playing that particular video.
We can get the info about current playing item from our video player i.e. SimpleExoPlayer and whenever the current playing item changes we can notify our PlayList and update it accordingly.
Similarly, on click of any item in our PlayList we need to again notify our SimpleExoPlayer to start playing that particular MediaItem.
This is our parent composable and our single source of truth to both VideoPlayer and VideoPlayList about current playing item.
Since we get a callback whenever a new MediaItem starts playing in onMediaItemTransition we can update current playing item here. Also, we can use the seekTo method to tell SimpleExoPlayer to play an item at a particular index in our MediaItems.
Finally, on clicking of any item in our PlayList we need to tell the SimpleExoPlayer to play that particular video by updating the current playing item.
Running the app now gives the following result:
Looks pretty good! One thing we have not added here is that, what should happen when the app is put to background and the video is playing? Ideally we would want to pause the video and resume it once the app is back to foreground.
I will leave this to you. A hint — you need to observe the lifecycle state.
Testing the composables
Now that we have designed our game video screen, let’s go ahead and write a test for it. Here we will not be testing the ExoPlayer and will be focusing on our compose UI.
The test is pretty self-explanatory. We are passing in fake GameVideosEntity to our composable and then asserting that all the views are displayed.
I will leave the rest of the test cases to you. Use all your creativity and make sure you cover as many test cases as possible for this screen!
You can find the complete source code with all the tests for the video screen in this repository.
What’s next?
In this post we have designed our game videos screen and also tested the same. This is the end of this series but not the app. Pull requests are welcome for minor changes. If you want to propose major changes or add features please feel free to start a discussion or open an issue!
Thanks for reading! If you liked the article please do leave a clap 👏 and don’t forget to subscribe and follow to get regular updates! :) You can also connect with me on LinkedIn.
We at ShareChat are constantly working on making our apps better across all our clients: Android, iOS and Web. If you are interested in building ShareChat/Moj or solving interesting problems, let us know by applying here!
Additional Resources
- Official ExoPlayer docs to dive deeper into the library
- Android Developers website to learn more about lazy lists in Jetpack Compose
- Android Developers website to learn more about animation in Jetpack Compose
- Android Developers website to dive deeper into testing in Jetpack Compose