Kotlin & Spring Boot: Building a Rest API
Hi everyone, in this first article as part of the series about Kotlin for server side, we’ll show how to build a Rest API with Kotlin and Spring Boot in an uncomplicated way.
For this article, we’ll build a simple Rest API to store and retrieve Players information.
We’ll use MySQL as our database, with JPA and Hibernate to access data from the database.
Setup the project
We can create our spring boot application in an IDE like IntelliJ IDEA or using the website: start.spring.io.
In our case we will use the start.spring.io website to generate the project.
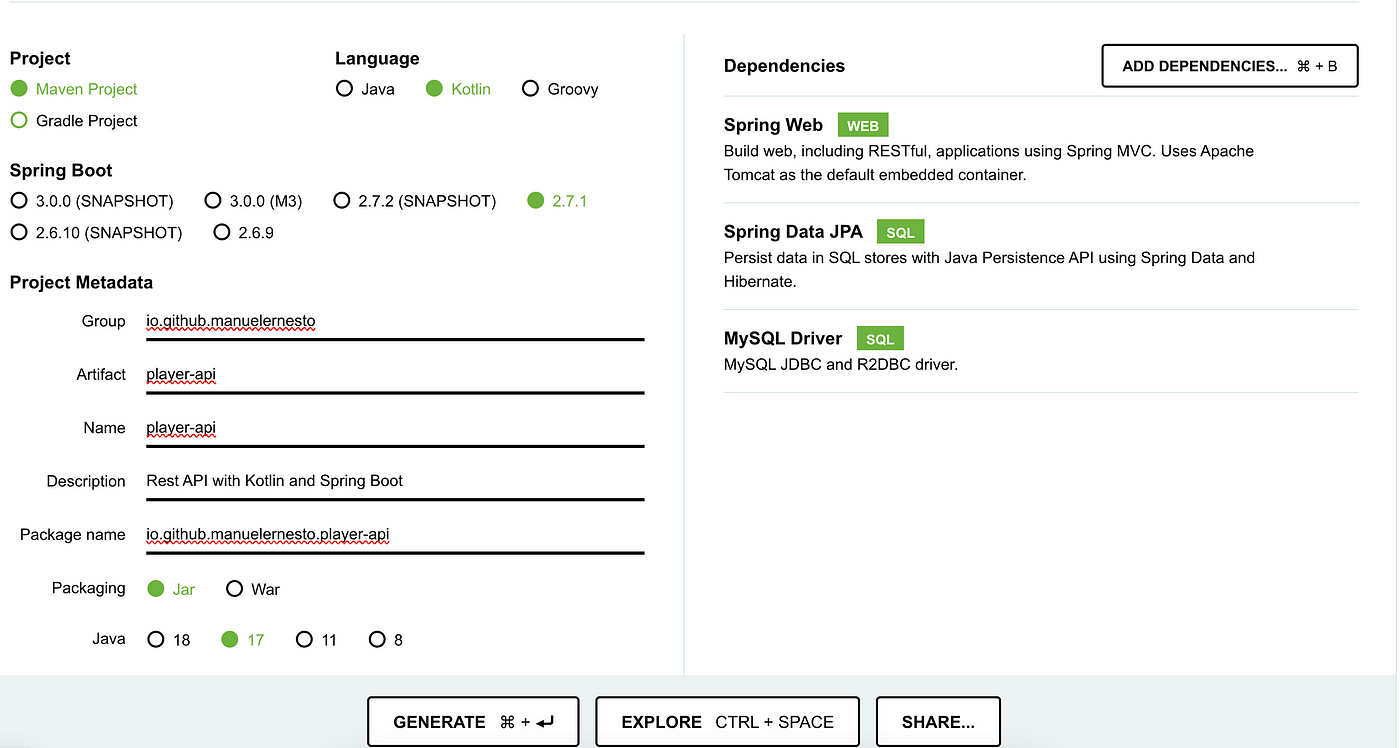
Fill the information about the project, add the Spring Web, Spring Data JPA and MySQL Driver dependencies and click generate, or you can clone/download the starter project from my GitHub.
After downloading or cloning the project, open/import in your IDE (IntelliJ IDEA in my case).
Project Overview
Pom.xml file
Dependencies section
Above we can see the dependencies for our API, these dependencies allow us to work properly with Kotlin, Spring and MySQL database.
Build section
In the build section of the POM.xml file we can find the plugins for Spring and JPA, and also the dependencies to allow to compile to allow open class in Kotlin, since by default all class are final, and to allow no arguments construct in Kotlin Data Classes.
Main file
In the main file, we can see the class annotated with @SpringBootApplication and main method for running the spring application.
Time to code
Config the Database
We’ll configure the database for our API, for that, in the application.properties file, put the configurations below.
Let’s see what each line means:
- spring.jpa.database — Setting the database type,
- spring.datasource.url — Setting the URL for the database,
- spring.datasource.username — Setting the database username,
- spring.datasource.password — Setting the database password,
- spring.jpa.show-sql — Enabling/Disabling (True/False) SQL query to be showing at logs,
- spring.jpa.hibernate.ddl-auto — Setting the Hibernate to update the database schema based on the modifications in the domain model.
Use the username and password as per your MySQL installation
Model
Let’s create a data class called Player, and annotate with @Entity, this means that this class will be mapped in our database table, the @Table annotation is to set the custom table name (by default the name of the table is the same from the class), and the @Id is to define the ID.
Repository
Let’s now create our JPA repository, first create an interface called PlayerRepositoy, annotate with @Repository and extends JpaRepository by passing the model and the ID data type.
Service
Next, we will create a service class that we contain all methods for performs the operation in database using methods of the JPA repository:
- getAll() function— will get all records from database,
- getById() function— will get one record from the database based on the Id, or throw an exception if the Player with the specific Id doesn’t exist,
- create() function— will create a record in the database,
- remove() function— will remove a record from database based on the Id or throw an exception if the Player with the specific Id doesn’t exist,
- update() function— will update a record from database based on the Id or throw an exception if the Player with the specific Id doesn’t exist.
Controller
Finally, we’ll create the REST controller that will provide endpoints for creating, manipulating, and deleting players. For that we need to annotate the controller with @RestController to say that this class is capable of handling requests and also annotate with @RequestMapping to define the path.
To handle incoming HTTP requests, we’re using spring provided annotations such as @GetMapping, @PostMapping, @DeleteMapping and @PutMapping.
Running the application
Now, we need to start our application by clicking on the run button in IDE or by terminal command using: mvn spring-boot:run
By default, spring boot application starts in port 8080
Testing the API
Now, it's time to test our API.
POST— Creating a Player
GET — Get all Players
GET — Get Player by Id
UPDATE — Update Player
DELETE — Delete Player
You can check the full code in my GitHub repository here.
Thanks to you for reading this post! Please do 👏🏿 if you liked it and want more posts about Kotlin for server-side.