Kotlin Guards Explained: Boost Code Clarity with when Statements in Kotlin 2.1
You’re attending an event at Buckingham Palace. A Guard checks not only your invitation but also verifies your age and even your dress code — all in one glance before allowing you entry.
Now, picture your everyday code having a similar gatekeeper: a mechanism that checks multiple conditions at once, ensuring that only the right “guests” get through to the heart of your function.

Important Clarification 1:
Kotlin Guards are not a general guard statement like in some other languages. They are specifically an enhancement to the
whenstatement. This means you can only use guard conditions within awhenexpression to add extra checks to each branch—not in every part of your Kotlin code.Important Clarification 2:
This feature is currently experimental
Introduction
When you first hear about guard conditions, you might wonder if it is just a fancy way to write code. However, it is more than that. Kotlin Guards represent a way of thinking about error checking. Instead of hiding important checks inside many layers of code, guard conditions let you put them all at the beginning. This means that the main part of your code is not hidden by many conditions and is easier to understand.
Think of it like this:
When you start a long car journey, you check your fuel, tire pressure, and oil level before driving. Once these checks are done, you can drive safely without worrying about a breakdown. In the same way, guard conditions check that everything is in order before your program continues with its main task.
What Exactly Are Kotlin Guards?
Kotlin Guards improve the way we use the when statement. The when statement is like a switch that lets you decide what to do based on the value or type of a variable. Before guard conditions, you might have had to write several nested if statements inside a when block. This made the code hard to read. With guard conditions, you add an extra check right next to the main condition, making the code more straightforward.
For example, let’s say you have a sealed class that shows the result of a network request. In older code, you might write:
when (response) {
    is HttpResult.Success -> println("Success")
    is HttpResult.Failed -> {
        if (response.statusCode == 503) {
            println("Service under maintenance")
        } else {
            println("Failed with code ${response.statusCode}")
        }
    }
}
In this code, you see that the branch for a failure is split into more checks. It is hard to read. With Kotlin Guards, you can write it like this:
when (response) {
    is HttpResult.Success -> println("Success")
    is HttpResult.Failed if response.statusCode == 503 -> println("Service under maintenance")
    is HttpResult.Failed -> println("Failed with code ${response.statusCode}")
}
Here, the extra check (if the status code is 503) is written in a simple, clear way. It is like having a guard at the door who only lets people in if they meet a specific dress code. This makes the code clear and easy to understand.
I am new to Kotlin: What were the Limitations Prior to Guards in “When Statements”?
If you are new to Kotlin, you might wonder why we needed this new feature. Before guard conditions were introduced, the when statement could only check a value or type.
The Limitations Were:
- Nested Conditions: You had to nest if statements inside a when branch when you needed more than one check, leading to extra layers of indentation and code that looked like a pyramid.
- Cluttered Code: Handling multiple conditions often split your logic across different parts of a function. If you had a failure case that needed more checks, the code got scattered and harder to follow.
- Reduced Readability: With deeper nesting, it was more difficult to see the happy path of your function. Error-handling code took center stage, pushing the main logic into the background.
With guard conditions, these problems are solved. You can now place all your checks right next to the pattern you match, resulting in code that is flatter and easier to understand. The main logic becomes clear, and you instantly see what conditions must be true before the function proceeds.
Constructing the New when Statement with Kotlin Guards
When using Kotlin Guards, the when statement gains an additional if clause right after each branch’s pattern. Traditionally, a when statement looks like this:
when (value) {
    patternA -> { /* do something */ }
    patternB -> { /* do something else */ }
    else -> { /* fallback */ }
}
With guard conditions, the new construct allows you to append an if <condition> after the match expression in each branch. In other words, both the type or value check and the extra condition must pass for that branch to be selected. Formally, you can think of it as:
when (<expression>) {
    patternA if <condition> -> /* branch code */
    patternA -> /* fallback for patternA if <condition> is false */
    patternB if <condition> -> /* branch code */
    else -> /* default fallback */
}
Here are the key details of this new construct:
- Pattern Matching Plus Condition
Each branch matches its usual pattern (a type, value, or range) and immediately checks an additional condition withif <condition>. - Selective Branch Execution
The guard condition filters whether or not that branch will execute, which makes early checks more concise. If the condition is not met, Kotlin will continue evaluating other branches in thewhenstatement. - Smoother “Fail Fast” Logic
By putting theifcondition on the same line as your match, the code remains flatter (less nesting), letting you handle specific scenarios—like special error codes—without burying them inif-elseblocks inside a branch. - Fallback Branches
You can still provide a fallback branch for the same pattern if the guard condition fails. This is done by adding another branch with the same pattern but without theifpart (or by using theelseblock if needed).
In short, Kotlin Guards extend the when statement’s traditional pattern matching with a direct conditional check. This fusion of pattern matching and immediate guard conditions is what makes the “fail fast” approach more idiomatic and your code more readable.
The Idea Behind Guard Conditions
Guard conditions are not just a syntax trick; they represent a shift in how we handle checks. Often, error-handling code is scattered throughout a function, hiding the main purpose. A common pattern is early exit: if something is wrong, you stop immediately. Kotlin Guards simply push all these checks to the start of the code.
Think of it like a pre-journey checklist for a road trip. Once it’s complete, you drive with confidence. Similarly, guard conditions verify all essential aspects first, allowing the rest of your code to focus on normal operation. This approach also reduces errors because you handle bad situations as soon as they arise.
Comparing Kotlin Guards and Swift’s guard
Both Kotlin Guards and Swift’s guard aim to improve code clarity by checking critical conditions early and exiting if necessary. Swift’s guard statement looks like this:
guard let value = optionalValue, value > 0 else {
    // Exit the function, throw an error, or perform another action
    return
}
// Safe to use 'value' here
Swift requires a forced exit if conditions fail, ensuring you never proceed with invalid data. Kotlin Guards, however, are not a standalone statement — they’re part of the when expression, letting you add checks without forcing an immediate exit.
Kotlin Guards, on the other hand, are not a standalone statement. They enhance the when expression.
They let you add extra checks to decide which branch to execute, yet they do not stand as an entirely separate statement. Even though their syntax differs, both follow the fail fast principle and help produce code that is clear, safe, and easy to maintain.
You add a guard condition after a match:
when (response) {
    is HttpResult.Failed if response.statusCode == 503 -> println("Service under maintenance")
    is HttpResult.Failed -> println("Failed with code ${response.statusCode}")
}
In Kotlin, the guard condition filters the branch but does not force you to exit. Both approaches share the fail fast idea, but Swift enforces it more strictly.
Similarities
- Both focus on early checks and improved readability.
- Both make it easier to follow the “happy path” of the function.
Differences
- Syntax: Swift uses a separate
guardstatement, whereas Kotlin extendswhen. - Strictness: Swift forces an early return; Kotlin simply filters branches, leaving the exit logic to you.
The Technical Steps to Get Started
Step 1: Add the “kotlin” block at build.gradle
Before you can use Kotlin Guards, confirm that your project uses Kotlin 2.1.0 or later. Since guard conditions are an optional feature, you need to activate them with a compiler flag. In a Gradle project, add the following to your build.gradle.kts file:
kotlin {
    compilerOptions {
        freeCompilerArgs.add("-Xwhen-guards")
    }
}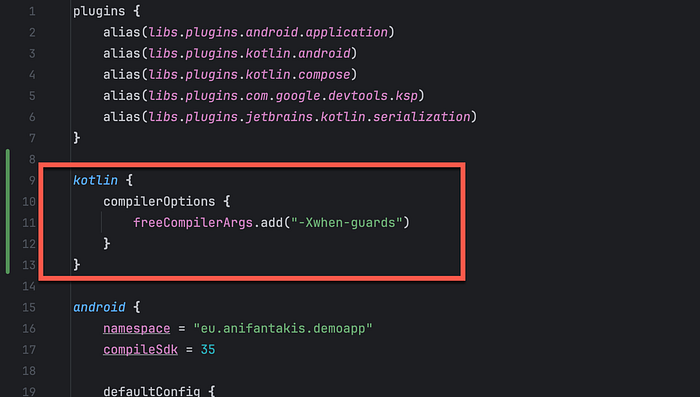
This small change tells the Kotlin compiler to allow guard conditions in your code. Once enabled, you can start refactoring your functions to make them cleaner and more direct.
Optionally…
If you want to ensure that your project uses the appropriate Java version alongside Kotlin 2.1 (or later).
This explicit configuration helps avoid potential mismatches between the Java Development Kit (JDK) used by your project and the requirements of the new Kotlin features.
kotlin {
    jvmToolchain(17)  // or appropriate version
    compilerOptions {
        freeCompilerArgs.add("-Xwhen-guards")
    }
}
Even though this is enough to make use of the new
guardsfunctionality in yourwhenstatements, you will still see an error in your IDE. This is because your Android IDE doesn’t make use of the K2 inside its analysis tool.So even though you can compile and run, your IDE highlights your when code with red error marking.
To fix this IDE problem, enable K2 Mode in your IDE!
Step 2: Enable K2 Mode in Settings
In your IDE (such as IntelliJ IDEA or Android Studio), navigate to Settings > Languages & Frameworks > Kotlin and check the option Enable K2 mode. After enabling, restart your IDE to apply the changes.

A Smooth Transition to a New Style
Adopting Kotlin Guards can feel like renovating an old house. While your code may “work,” improving its structure can make it more enjoyable to maintain and more robust. If you have functions packed with nested conditions, try rewriting them with Kotlin Guards:
- Start with the most complex functions.
- Refactor one function at a time.
- Notice how the main logic becomes simpler and clearer.
When your entire team uses guard conditions, everyone wins: code reviews become smoother, onboarding new developers is easier, and errors become more apparent.
Edge Cases to Consider
While guard conditions greatly improve clarity, there are a few subtle scenarios to watch out for:
1. Ordering Matters
The when statement checks each branch one by one. This means you must put the most specific cases first. For example, consider this code:
when (response) {
    is HttpResult.Failed if response.statusCode == 503 -> println("Maintenance")
    is HttpResult.Failed if response.statusCode == 500 -> println("Server Error")
    is HttpResult.Failed -> println("Generic Failure")
}
If you change the order, a general case might catch a response before a specific case is checked. Always put the specific conditions (like status code 503 or 500) at the top.
2. Exhaustiveness and Fall-through
The Kotlin compiler must know what to do with every possible value. This means your when statement must cover all cases. If you forget to add an else branch or cover every possibility (especially with sealed classes), your code will not compile. For example:
when (response) {
    is HttpResult.Failed if response.statusCode == 503 -> println("Maintenance")
    is HttpResult.Failed -> println("Other error")
    else -> println("Unknown response")
}
Always make sure there is a fallback option.
3. Guard Conditions and Side Effects
A guard condition should only check a condition and nothing else. “Side effects” are extra actions, like printing a message or changing a variable, that happen while checking the condition. For example, this guard is clean:
is HttpResult.Failed if response.statusCode == 503 -> println("Maintenance")But if you add extra work in the guard, like:
is HttpResult.Failed if response.statusCode.also { println("Checking guard") } == 503 -> println("Maintenance")Here, the guard prints “Checking guard” while checking if response.statusCode is 503. This extra print is a side effect—it does more than just return true or false.
In real code, you generally want the guard to only check a condition.
Performance Considerations
Guard conditions are designed to be fast, but here are a few points to keep in mind:
1. Lazy Evaluation of Conditions
The guard condition is only checked if the main condition is true. This saves time because the extra check is skipped when the main condition does not match. However, if your guard condition does heavy work or many calculations, it might slow down your code. For example, if you have a complex calculation:
fun calculateHeavy(): Int { /* imagine heavy work here */ return 42 }

when (value) {
    is SomeType if calculateHeavy() > 10 -> doSomething()
    else -> doOtherThing()
}
It might be better to calculate the value once:
val heavyResult = calculateHeavy()
when (value) {
    is SomeType if heavyResult > 10 -> doSomething()
    else -> doOtherThing()
}
This way, the expensive calculation is not repeated.
2. Readability and Branch Prediction
Guard conditions keep your code flat and easy to read. However, if you put too many checks in one branch, it may become hard to follow. For example:
when (value) {
    is SomeType if conditionA && conditionB && conditionC -> doSomething()
    else -> doOtherThing()
}
In such cases, it might be better to split the logic into multiple branches. This not only makes the code easier to read, but it also helps when you need to debug.
3. Compiler Optimizations
Kotlin’s compiler is smart and optimizes guard conditions. They are usually as fast as traditional if-else checks. However, if you use them inside loops or in parts of your code where speed is very important, it is a good idea to test (or “profile”) your code. Sometimes, a small change like reordering the checks or computing a value once can improve performance.
Example: Managing Orders in an Online Store
Let’s say you have various order statuses. You might want different responses for different error codes in a failed order.
sealed class OrderStatus {
    data class Processed(val orderId: String) : OrderStatus()
    data class Failed(val errorCode: Int) : OrderStatus()
}
This is how you would handle the OrderStatus prior to Kotlin Guards:
fun handleOrder(status: OrderStatus) {
    when (status) {
        is OrderStatus.Processed -> println("Order ${status.orderId} processed successfully.")
        is OrderStatus.Failed -> {
            if (status.errorCode == 404) {
                println("Order failed: Product not found.")
            } else if (status.errorCode == 500) {
                println("Order failed: Internal server error.")
            } else {
                println("Order failed with error code ${status.errorCode}.")
            }
        }
    }
}
It’s perfectly valid but can grow unwieldy with more special cases. With Kotlin Guards:
fun handleOrder(status: OrderStatus) {
    when (status) {
        is OrderStatus.Processed -> println("Order ${status.orderId} processed successfully.")
        is OrderStatus.Failed if status.errorCode == 404 -> println("Order failed: Product not found.")
        is OrderStatus.Failed if status.errorCode == 500 -> println("Order failed: Internal server error.")
        is OrderStatus.Failed -> println("Order failed with error code ${status.errorCode}.")
    }
}
Final Thoughts
Kotlin Guards are more than just a feature — they provide a new way to structure your code by placing all key checks right at the start, making your main logic concise and focused.
Think of every function like a well-organized story. The opening lines handle setup and checks. Once those checks pass, the function’s main part continues smoothly. This is exactly the promise that Kotlin Guards fulfill.
If you have not tried Kotlin Guards in projects using Kotlin 2.1.0 or later, consider it a chance to make your code more readable and less prone to errors. You may find that your functions become simpler, making them easier to maintain and review.
Embrace this approach, and let your functions weave a tale of clarity, simplicity, and elegance. Enjoy your journey into cleaner, more expressive when code with Kotlin Guards!