Jetpack Navigation with custom views
Motivation
The Navigation Architecture Component was presented to a community not so long ago. The idea is simple: create an orientated graph, where screens are vertices and transitions are edges. In the nutshell, there is single navigation engine, router you can say. We’ve already seen this in the bunch of libraries, and now it’s time to have it out of the box. Quoting Lyla Fujiwara
… the basic building blocks for navigation are called Destinations. Destinations are specific screens you can go to. There are out-of-the-box support for fragments and activities as destinations, but you can also make your own.
In my practice Activity manages a particular feature, whilst separate screens of the feature are implemented with custom views. So, how could one utilize this new Navigation component with the approach mentioned above? Let’s try to do it in baby steps.
Key concepts
But first few key concepts for the better understanding of what’s going on:
An activity hosts navigation for an app through implementing of a NavHost interface added to your activity’s layout. The NavHost is an empty view whereupon destinations are swapped in and out as a user navigates through your app. Navigating to a destination is done using the NavController class. Navigator defines a mechanism for navigating within an app. NavControllers rely on one or more Navigator objects to perform the navigation operation. To be able to navigate to any other type of destination, one or more additional Navigator objects must be added to the NavController. Check official documentation for more details.
So, two major components should be implemented: NavHost and Navigator. The general idea is: main activity contains container (e.g. FrameLayout), which is NavHost, and we will replace views in that container with Navigator.
High-level overview
Navigation graph is defined with resource file of new type: navigation. It looks like this:
Here custom_view is destination. Name for this xml element is set in the Navigator implementation with special annotation:
@Navigator.Name("custom_view")
class CustomViewNavigator()
Also, you can see custom attribute app:layoutId, that is used to define, what resource should be inflated to be placed into the container. Here is how we define that attribute:
<declare-styleable name="CustomViewNavigator">
    <attr name="layoutId" format="reference"/>
</declare-styleable>
At this moment there is a single destination with id start. Root element navigation had a specific attribute startDestination, which speaks for itself. Note, that this attribute is mandatory if you host included into activity layout xml file. You’ll get IllegalStateException: no start destination defined via app:startDestination for root navigation if you don’t set this attribute.
And this is how main activity layout looks like:
Here NavHostFrame is our container, and it has one more custom attribute navGraph for providing navigation resource file. Actually, I’ve copied it from NavHostFragment:
<declare-styleable name="NavHostFrame">
    <attr format="reference" name="navGraph"/>
</declare-styleable>
Navigator
In purpose of creating new destination type, we should create another implementation of Navigator. Three methods should be overridden: createDestination(), navigate(D destination, Bundle args, NavOptions navOptions), popBackStack().
This is a naive implementation where we simply replace views in the container and keep layouts in a stack for back navigation.
Navigation Host
As said in the documentation, navigation host should care about saving and restoring its navigation controller’s state. Also, one should call Navigation.setViewNavController(View, NavController) on their root view. This should be done to make Navigation.findNavController(View) work. Let’s look at the implementation:
The only abstract method of NavHost is getNavController() and it’s pretty straightforward. onSaveInstanceState and onRestoreInstanceState are obvious choices to handle Navigator's state. I just put View’s and Navigator’s state into a single Bundle.
Things to care about
Note two calls of dispatchOnNavigatorNavigated in CustomViewNavigator. At first, we notify the controller that navigation is performed. The second time we notify the controller that “back” navigation was performed. These two calls are critical in achieving backstack work. Without the first call, the controller won’t know about the possibility of back navigation at all. Without the second call, controller’s listeners won’t be notified about back navigation.
Let’s give a closer look to init section of NavHostFrame:
After main activity inflated, an application should be navigated to the start destination immediately. Thus, navigator and host should be ready to do the job. As said in docs, Navigation flows and destinations are determined by the navigation graph owned by the controller. So, the graph should be assigned to the controller. But controller won’t be able to handle this graph, because it doesn’t know about custom_view destination. Thus, CustomViewNavigator should be provided to the controller before graph.
Puting things together
Let’s add two more destinations to navigation graph, and, finally, here is MainActivity:
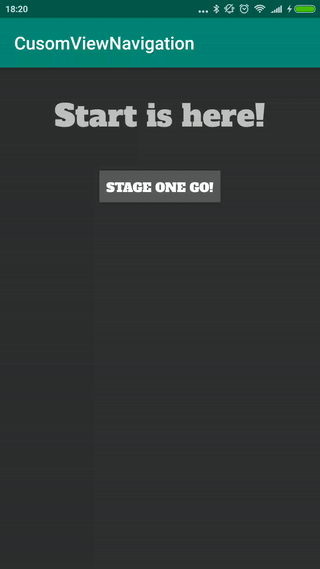
And here is a result:
You could find whole project here: https://github.com/Shakenbeer/CustomViewNavigation
Next steps
Of course, there is a lot of room for improvement. First, CustomViewNavigator should justify its name. Instead of layouts, it would be more convenient to use views themselves. In this manner destinations will look like this:
<custom_view android:name="com.shakenbeer.MyAwesomeView" />Also, quoting the same video from Android Developers
This UI structure allows you to share an activity ViewModel between all of the fragments associated with that activity.
It would be interesting to try this with custom views as well.
And one more improvement to think about is an animated transition between screens. There is out-of-box support for fragments, and transition package is there to help.
Conclusion
Part of the community is not big fans of Fragments :) And we see, that new Navigation library could be used without them. But the main goal of this article is to show, how the library works in the nutshell by implementing your own navigation approach. And, I hope, I reach that goal.
Navigation library still in alpha. Few bugs should be fixed and tools improved. For example, I still can’t see visual representation of my graph. Design tab is “Waiting for build to finish…”. But, in my opinion, eventually we will get a great tool, that allows us to concentrate more on an application itself instead of usual routine.
Photo by Jeremy Bishop on Unsplash