Integrating Native Swift Code in a Kotlin Compose Multiplatform App

Introduction
In Compose Multiplatform, we typically develop our user interface with Jetpack Compose while placing the majority of our code in the commonMain module. Whenever we need platform-specific functionality, we rely on the expect/actual mechanism: the expect declaration in the common module works like an interface, and each platform offers its own actual implementation.
Kotlin Multiplatform already supports interoperability with many Swift APIs by generating bridging code that lets you call iOS frameworks and libraries directly from shared Kotlin code. However, if you come across a library or functionality that isn’t automatically bridged, you’ll need to write your own Swift code and invoke it from Kotlin — effectively creating your own interop layer.
This article explains how to do exactly that: how to write Swift code that isn’t automatically bridged and then call it directly from Kotlin in a Compose Multiplatform project.
Overview
The key approach is to create a Kotlin object that serves as a bridge between your Kotlin code and the native Swift implementation.
On the Kotlin side:
- You’ll define a common interface
- and then expose a set of functions for setting and accessing native implementations.
On the Swift side,
- you’ll implement this interface
- and register it at app startup.
Our Scenario
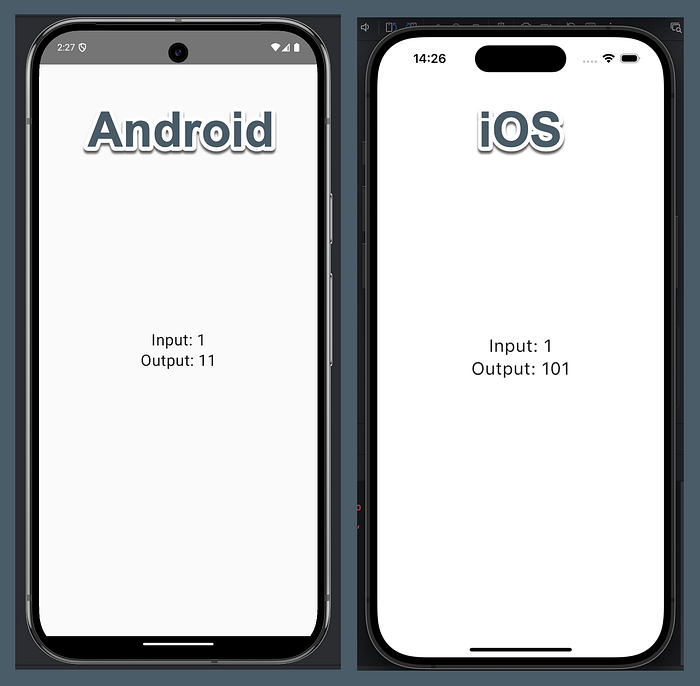
We will define a very simple example using the expect/actual mechanism, where our shared code passes a number to a platform-specific function. On Android, this function will return the input plus 10, while on iOS, it will return the input plus 100.
Starter Code:
commonMain: Here we just define our interface to implement for Android and iOS.
// commonMain/NativeResponse.kt
expect fun getNativeResponse(input: Int): IntandroidMain: On Android implementation we just return input+10
// androidMain/NativeResponse.android.kt
actual fun getNativeResponse(input: Int): Int {
    return input + 10
}iosMain: On iOS implementation we just return input+100
// iosMain/NativeResponse.ios.kt
actual fun getNativeResponse(input: Int): Int {
    return input + 100
}
Our UI will be as simple as that:
@Composable
@Preview
fun App() {
    MaterialTheme {
        Box(
            modifier = Modifier.fillMaxSize(),
            contentAlignment = Alignment.Center
        ) {
            val input by remember { mutableStateOf(1) }

            Text(
                text = "Input: $input\nOutput: ${getNativeResponse(input)}",
                fontSize = 24.sp,
                textAlign = TextAlign.Center,
                lineHeight = 1.3.em
            )
        }
    }
}
Moving Code to Swift — Direct Solution
We’ll migrate the actual iOS functionality from Kotlin to Swift and then call that Swift code from Kotlin to fetch the result (input + 10) from Swift.
1. Modify the iosMain side
Let’s start by modifying our iosMain code first
Before
// iosMain/NativeResponse.ios.kt
actual fun getNativeResponse(input: Int): Int {
    return input + 100
}
After
We declare an interface NatifeResponseFactory which will be utilized at the iOS side.
Then we use the setNativeResponseFactoryfor Swift to be able to talk back to Kotlin.
Finally, our altered actual implementation, will utilize the factory to communicate with Swift.
// iosMain/NativeResponse.ios.kt
interface NativeResponseFactory {
    fun getNativeResponse(input: Int): Int
}

// Add this variable to store the Swift implementation
private var nativeFactory: NativeResponseFactory? = null

// Add this function to be called from Swift
fun setNativeResponseFactory(factory: NativeResponseFactory) {
    nativeFactory = factory
}

actual fun getNativeResponse(input: Int): Int {
// Get the Swift implementation and call it
    return nativeFactory?.getNativeResponse(input)
        ?: throw IllegalStateException("NativeResponseFactory not set")
}
Now at Xcode press [command]+[B] to build the app, so this interface can become available at Swift, as Swift can communicate with compiled code only.
2. Create the Swift “actual” code in Xcode
Open Xcode and go to your iOS project hosted at the iosApp folder and select the iosApp.xcodeproj to open the iOS project.
There, create a new empty Swift file (for example NativeResponse.swift) and add the following code:
import ComposeApp

class IOSNativeResponseFactory: NativeResponseFactory {
    func getNativeResponse(input: Int32) -> Int32 {
        // Native Swift logic; for example, add 100 to the input
        return input + 100
    }
}
Pay attention not to forget to add the
import ComposeApp, otherwise Swift won’t be able to retrieve theNativeResponseFactoryinterface which was declared on iosMain.
3. Modify the “iosApp.swift” file in Xcode
Now it is time to modify our “entry point” of the iOS App so that it is bridged with our
Before
import SwiftUI

@main
struct iOSApp: App {
    var body: some Scene {
        WindowGroup {
            ContentView()
        }
    }
}
After
import SwiftUI
import ComposeApp

@main
struct iOSApp: App {
    init() {
        let nativeResponseFactory = IOSNativeResponseFactory()
        NativeResponse_iosKt.setNativeResponseFactory(factory: nativeResponseFactory)
    }

    var body: some Scene {
        WindowGroup {
            ContentView()
        }
    }
}
Note here that because the
setNativeResponseFactorywas declared insideNativeResponse.ios.ktfile in iosMain, we can reference it asNativeResponse_iosKt.Again, don’t forget to
import ComposeAppin order for Swift to be able to utilize Kotlin code and get access toNativeResponse_iosKt
But now due to our
initstatement, Kotlin can now utilize Swift!
Conclusion
By creating a native Swift implementation and bridging it to Kotlin via the setNativeResponseFactory mechanism, you can easily call platform-specific code that isn’t automatically bridged by Kotlin Multiplatform.
This approach empowers you to mix platform-native features with your shared Kotlin business logic, giving you full flexibility across both Android and iOS.
Enjoyed the article?
SUBSCRIBE and CLAP on Medium
Ioannis Anifantakis
anifantakis.eu | LinkedIn | YouTube | X.com | Medium