Implementing your first Android lint rule

By the end of this article you should be able to write your first Android lint rule. But first …
What is lint?
Lint is a static analyser, which has the goal of finding bugs on our source code without the need of compiling or running it.
And even if you are not totally sure what I am talking about, you have definitely seen it in action during your Android development work. Are this type of messages familiar to you?


If so, you saw Lint in Action!
We can then understand the power of these rules, and how they can help developers to quickly identify and fix bugs in a systematic way.
However, the default set of lint rules is limited and in some situations we could benefit from creating custom rules that identify issues that are specific to our projects. We will now go over the process of creating and integrating a Lint rule.
Creating your rules module
We start off by defining a separate Java/Kotlin module where our rules will be declared. This module is the rules module. We then go to the rules/build.gradle and add the following dependencies:
dependencies {
 compileOnly "com.android.tools.lint:lint-api:lint-version"
 compileOnly "com.android.tools.lint:lint-checks:lint-version"
}Important: For historical reasons, your lint version should correspond to the Android Gradle Plugin version + 23. This is, if your AGP is 3.5.1, then your lint version should be 26.5.1
In order to integrate our custom rules with the app module, we then add the following to our app/build.gradle:
dependencies {
       ...
       lintChecks project(path: ':rules')
}
This way, the lint rules existing in the rules module will be compiled into the final lint.jar that your app uses.
Issues and Detectors
After the initial setup, we can now look into how to actually write custom Lint rules. For that we need to understand two fundamental concepts: Issues and Detectors.
What is an Issue?
As per the documentation, an Issue is a potential bug in an Android application. It is the way you declare the bug your rule should tackle.
An issue has the following base structure:
id— in order to identify uniquely this issuebriefDescription— summarised description of the issueexplanation— should be a more in-depth description of the issue and ideally on how it should be solvedcategory— identifies the type of the issue. There are a lot of possible categories such asCORRECTNESS,USABILITY,I18N,COMPLIANCE,PERFORMANCE, ...priority— a number between 1 and 10, where the bigger the number the more serious the issue isseverity— it can be one of the following values:FATAL,ERROR,WARNING,INFORMATIONALandIGNORE. Note: If the severity is eitherFATALorERRORthen runninglintwill fail and you will have to address the issue.implementation— the class responsible for analysing files and detecting the issue
What is a Detector?
A Detector is a class that is able to find one/more specific issues. Depending on the Issue, we can use different types of Detector in order to provide better interfaces to different file types:
SourceCodeScanner- a detector specialised in Java/Kotlin source filesXmlScanner- a detector specialised in XML filesGradleScanner- a detector specialised in Gradle filesResourceFolderScanner- a detector specialised in resource folders (not the files that it contains)
Putting it into practice!
Our first example will be a really simple one. The goal is to create a rule that detects usages of android.util.Log and replace them by the “amazing” logger com.fabiocarballo.lint.AmazingLog .
For that let’s first define the AndroidLogDetector :
Regarding the class signature:
- It extends
Detectorso that it can be used by Android Lint to detect an issue - It extends
SourceCodeScannersince we need to inspect both Kotlin and Java files.
Regarding the body of the class:
getApplicableMethodNames- filters only the method signatures that exist inandroid.util.LogvisitMethodCall- uses theevaluatorto guarantee that the method is being called by theandroid.util.Logand not by any other class. For example, theAmazingLoghas the exact same methods and shouldn't be flagged.reportUsage- used to report an issue when found.
With the detector defined we are just left to define the Issue . We will do that inside a companion object in the AndroidLogDetector .
Issue Registry
Since we have created our first Issue and corresponding Detector, then we have to make it visible to the Android Lint engine. The way we do it is via a IssueRegistry, which has the sole responsibility of defining the issues and their detectors.
However, in order to Android Lint to discover our IssueRegistry we have to declare a Service Locator. This Service Locator is defined in a specific location in our resources folder. To define it, we create this file entry:
rules/src/main/resources/META-INF/services/com/android/tools/lint/client/api/IssueRegistry
com.fabiocarballo.rules.IssueRegistryRunning the rules
Finally, all the boxes needed to run our lint rule are checked:
- [x] Issue and Detector (
AndroidLogDetectorandAndroidLogDetector.ISSUE) - [x] Issue registry declares the issues
- [x] Service locator is pointing to our
IssueRegistryimplementation - [x]
appconsumes the lint rules inrulesthroughlintCheck
We can now detect errors such as this one:
As we can see, this class is using the forbidden android.util.Log . Now, we just need to run: ./gradlew app:lintDebug
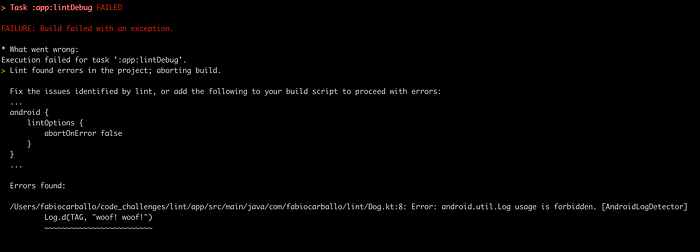
You can see which is the issue found and its description. You also have the option to check in more detail either in the generated XML/html report.
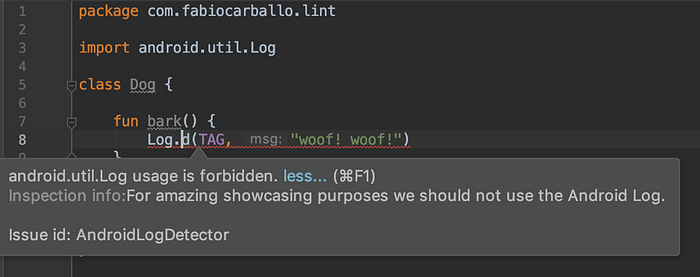
Moreover, this issue is also visible in Android Studio as shown below:
P.s: You can access the sample code at this repository.
What’s next
In the following posts I will go over more topics:
- How to create automatic correction suggestions (as seen in the IDE)
Resources
These are useful resources I have found during my Lint learnings:
Documentation:
Talks:
- Getting the Most Out of Android Lint (Android Dev Summit’ 18)
- Coding in Style: Static Analysis with Custom Lint Rules (Android Dev Summit ’19)
Repositories: