How to Use Shaders for Android View and How Android View May Use Shaders

It’s not enough to use only Canvas to work with dynamic UI elements that use shadows, real-time filters for photo or video, or responsive UI or lighting. It would be best if you had something more powerful. In the past, we were able to use RenderScript for this, but is it supported anymore?
I suggest using OpenGL for your custom view, which is an inheritor of the Android View class (android.view.View) with regular GLSL shaders if you are working on one of the following:
- Shaders or real-time color corrections for video streams.
- Dynamic shadows and lighting for custom UI elements.
- Advanced per-pixel animations.
- Some UI effects, such as blurring, distortion, pixelization, etc.
- If you are creating a brand new, neuromorphic, responsive UI.
It will provide a robust environment and many examples of shaders that you can easily use for your application. And I will show you how to do it easily!
Idea
We need to have a class that behaves the same as Android View (android.view.View) lying in our standard layout, and we can use the OpenGL fragment shader to render its content.
Demo

How it Works in Abstract
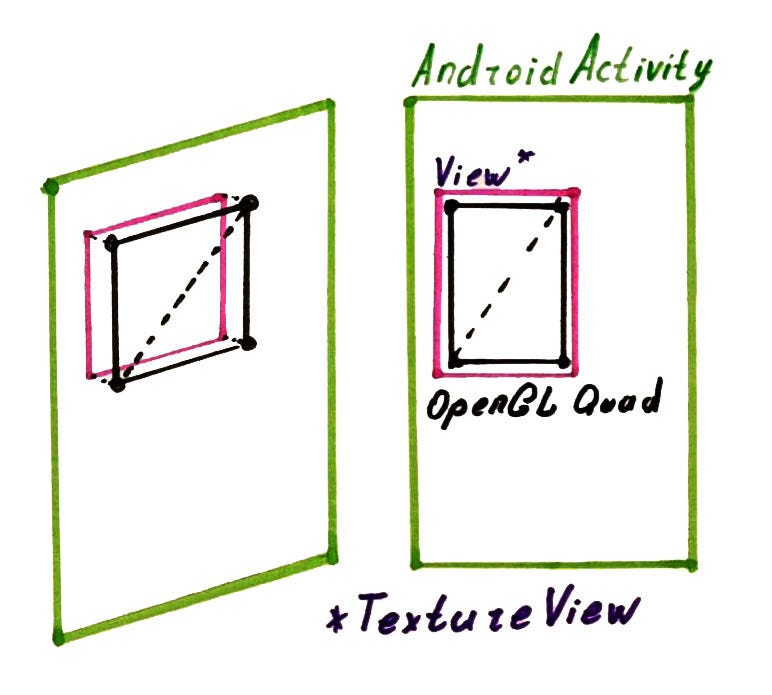
Suppose we want to order a new picture painted with some magic paints from one famous artist and hang it on the wall. What we have in our situation:
- Magic paints — OpenGL GLSL shaders.
- Canvas — a quadrangle that will fill in all space of our custom view.
- Famous artist — a class that implements Render interface. This artist, in turn, uses magic paints to draw the picture on the canvas.
- Picture — custom view class that uses artist with his/her canvas and magic paints.
- Wall — android Activity or Fragment.
How it Works on the Technical Side
- Let’s choose a parent view for our custom view class (BTW, let’s call our view class ShaderView). We have two options: SurfaceView and TextureView. I will describe the difference in a moment.
- Create a Render class that will render the view using shaders.
- Create a 3D model of a quadrangle that will fill in all the view space (3D, as far as OpenGL was made for 3D scenes). Don’t worry about this point; it’s a standard solution, and it’s easy to do.
SurfaceView or TextureView
SurfaceView and TextureView are both inherited from the Android View class, but there are some differences between them.
To that point, SurfaceView has an inherited class that works perfectly with OpenGL and provides excellent performance. This class is called GLSurfaceView. But the main issue of this class is that we cannot overlay one GLSurfaceView with another. Hence, we cannot use it in our layout hierarchy, and we are not able to transform, animate, or scale a view like this
TextureView behaves as a regular android.view.View, and you can animate, transform, scale or even overlay one with another. But this advantage consumes more memory than SurfaceView, and you lose performance (avg. 1–3 frames).
Coming back to the point, as we wanted that our custom view acts as a regular Android View, we should use TextureView.
The next challenge for us is that there is no built-in class that uses OpenGL render and TextureView. But hold on — GLSurfaceView works exactly for what we need but with SurfaceView, so let’s think about how we can use this class for our brand new GLTextureView.
Create GLTextureView
Okay, GLSurfaceView has almost everything that we need for OpenGL rendering. What we need is to copy this useful code to our class and do some modifications.
- Create a new class GLTextureView.kt which is inherited from TextureView and extends TextureView.SurfaceTextureListener and View.OnLayoutChangeListener. Add constructors.
2. Copy-paste code from GLSurfaceView to our GLTextureView class.
3. Remove old Java-style constructors and init() method.
4. Add a new init {} block.
5. Update finalize() method to the Kotlin way :) (If you’ve got a better solution, let me know in the comments!).
6. Replace SurfaceHolder with SurfaceTexture.
7. Replace all mentions of GLSurfaceView with GLTextureView.
8. Update imports avoiding using GLSurfaceView. Also, check existing imports and delete everything related to GLSurfaceView.
9. Fix nullability issues after auto-conversion of Java code to Kotlin. In my case, I had to updates override methods and some nullable parameters (e.g., `egl: EGL10` should be `egl: EGL10?`).
10. Move constants to companion object or to the top level.
11. Remove unsupported annotations.
12. Add methods of SurfaceTextureListener interface.
13. In createSurface() method you may find a broken line, replace view.holder by view.surfaceTexture.
14. Override onLayoutChange.
As a result, you will have something like this.
Extensions
To make the work easier on ourselves, we will create extensions that load the shader’s source code from the RAW resources directory.
Code of Shaders
In this article, we will use simple shaders to make our code less complicated. If you’re looking for more complex shaders, you may them find here or here.
Vertex Shader
For our purposes, we need just a simple vertex shader to render our quad (don’t spend a lot of time on its code).
Fragment Shader
The code is quite simple, but let’s see what we have here.
First of all, we define the version of GLSL.
#version 300 esThen, define the custom parameters that we’re going to send to the shader.
uniform vec4 uMyUniform;Define input and outputs parameters for our fragment shader. Input — what we receive from Vertex Shader (texture coordinates, in our case) and Output — what we send as a result (color of a pixel).
in vec2 textureCoord;out vec4 fragColor;
And write the function that will be executed for each pixel of our Android View and return its color.
void main() { fragColor = vec4(textureCoord.x, textureCoord.y, 1.0, 1.0) * uMyUniform;}
As a result, we will have this:
QuadRender
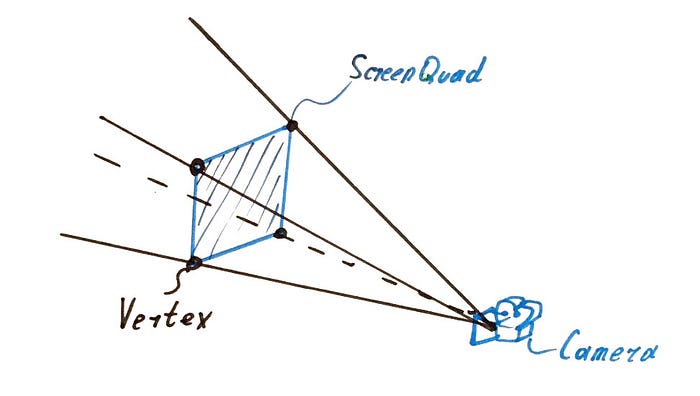
The next class that we’re going to need is a rendering class. This class will draw a quadrangle with the size of the ShaderView using shaders.
Our class should extend GLTextureView.Renderer interface with three methods:
onSurfaceCreated() — Create shader program, bind some uniform params, and send attributes to the vertex shader.
onDrawFrame() — Each frame update. In this method, we draw the screen quad and update uniform params if needed.
onSurfaceChanged() — Update the viewport.
So, let’s write the code step by step. I won’t go into detail describing how OpenGL works in detail because it’s out of the scope of this article. I also want to mention that we are focusing only on the fragment shader and are not concerned with the vertex shader’s details, as it should be the same for almost any possible fragment shader requirements.
Define constants.
Two variables which will keep the source code of our vertex and fragment shaders.
Define the list of vertices for the vertex buffer.
Define matrices.
And add initialization to init {} block.
Vertex shader, vertices attributes, and matrixes locations.
Locator of shader program.
Okay, we’re done with initialization, so let’s write the onSurfaceCreated() method. We will load and initialize our shaders and get locators for attributes, including the uMyUniform uniform parameter that we will use to send some custom vector data to the fragment shader.
Please pay attention to the last three lines where we get our custom uniform’s location (uMyUniform) for the fragment shader. For more complex shaders, we will have to add more such parameters.
In onSurfaceCreated() we’ve used some methods to create and link the program.
The next method that we should make is onDrawFrame().
Please pay attention to the lines where we send a custom value (uMyUniformValue) to uniform (uMyUniform) to the fragment shader.
And the last one, surfaceChange() is quite a simple method.
The full code of this class you may find here.
ShaderView
Great, everything that we need for our Shader View is ready. Now we can use the power of a fragment shader to render its content! Let’s create a ShaderView.
Advanced: Using Textures in Fragment Shaders
It’s nice that we’ve learned how to communicate and work with fragment shaders, but in many cases, you have to deal with textures (e.g. for effects like blurring or video effects).
In the fragment shader, you should define the uniform as sampler2D type and get the current pixel of texture by the texture coordinates using the texture() method from GLSL.
Here is a complete code of the shader.
Then, we will need two extensions to load and use bitmap as OpenGL textures.
Now we’re ready to load a texture from the drawable resource directory as a bitmap using loadBitmapForTexture() and then in the QuadRender.onSurfaceCreated() method. We will bind the texture to the OpenGL texture slot (slots from GL_TEXTURE0 to GL_TEXTURE31 are available).
Don’t forget to recycle the bitmap when you don’t need it anymore.
After this, we set this texture as active and visible for the fragment shader in QuadRender.onDrawFrame().
For the full code of the example of how to use a texture, you will find it in this branch.
Examples and references
For the source code of this article, you will find it in my repository.
Or you can explore the ShaderView library with a friendly, high-level API here.