
How to optimize memory consumption when using Glide
For developers of the apps which a lot of images, the one thing is certain besides death and taxes: OutOfMemory errors (OOM). Facing these errors is definitely not an easy task since the place shown in a stack trace is very rarely a source of the problem. Usually, OOM errors are a result of multiple decisions that are not optimal and quickly add up and excessively increase the memory footprint of the app.
In this article, I want to describe a few interesting facts that I found when looking for reasons for OOM errors. I hope that some of them will help you decrease the memory consumption of your app and deal with those awful errors. I focus mainly on Glide, but some of the tips may be relevant even if you use other image loading libraries.
A (very) short explanation on how glide manages memory
In most cases, when you use Glide to load images you don’t have to worry about releasing memory — Glide does that for you. Each bitmap is released when the activity or the fragment passed to theGlide.with is destroyed. That’s also the time when Glide clears all pending requests, so it should be obvious that’s good to use the closest possible context or fragment.
OOM in a deep activity stack 📱➝📱➝📱➝☠️
The fact that Glide releases bitmaps when the activity or fragment is destroyed have a very interesting consequence that may cause problems in your app.
Let’s say, you have an app with many activities, each containing big images. When the user interacts with the first activity and starts the second activity, the first one goes into the stopped state. Then, the user interacts with the second activity and another activity opens. And then another, and another… Meanwhile, what’s happening in device memory?
Since none of the activities was destroyed — Glide holds each loaded bitmap from all stopped activities in memory. It’s, of course, for a good reason: doing so allows the user to see all images instantly after coming back to the activity. Also, should Glide remove bitmaps from memory when activity is stopped instead of destroyed, all images that were scheduled to load before activity started would not be visible when the user returns to the activity.

What can be done about it?
The most obvious solution may be to avoid deep activity stacks altogether but, unfortunately, it is not always possible. To minimize the impact of this issue you can manually cancel all pending loads and free all resources that were loaded for the view by calling:
Glide.with(context).clear(view)
You may, for example, call this method when the activity was stopped. However, you have to remember that if the image was loaded after activity was created but before it was started when the user comes back to this activity, your image will no longer be present in the view — it has to be reloaded. Reload may cause some flickering, since the image may not be available right away if it was already removed from the memory cache.

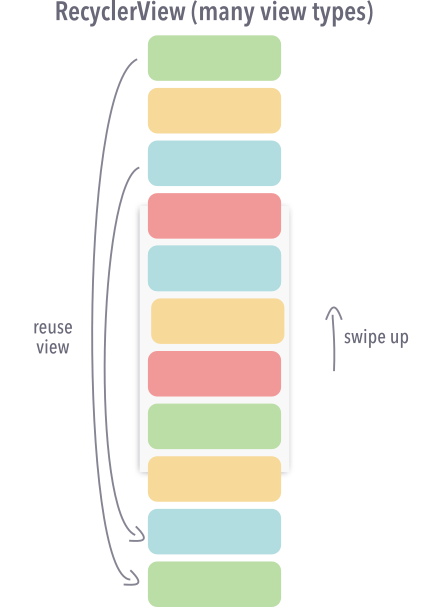
RecyclerView with many ViewTypes
Another problem that may lead to increased memory consumption is the consequence of how the RecyclerView works.
When RecyclerView is being scrolled, views that were created at the top and are now off-screen are being recycled. All recycled views are moved to the special RecyclerViewPool associated with a given view type to be reused for rendering the next item of that type.

If you use RecyclerView with a lot of view types, a separate pool is created for each view type. If all items contain some heavy bitmaps that may very quickly add up.
How to fight it? 🥊🥊
If your list consists of items with many different view types, it may be a good idea to call Glide.with(context).clear(imageView) in onViewRecycled method of the RecyclerView.Adapter to manually free all resources loaded for that view. However, keep in mind that if an item size depends on the image size it may make the experience of scrolling back up worse (since the images will be reloaded and the item will resize).
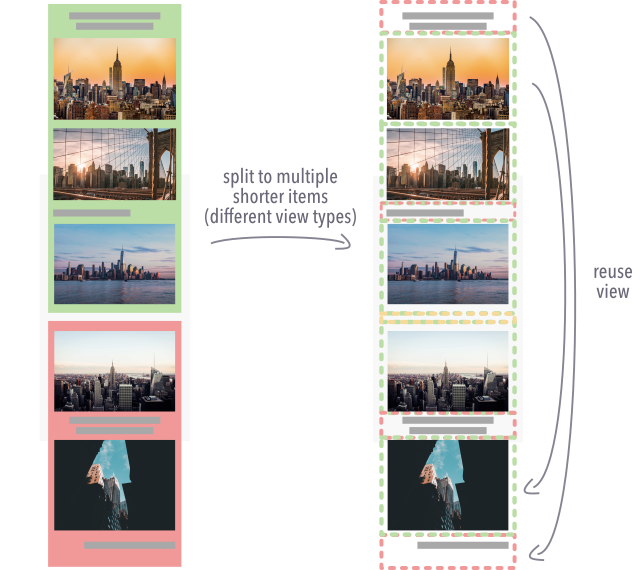
Very long items in RecyclerView
It’s also not safe to create a list with very long items which consist of multiple images. Even if an item is not fully visible on the screen, all images are kept in memory and will not be released until the view is reused to bind the next item of that type.
Calling clear method in onViewRecycled may not be enough to get rid of that problem since the item will be recycled only after it fully disappeared from the screen.
A good idea may be to split very large items into smaller ones. For example, if you have an item consisting of multiple images and some other elements, you can split it to multiple smaller items of a different type that can be reused.
Choose the right quality 🎨
By default, Glide v3 uses RGB_565 Bitmap format. It requires only two bytes per pixel, half the memory footprint of the default ARGB_8888 format. That changed in version v4 which uses ARGB_8888 format by default.

In both versions of Glide, decode format can be changed per request or globally in GlideModule.
Of course, using lower bitmap quality comes with a price and it’s up to you to decide if it makes sense in your case. You can also use different decode formats depending on the total available memory of the device or just the SDK version.
Drawbacks of using RGB_565 instead of ARGB_8888
1 RGB_565 does not support transparency. However, you can always use higher quality for the images that you know may be transparent and lower quality for the rest to save some memory.
2 RGB_565 can have some issues with banding. In most images it’s not visible but if the image contains gradient you can sometimes spot abrupt changes between shades of the same colour.
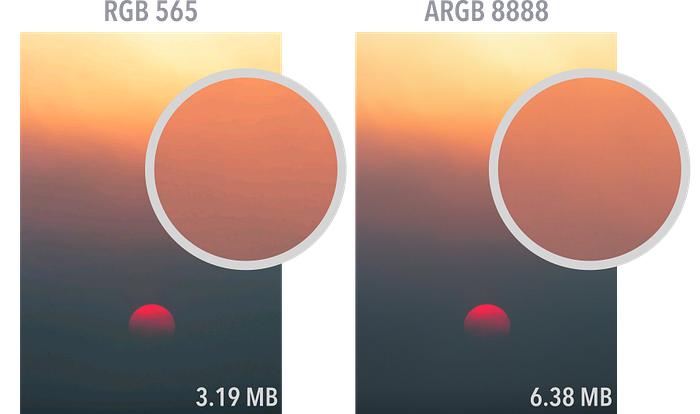
3 In Glide v3 white images in RGB_565 quality may appear yellowish instead of white. This problem doesn’t appear in Glide v4, so it may be some argument to upgrade 😉. It also doesn’t occur right away, but only after the image is loaded from a disk cache and the cache strategy is set to DiskCacheStrategy.RESULT (which is a default setting in Glide v3).

Size matters
The size of the loaded bitmap is of course not only determined by its quality but also the size. Before displaying an image in the ImageView, Glide resizes it so it fits the target dimensions to achieve the optimal memory footprint. However, there are some things worth knowing about how Glide works not to load big bitmaps into memory unnecessarily.
ImageView size
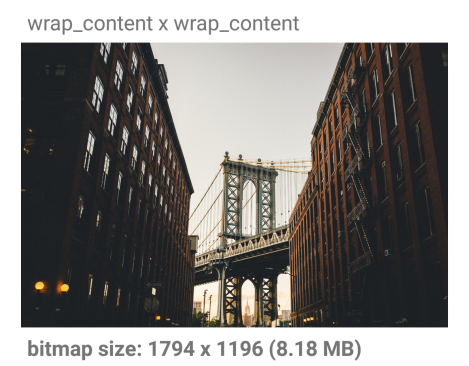
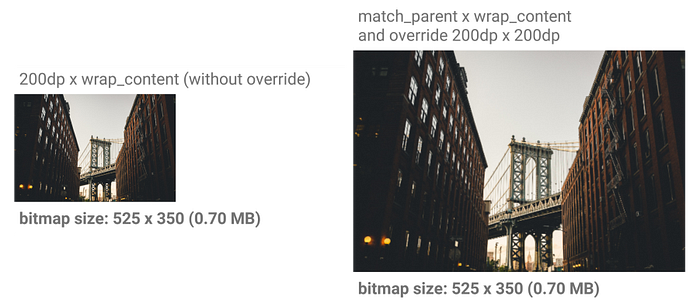
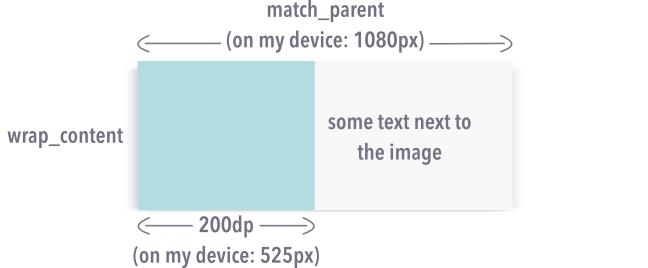
Let’s put this straight: loading an image into an ImageView with both dimensions set to wrap_content without specifying image size is definitely not a good idea. In this case, the size of the loaded bitmap would depend on the screen size of the device.
For example, if my device has a screen size of 1080x1794 and I want to load 2000x1000 image into it, the loaded bitmap would have the size 1794 x 1196 (all dimensions if not specified otherwise are in pixels). Such a big bitmap in ARGB_8888 quality weights 8.18 MB!
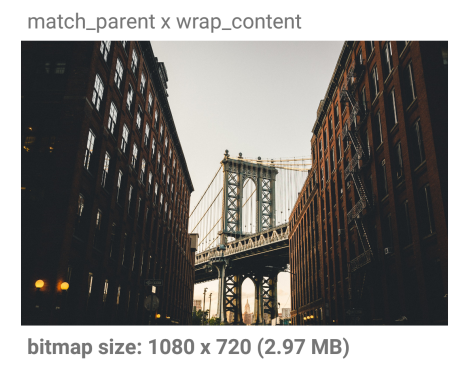
However, if at least one dimension is known — Glide will resize the image accordingly. For example, the same image loaded into the ImageView with width set to match_parent will have dimensions 1080 x 540 (width of the parent is 1080px). In ARBG_8888 quality it weights only 2.97 MB, almost three times less!
Of course, you can also specify the size of the bitmap that you want to load as smaller than the size of the container. That way the bitmaps may weight even less but if you’re not careful, one may spot quality decrease.
Loading images with the unknown size
In some cases, the size of the loaded image may not be known beforehand. If a loaded image happens to be smaller than the ImageView, Glide will unnecessarily expand original bitmap to match the size of the target view.

One way to prevent it is to set scaleType=”centerInside” in the ImageView. That way loaded image won’t expand beyond the original size. You can also achieve the same effect by specifying RequestOptions.
Note that in both cases (with and without centerInside) the image stretches to match container size so the displayed image will look exactly the same.

CustomViewTarget
CustomViewTarget is usually used to load images into custom views that contain some ImageView.
It’s worth remembering that the size of a generated bitmap depends on the size of the customView that was passed in the CustomViewTarget constructor.
So if the custom view has the following layout:
the width of the loaded bitmap would be 1080 px even if the width of ImageView was much smaller.

To resolve that problem you can specify desired image size by calling override to request the image with specified size:
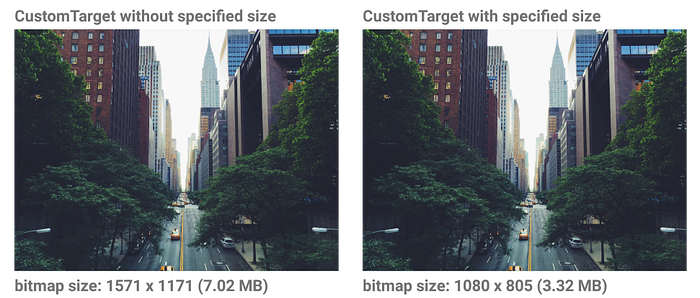
CustomTarget
Last but not least: when loading images into the CustomTarget (SimpleTarget in Glide v3) remember to pass the size to the constructor or call override to specify the desired bitmap dimensions. If you don’t, the original image size will be used.
But what if you only know one dimension of the target container and don’t know the aspect ratio of the image? Are you forced to use original image size? It turns out there may be a way to work around this.
Let’s say that you know that your container has a width of 1080 px and you want the image to match this container. In this case, if you instantiate CustomTarget with the desired width (1080px) and height set to 1, Glide will create the Bitmap with the width equal to 1080 and height that depends on image aspect ratio. Glide always creates a bitmap that has all dimensions bigger or equal to specified. This rule also applies for override(width, height) method of the RequestManager.

Glide is a great library that makes loading images dead easy. However, sometimes it’s good to know how it works under the hood to use it in the most memory efficient way. I hope that the facts I described in this article will help you to decrease memory footprint of your app and to avoid some of the evil OOM errors 😉.
As always, if you enjoyed this article remember to 👏👏 and if you have any questions or suggestions, please let me know!
