Fully cross-platform Kotlin applications (almost)
In my last article “Decompose — experiments with Kotlin Multiplatform lifecycle-aware components and navigation”, I mentioned two cases when we can’t share code using Kotlin Multiplatform. The first one was navigation and the second one was UI. In that article we managed to share the navigation logic using the Decompose library. But UI was still platform specific.
Good news! Recently JetBrains released its multiplatform implementation of Jetpack Compose, and it is now possible to have a shared UI. Basically, the multiplatform Compose can now be used on both Android and JVM. And the latter works on Linux, macOS and Windows.
Since both navigation and UI can now be shared, we can create almost cross-platform applications. Why almost? Because some parts may still require platform-specific API. And this is actually a big benefit, you choose what to share.
(De)Compose
How can we use both libraries so that we have a completely shared code, including navigation and UI? Let’s create a very simple Todo list application. There will be just two screens: List and Details.
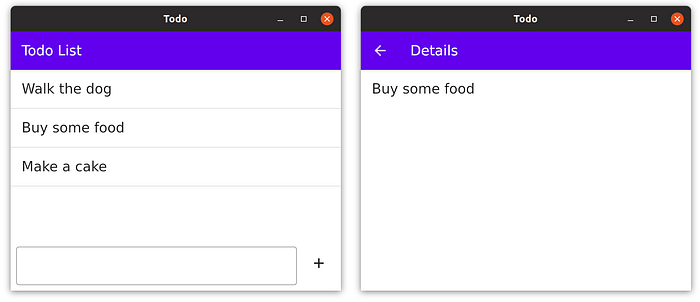
If you’ve read the introductory article on Decompose, you probably know its concept of components. If not, I recommend that you read it first. In this example every screen will be a component. And there will be a Root component for navigation between screens.
The List screen
Let’s start with the List screen. We can first make the UI, and then integrate it into the component with business logic. Thanks to JetBrains Compose we can put all this code in the commonMain source set, which means it is multiplatform!
The bottom input field with the “plus” button can be implemented like this:
Here is the list item:
Now it’s time for TodoList component:
We created a class and used DI to provide all required dependencies.
The Model data class contains all the data required for the screen. The state is managed by Compose MutableState, which is created using the mutableListOf function. You can learn more about Compose state in the codelab. The state is exposed as Compose State, so our UI can listen for its changes.
And finally the whole List screen UI:
It accepts the TodoList component, listens for Model changes and renders the UI. It also triggers various callbacks when UI events occur, such as onTextChanged , onAddClicked , etc.
The Details screen
This will be a very simple screen. No mutable state is required, just display the data. And as before, we will pass all dependencies and data via constructor.
The Root component
Now we have components for both screens: TodoList and TodoDetails. Time to add navigation! TodoRoot will integrate both children and navigate between them. The key point here is that child components don’t known anything about parent’s navigation logic. So they can be put into separate Gradle modules and reused in different scenarios.
Decompose provides Child Stack, which makes navigation a very simple task. Each child component is created using Parcelable configuration. In this case we defined the Config sealed class with just two entries: List and Details. The Parcelize extension comes to the rescue in implementing Parcelable interface.
Such an approach brings two benefits:
- It allows the navigation stack to be preserved in Android when Activity or process is recreated.
- It enables proper DI and IoC when instantiating child components (unlike the AndroidX FragmentFactory).
The TodoRoot component exposes its Child Stack state via val stackproperty. So as always its UI can listen for changes and render a currently active child.
Children are rendered using the Children function, also provided by Decompose. It listens for back stack changes and takes care of UI state preservation. It also provides the ability to spcifiy various animations.
Now we have everything ready, it’s time to integrate the TodoRoot component into both Android and Desktop applications. So far, all our code has been fully multiplatform. The following integration parts will be the only platform-specific code. We will use some handy extensions from Decompose to make the integration easier.
Android application
Desktop application
Preserving the list state
Currently if we rotate the list screen on Android, all data will be lost. Let’s fix this and preserve the state. We’ll use the StateKeeper from Decompose.
So if there is a saved state, it is used as the initial state. Otherwise an empty state is created.
In addition, the List screen state is now fully preserved (including scrolling position) even if the Details screen is rotated.

Advanced example
If you are interested in a more advanced example, checkout the Todo example in the JetBrains Compose repository.
Its highlights:
- Most of the code is shared: data, business logic, presentation, navigation and UI
- View state is preserved when navigating between screens, Android configuration change, etc.
- Dependency injection
- Model-View-Intent (aka MVI) architectural pattern
- Persistent storage using SQLDelight
- Multi-module tree structure
- Unit and integration tests
Conclusion
When used together, Decompose and JetBrains Compose libraries allow us to share most of the code, including navigation and UI. Currently JetBrains Compose supports only Android and Desktop JVM. But there is no doubt, more platforms will be supported in future. Each such addition will add more power to the stack.
Decompose is a multiplatform library. At the moment the following targets are supported: Android, JVM, iOS and JavaScript. So we can share Compose UI between Android and Desktop targets (Compose for iOS is also supported experimentally), and plug in platform-specific UI (like SwiftUI or React) for other targets.
Decompose takes care of navigation and state preservation. This improves the UX when moving between screens. It also enables proper DI and IoC via constructor.
Thank you for reading the article, and don’t forget to follow me on Twitter!


