From Dagger components to manual dependency injection
Dagger is a great framework that has changed the way we have written Android apps in the latest years. Using Dagger we don’t need to write the boilerplate code needed to manage our objects, the framework creates and connects them based on some annotations. Since Dagger was built with Java in mind, it can reduce the boilerplate by a significant amount, but is it still the case with Kotlin? Can we replace Dagger (or at least a subset of the features) with some manual written classes?
A classical Dagger example
Dagger contains a lot of features, and it can be used in countless ways. Usually, in an Android project, it can be used in three ways to organize the classes:
- component dependencies
- subcomponents
- Dagger Android
Leveraging the component dependencies it’s easy to achieve a good organization especially in multi-module projects (more info on this post written by Ben Weiss and on this other one written by Marcos Holgado).
Right below, we can see an overview of how a simple project (here the GitHub repository) could be organized using this technique:

Starting from the bottom, a CoreComponent exposes two objects (app and prefs) that will be used by the other components:
Another component MyFeatureComponent depends on CoreComponent and exposes the prefs and a repo object (they will be used in the activity component we’ll see later):
CityRepo is an interface that contains a single method, the concrete implementation CityRepoImpl is managed by Dagger thanks to the Inject annotated constructor:
In this way Dagger knows how to create an instance of CityRepoImpl but doesn’t know that it can be used as a CityRepo too. The implementation can be connected to the interface using a Binds annotated abstract method in a module:
The CityRepo is used by a MyViewModel object, as in the previous example Dagger can manage it thanks to the Inject annotated constructor:
Then MyDaggerActivity is injected using MyActivityComponent that uses MyFeatureComponent:
The viewModel is managed using a delegate that creates it, only when needed, using a Provider injected by Dagger. In this way a compilation error is raised in case there is something wrong in the Dagger configuration of the ViewModel. The source code of the delegate is available here, something similar can be created for fragments as well.
All the Dagger magic is used to manage the Inject annotation, it can be used to:
- create new objects using the annotated constructor
- populate the annotated fields in an object using a component
Let’s remove the magic :(
The first step to convert Dagger code into manual dependency injection is to remove the magic. First of all we can remove the Inject and MyFeatureScope annotations on CityRepoImpl class:
But now Dagger doesn’t know anymore how to create it. To fix it the abstract Bind annotated method in MyFeatureModule can be transformed into a concrete Provides annotated method that instantiates the object:
Then we can do something similar for the ViewModel, remove the Inject annotation in the constructor:
And it can be created in a new module and exposed in the MyActivityComponent (the inject method in the component can be removed):
We have introduced some extra code, not too much in this example but it can be more if an object needs multiple dependencies. Each dependency is defined in the constructor and in the Provides annotated method, both must be kept in sync in case we need to add or modify a dependency.
Finally in the Activity the viewModel and prefs properties can be retrieved manually from the component instead of using the Inject annotation:
Here there is some extra code but the properties don’t need to be defined as lateinit and can be defined as private val.
The example on GitHub contains the different versions on multiple branches, comparing them we can see all the differences. For example all the modifications described in this paragraph are available here.
Manual dependency injection FTW
The final step is to remove Dagger and write a manual implementation of the Components. Let’s start from the CoreComponent, it exposes two objects:
A manual implementation can be created easily (using a lazy delegate we are sure that there is a single instance and that it's created only if needed):
Some code, like the SharedPreferences creation previously in the Dagger module, is now in the component implementation.
It’s important to note that using Dagger the dependent “components” are just interfaces, they don’t need to be real Dagger components. For this reason, we can use Dagger to manage a component and a manual implementation in another. For example MyFeatureComponent can use the implementation of CoreComponent seen in the latest example.
MyFeatureComponentImpl can be created using CoreComponent as constructor parameter (the same component that was declared as a dependent component in the initial Dagger version):
The repository is created using the app provided by the coreComponent as parameter, here it’s retrieved directly without using the coreComponent property. This works thanks to the class delegation, MyFeatureComponentImpl implements CoreComponent delegating all the methods/properties to the coreComponent object defined in the constructor. This is also the reason why MyFeatureComponentImpl doesn’t define the prefs property defined in the interface. Class delegates can be used to simplify the code but the example can be implemented even without using it, there is some extra code to write but it’s easier to see where each dependency is created.
The last component to implement is MyActivityComponentImpl, it uses a standard field (not a lazy delegate) to define the ViewModel because the lifecycle is managed by the Android framework:
And that’s all! Here there are all the modifications done in this paragraph.
Configuration errors
When there is something wrong in the dependencies configuration it’s important to get a clear error that allows finding the cause of the problem easily.
Let’s try to simulate an error in the Dagger version commenting the repo property in the MyFeatureComponent:
Building the project we get this error:
MyActivityComponent.java:8: error: [Dagger/MissingBinding] CityRepo cannot be provided without an @Provides-annotated method.
public abstract interface MyActivityComponent {
 ^
CityRepo is injected at
MyViewModel(repo)
 Provider<MyViewModel> is injected at
 MyActivity.viewModelProvider
 MyActivity is injected at
 MyActivityComponent.inject(MyActivity)
The usual reaction to an error like this is something like “WTF! Dagger, you are wrong! The constructor is annotated and there is a Bind annotated method in the module!” The problem is that CityRepo is exposed by CoreComponent but MyActivityComponent can use only the objects exposed by MyFeatureComponent.
Let’s make the same modification in the manual dependency injection example, we get immediate feedback in the IDE (even without building the project) with a standard Kotlin error:
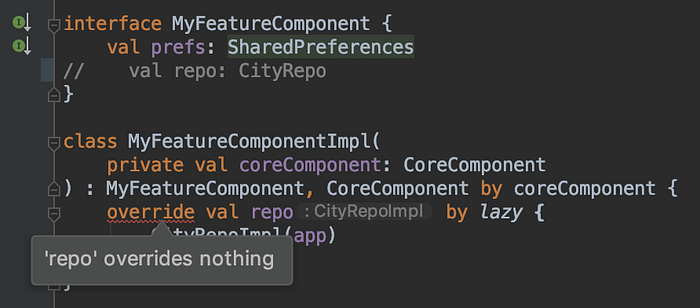
Another standard Kotlin error is in MyActivityComponentImpl class:

Testing
One of the most important reasons why it’s important to use dependency injection in a project is code testability. For example, using Dagger, collaborators can be replaced with mocks/stubs in two ways:
- classes created by Dagger defines a constructor with all the dependencies, it’s easy to test them just using the normal constructor passing mocks/stubs instead of real collaborators;
- other classes (for example activities and fragments) can be tested replacing some objects in the Dagger graph. It can be done in various way, the Dagger documentation suggests to replace some components with test versions that provide stubs instead of the real objects. Other unofficial solutions are available to try to simplify testing. For example DaggerMock (a library I worked on some years ago) reduces the boilerplate code in testing but it works only if the code under test uses a subset of all the Dagger features.
Comparing the manual dependency injection and the Dagger branches on the GitHub project (here the differences) we can notice that there are no differences in the tests code. The reason for the JVM tests is easy to spot: Dagger is usually not used in JVM tests, the real objects are replaced by mocks/stubs passing them to the constructor. In an Espresso test (here an example) a Dagger component is replaced with a fake one that provides mocks/stubs. However the concept we are leveraging to make the code testable is the component itself and not the fact that the component is created by Dagger, so the same test strategy works even using manually created component subclasses.
Using manual dependency injection everything is in the component implementation, for this reason an object can be replaced easily using a Mockito spy. Let’s see an example with a Dagger component that exposes two objects:
The String is calculated based on the Int. Now let’s say that we want to replace the way we provide the Int. An idea can be to create a spy based on the original component and define a new returned value using Mockito:
This test fails! The reason is that MyComponent uses the MyModule method to obtain the Int, so the method in MyComponent (that is replaced in the test) is not used.
Let’s try to use manual dependency injection to implement MyComponent:
Then a similar test can be written:
This test works! The reason is that the MyComponentImpl string property uses the int property (replaced in the test using Mockito).
This concept can be used to simplify the test strategy, however in case a component is used in many tests probably it’s better to write a fake version and reuse it. Creating a spy can be useful in case of an object used just in one test, the final code simple will be probably simpler.
Wrapping up: is it worth it?
The complete example analyzed in this post is available in this GitHub repository, it’s simple but it’s a good starting point to see manual dependency injection in action.
There are some tradeoffs in using this solution, there are some cons:
- no more Dagger magic: the
Injectannotation can’t be used so some extra code is needed to manually create all the objects - no support for subcomponents, Dagger Android and other Dagger features (for example the multibindings)
- works well only for Kotlin classes: in Java the boilerplate needed to implement manual dependency injection is way more
And there are some pros:
- no more Dagger magic (yes, I know it was a con too!): it’s easy to understand which object is injected somewhere using the Find usages command in the IDE
- errors at “ide time”: if there is something wrong Android Studio immediately shows an error even before executing a build/run
- standard Kotlin errors instead of Dagger errors
- faster build time: the Dagger annotation processor is not executed anymore
- no more generated code
It’s worth noticing that, in a Dagger project with multiple components, manual dependency injection can be introduced just for some components. The other Dagger components that depend on the converted components don’t need to be modified, they can continue to use Dagger in the usual way.
Manual dependency injection is not a new subject, for example this post on Kotlin Academy and this talk given by Sam Edwards at Android Summit 2019 are about this subject.
Manual dependency injection can be used to replace Dagger components, in some projects it can be introduced easily while in others it’s more complicated. There are pros and cons (as always!) so, probably, it’s worth introducing it in some contexts but it’s better to continue using Dagger in other.