Font (Typeface) in Android Application
Way to deal with face of characters (typeface) in Android Applications
Its weekend now and time to have some fun with android. In this story we will have a deep discussion about font (Typeface) in android application.
Android 8.0 introduces two new feature “Font in xml” and “Downloadable fonts” to deal with typeface.
In this story we will discuss about following way to deal with typeface.
- Overriding predefined typeface
- Iterating through view group
- Font using data binding (API level 14 and higher)
- Font in xml (API level 16 and higher)
- Downloadable Font (API level 14 and higher)
Let’s discuss one by one
1. Overriding predefined typeface:
Typeface class in android package “android.graphics” contains five pre-defined typeface by-default. As a developer we can use these fonts in our app’s style to apply these fonts.

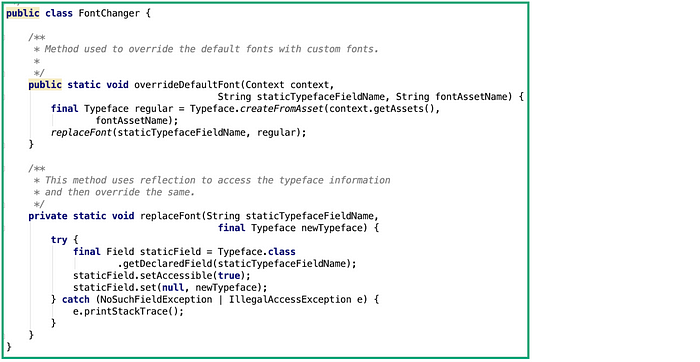
Now the trick is to override these pre-defined typefaces by our own typefaces from asset folder of our application. We can achieve this by using reflection concept in java.
To do this we need to create a class FontChanger that will use reflection to override the typeface.
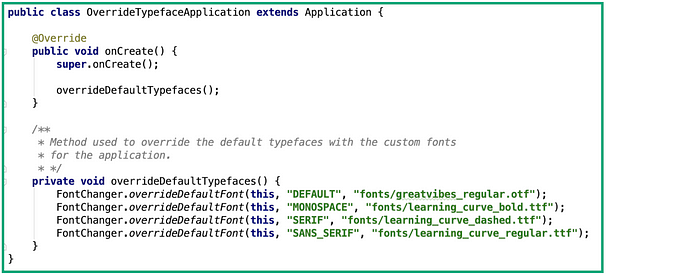
Now we need to call this overrideDefaultFont method from our app class so that it will override the default fonts once app will launch. So our app class will look like:
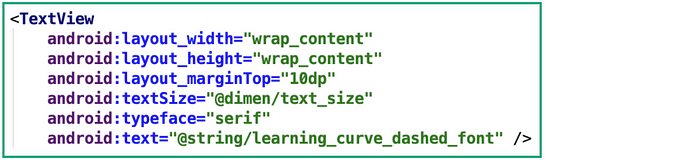
Now we are good to apply our typefaces to any TextView and/or its subclasses by just defining the pre-defined typeface name in typeface attribute as :
You can get the sample code on GitHub.
Conclusion:
Although it is not advisable to use reflection to get at protected data (e.g. non-public members), violating standard language conventions will get us into all sorts of trouble further down the line.
2. Iterating through view group:
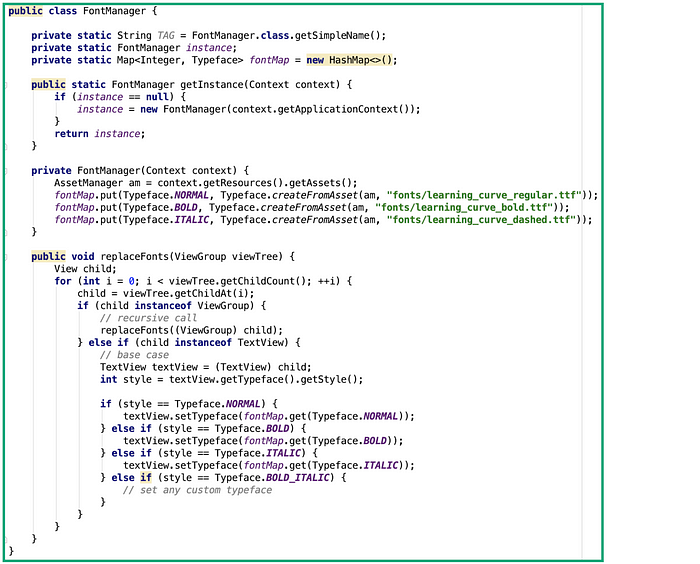
In this approach we need to iterate through each child view of a view group. If the child view is instance of TextView (i.e. TextView, EditText, Button), then we need to set Typeface to that child view otherwise no need to set it.
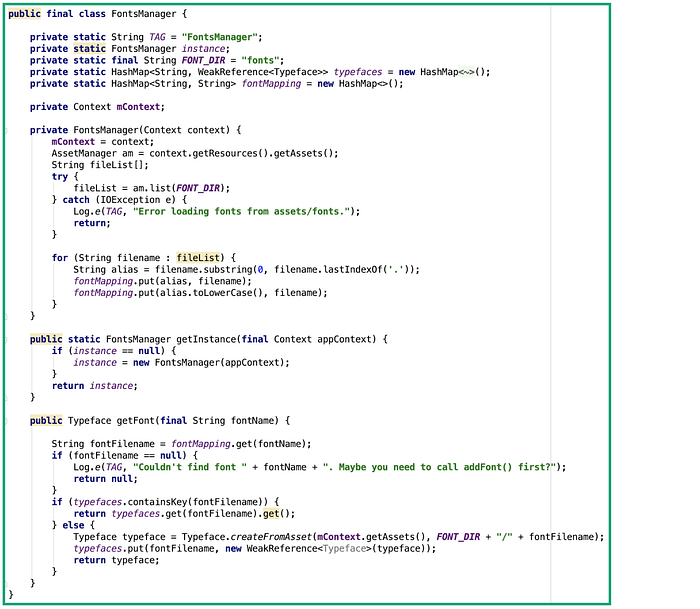
Let’s start coding, First of all we will create a class FontManager which will be responsible for iterating through child views of ViewGroup and setting typeface to Textview instance.
Now we have Activity, Fragment, Adapter etc where we need to set typeface.
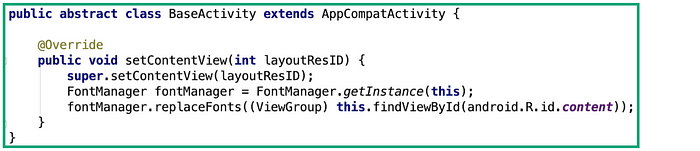
A) Replace Entire Activity’s Typeface: To set the typeface to every view within an Activity’s layout, simply we need to use the FontManager from above in our BaseActivity class as below:
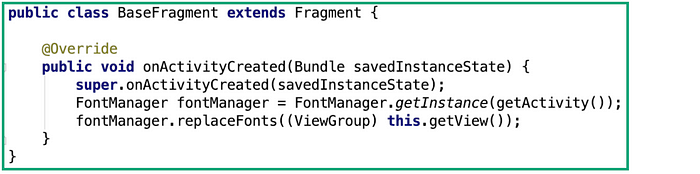
B) Replace Fragments’s Typeface: To set the typeface to every view within an Fragment’s layout, simply we need to use the FontManager from above in our BaseFragment class as below:
C) Replace Adapter’s Typeface: The list items in a ListView are built within an adapter, not within an Activity. Therefore, we also need to use the FontManager in our adapters:

You can get the sample code on GitHub.
Conclusion:
Each time when an Activity or fragment or adapter will be created then this approach will iterate through each child view of ViewGroup to check if it is instance of TextView. Iteration of view in ViewGroup will increase the view draw overhead. So we should avoid this approach.
3. Font using data binding:
The Data Binding Library is a support library that allows us to bind UI components in our layouts to data sources in our app using a declarative format rather than programmatically.
So let’s just make our hand dirty by code rather than taking about theory. First of all we need to make data binding enable in our app.
Step 1: Enable data binding into app by adding below line into module level build.gradle file.
dataBinding {
    enabled = true
}
Step 2: Create a Singleton class for caching font name, path and it’s typeface
Step 3: Define our custom binding for font.

Step 4: Now we initialise and cache the typefaces in Application class. Also initialise layout binding in activity.


Step 5: That’s all, we are good with defining data binding, initialising and caching font. Now its time to use font binding into our activity’s xml as:

You can get the sample code on GitHub.
4. Font in xml:
Android 8.0 (API level 26) introduces a new feature, Fonts in XML, which lets us use fonts as resources. We can add the font file in the res/font/ folder to bundle fonts as resources. These fonts are compiled in our R file and are automatically available in Android Studio. We can access the font resources with the help of a new resource type, font. For example, to access a font resource, we use @font/myfont, or R.font.myfont.
To use the Fonts in XML feature on devices running Android 4.1 (API level 16) and higher, use the Support Library 26.
Below are steps to use font in xml:
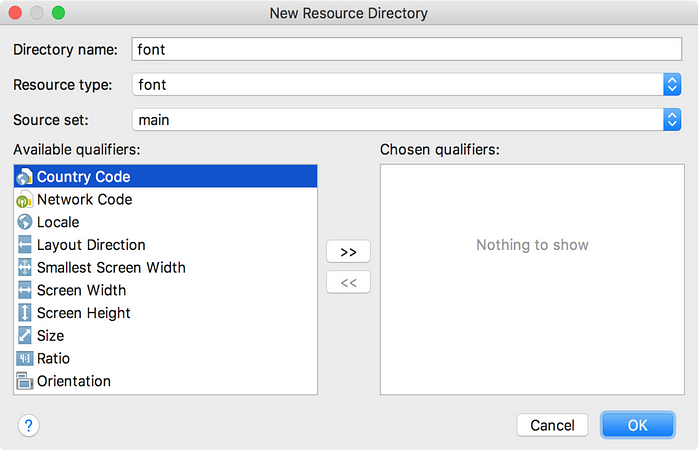
Step 1: We need to create font resource folder under res directory and places our font files (.ttf or .otf) under res/font directory.
Right-click the res folder and go to New > Android resource directory. The New Resource Directory window appears. In the Resource type list, select font, and then click OK.
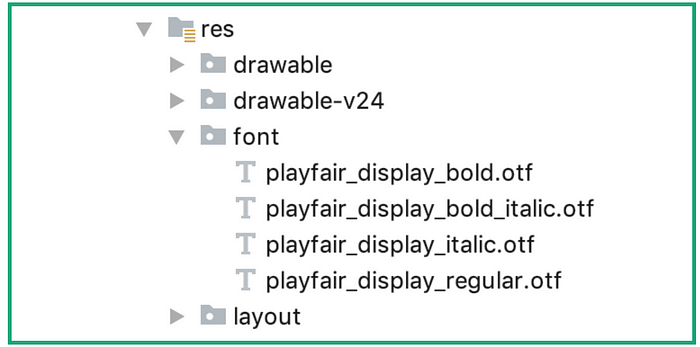
Step 2: We need to add our fonts under res/font folder
Step 3: Creating a font family
Font Family : A font family is a set of font files along with its style and weight details. In Android, we can create a new font family as an XML resource and access it as a single unit, instead of referencing each style and weight as separate resources. By doing this, the system can select the correct font based on the text style you are trying to use.
How to Create:
- Right-click the
fontfolder and go to New > Font resource file. The New Resource File window appears. - Enter the file name, and then click OK. The new font resource XML opens in the editor.
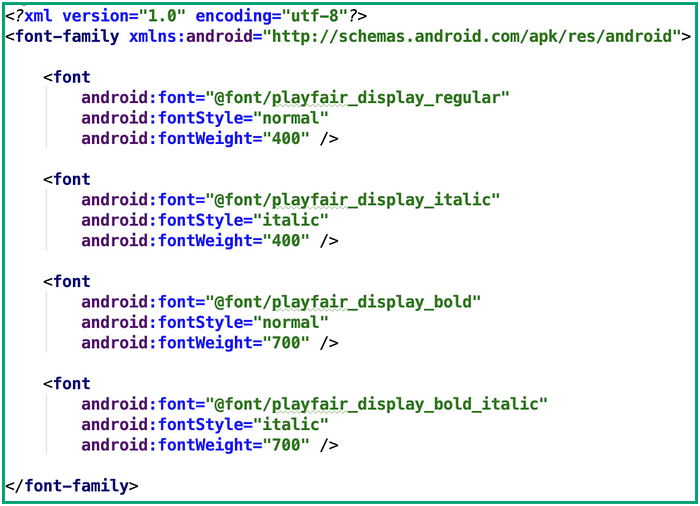
- Enclose each font file, style, and weight attribute in the
<font>element. The following XML illustrates adding font-related attributes in the font resource XML:
Step 4: Using font family in Application:


Note : If we are using support library in our project then to define our font family we need to use “app” namespace in place of “android”. Also we need to use ResourcesCompat.getFont(context, int) to access fonts programatically.
You can get the sample code on GitHub.
5. Downloadable Font:
Along with Fonts in XML, Support Library 26 introduced support for Downloadable Fonts, with backwards compatibility till API 14. We can now choose from any of the thousands of fonts on Google Fonts and use them in our app.
What is it? : Downloadable Fonts allow the ability for apps to request fonts from a font provider application instead of including font files in the apk or downloading it themselves. A font provider application retrieves fonts and caches them locally so that other apps can request and share fonts.
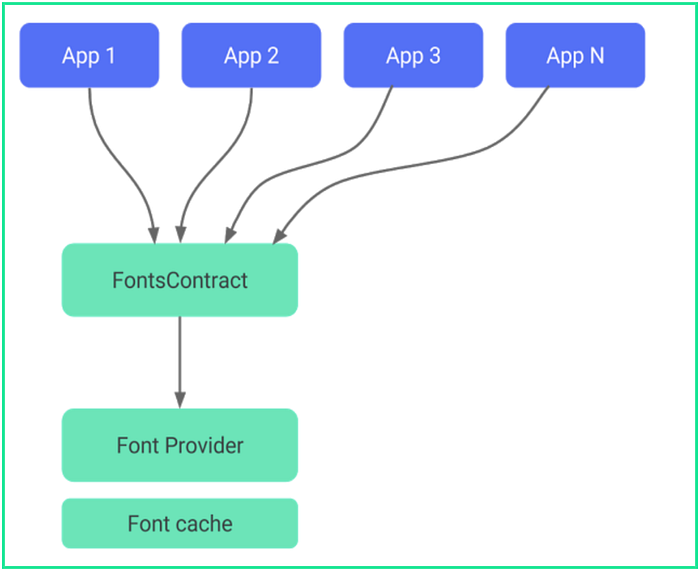
Basically it provides a single point where font will be downloaded, saved and distributed on demand.
Google Play Services acts as font provider for google fonts. There isn’t any documentation yet on how to implement our own font provider if we want to use a custom font not available through Google Play Services.
Advantages of using Downloadable Fonts:
- Reduced APK Size (We don’t have to bundle all our .ttf or .otf files with our APK)
- Since the apps can share fonts from the same provider, this results in less usage of memory, disk space and cellular data.
Let’s make our hand dirty by code:
Step 1: Add dependency for Support Library to our module level build.gradle file.
implementation 'com.android.support:support-compat:26.0.1'Step 2: Go to layout xml -> select Design view -> click on the TextView and scroll down to the fontFamily property in the right hand pane.
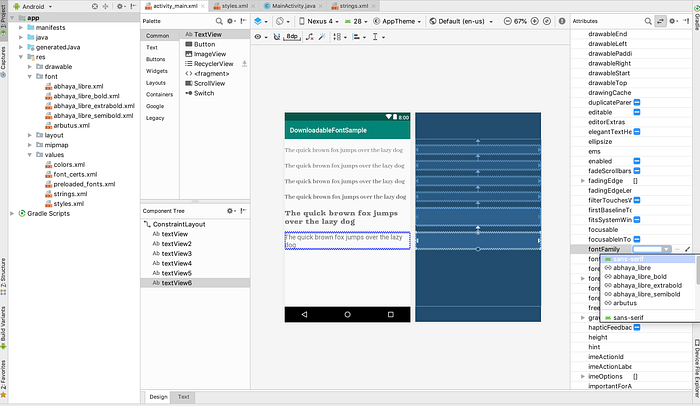
Step 3: Click on More Fonts to see the list of other font options.
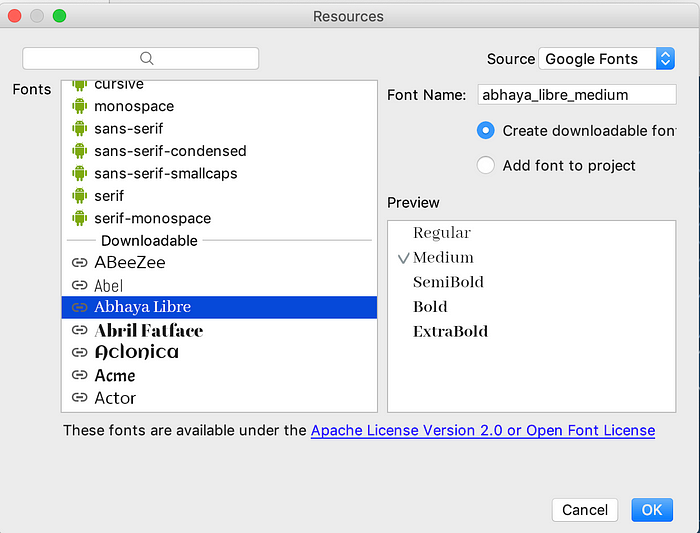
Select the desired font (I have selected Abhaya Libre) and the textStyle (Regular, bold, italic etc). Make sure to select “Create downloadable font” and then press OK.
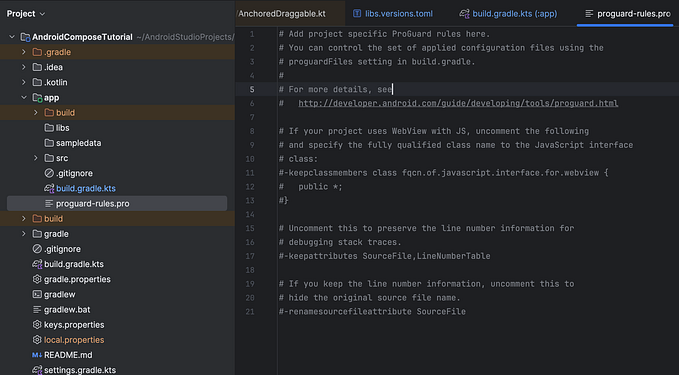
This will lead creation of three files: abhaya_libre_medium.xml under res/fonts, font_certs.xml and preloaded_fonts.xml under res/values. Let’s have a little bit intro of these files:
- abhaya_libre_medium.xml: This file contains the font attributes for loading a Typeface from the Google Fonts Provider Application.

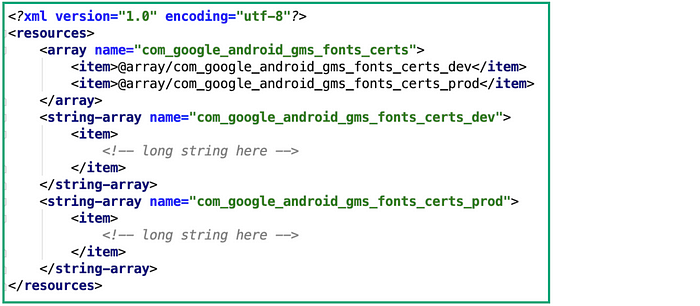
2. font_certs.xml: This file basically has the certificates mentioned in our res/font/font_name.xml. It contains a long encrypted certificate which will verify the font.
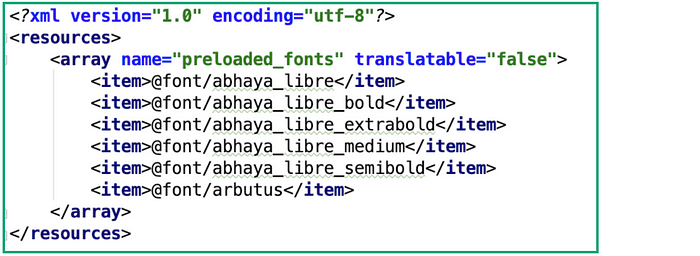
3. preloaded_fonts.xml: This file is referenced in the Android manifest. It helps the framework to pre-load fonts to avoid delays when the app is launched.
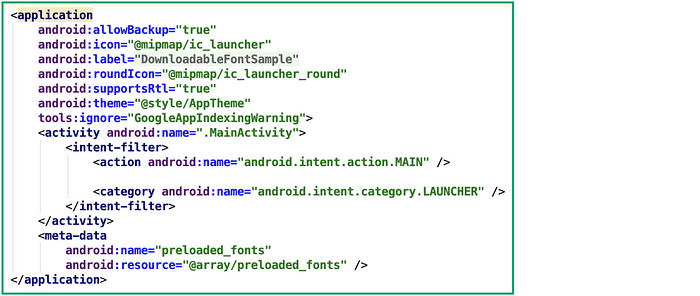
Step 4. Android studio adds below meta data into app’s Manifest file. But we should just make sure that this line is added to our app’s Manifest file.

Step 5: Now, we are good with the set up, let’s apply the font into our application. We can apply the fontFamily either in AppTheme or in our layout.
- Define fontFamily as direct attribute of TextView

- Define fontFamily into AppTheme and add

That’s it about downloadable fonts via xml. If you want to explore more and want to look into downloadable fonts programatically then have a look to developer site.
You can get the sample code on GitHub.
I hope this explanation has given some insights on Font/Typeface in android application. 👏 clap 👏 if you learnt at-least one thing & share if you feel the content deserves. Give Feedback, Comment or start a discussion. Feel free to correct mistakes. Cheers!