Demystifying the new Dagger Android Injection API 2.10+

Recent Dagger version 2.10 introduced major API changes to how dependencies are injected in an Android application. In this article I will go over a simple Android app utilizing the new API to perform injections within various scopes, including application scope, activity scope and fragment scope. If you need a primer on dependency injection, Dagger, or an in-depth comparisons between “the old” and “the new” ways, check out the Recommended Reading section below.
Visit GitHub to get the source code for this article (available in Java and Kotlin).
Why this article?
I have seen a fair amount of confusion about using the new Dagger API and the usage examples published out there vary widely. So I set out to create a sample project of my own in an attempt to present the new dagger.android API as easy to understand as possible.
For the sake of simplicity, the sample code here uses pure Activities and Fragments and does not follow any of the design patterns such as MVP or MVVM. But not for long — see the Next Steps section at the bottom of the post.
The old way
In the past, an activity could inject its dependencies by doing something like this:
The code above makes it apparent that the activity knows quite a bit about how it’s initialized with the dependencies. This violates the core principle of dependency injection known as Inversion of Control: The client delegates the responsibility of providing its dependencies to external code (the injector). The client code does not need to know about the injecting code.
Dagger 2.10+ and its dagger.android aim to address the issue above in addition to simplifying dependency injection in Android in general.
What we will cover
- Set up Gradle dependencies.
- Set up application scope dependencies and inject them into an Activity.
- Set up and inject dependencies for a given Activity.
- Set up and inject dependencies for a given Fragment.
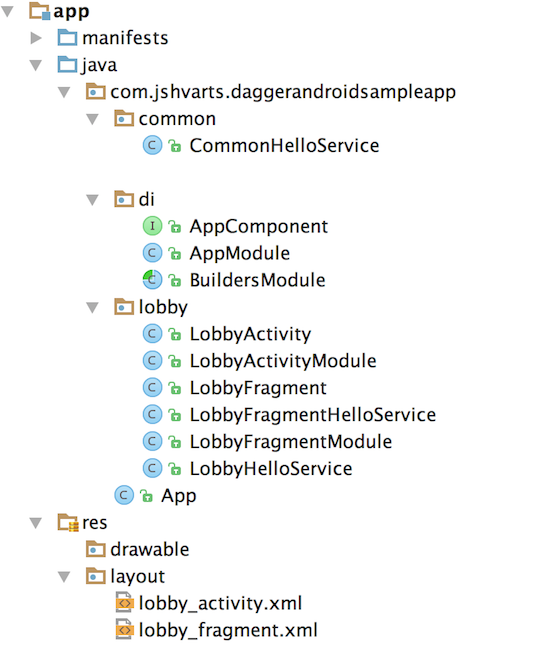
If you follow all of the steps in this article, your project’s directory structure will look similar to this one:

Set up Gradle dependencies
Make the following changes to your app/build.gradle.
Set up application scope dependencies
First, let’s add a simple dependency, CommonHelloService, that can be injected into any class within the app.
Create a custom Application class for our application and update AndroidManifest.xml to use it. This is how we bind our application instance to our Dagger graph.
Create AppModule class where providers for all application scope components, including CommonHelloService, will be defined. Note that the latter is defined as a singleton because it makes sense for the application to have only one instance of it. Also note that I could have used constructor injection here but for the sake of consistency, I defined dependencies to be injected in each scope using classes annotated with @Module.
Create BuildersModule class which will define bindings for our sub-components so that Dagger can inject them. Note that @ContributesAndroidInjector annotation (introduced in 2.11) frees us from having to create separate components annotated with @Subcomponent .
Create the following AppComponent interface that ties them all together. It is implemented as an interface that Dagger will use to generate the code necessary to perform the dependency injection.
Create LobbyActivity which injects our CommonHelloService.
Note that the Activity injection is done in
onCreate(Bundle savedInstanceState)viaAndroidInjection.inject(this)before the call tosuper
And here is the layout file with a single TextView used to display the result of the service call:
Now when you run the app, the TextView will display “Hello from CommonHelloService”.
Set up Activity scope dependencies
Let’s create a simple dependency, LobbyHelloService, that only LobbyActivity has access to.
Provide LobbyHelloService to be injected into LobbyActivity via LobbyActivityModule:
Update BuildersModule created above to reference the LobbyActivityModule:
And finally @Inject and use the LobbyHelloService into LobbyActivity
Update lobby_activity.xml to include TextView with id lobby_hello
Now when you run the app, the TextView with id common_hello will display “Hello from CommonHelloService” while the TextView with id lobby_hello will display “Hello from LobbyHelloService”.
Set up Fragment scope dependencies
Create LobbyFragmentHelloService to be injected into our fragment below only.
Next create the LobbyFragment that will @Inject the LobbyFragmentHelloService created above.
Note that the Fragment injection is done in
onAttach(Context context)viaAndroidSupportInjection.inject(this)before the call tosuper
Now we need to update the LobbyActivity to support injecting fragments by implementing HasSupportFragmentInjector. Note, if our activity did not contain any fragments or the fragments did not need to inject anything, the activity would not need to implement HasSupportFragmentInjector.
Create LobbyFragmentModule which will provide an instance of LobbyFragmentHelloService and other dependencies for LobbyFragment:
Update BuildersModule to include the binding for injecting LobbyFragment:
Create layout file lobby_fragment.xml for our LobbyFragment:
Now let’s include the new fragment layout into our lobby_activity.xml. Note the fragment is defined statically for simplicity.
Now when you run the app, the TextView with id common_hello will display “Hello from CommonHelloService”, the TextView with id lobby_hello will display “Hello from LobbyHelloService” and, finally, the TextView with id lobby_fragment_hello will display “Hello from LobbyFragmentHelloService”.
The above code illustrates how we can inject various resources into different scopes using the new dagger.android module while ensuring that our injection clients have no knowledge about the mechanics of the injections being performed.
Next steps
I will be writing 2 more articles on applying the new Dagger setup to projects implementing MVP and MVVM design patterns commonly used in Android. Stay tuned. In the meantime, any questions or feedback (or pull requests!) are welcome.
Recommended Reading
- The source code for this article is available on GitHub in Java and Kotlin.
- Dagger 2 release notes history can be found here.
- Android and Dagger 2.10 AndroidInjector by Nimrod Dayan. Great overview of the Dagger 2 API differences before and after v2.10.
- New Android Injector with Dagger 2 — part 1 and part 2 by Mert Şimşek.
Visit my Android blog to read about Jetpack Compose and other Android topics

