Why fitsSystemWindows doesn’t work sometimes?

Our goal is to implement such behavior:

First set the theme:
<style name="AppTheme" parent="Theme.AppCompat.NoActionBar">
    <item name="colorPrimaryDark">@android:color/transparent</item>
</style>
and layout file
Now let’s have a break before the next step.
When people want to put some View under status bar they usually can find the answer like:
“Just add “fitsSystemWindows= true” and it should work fine. -No? Then change your root view to CoordinatorLayout and apply fitsSystemWindows = true”.
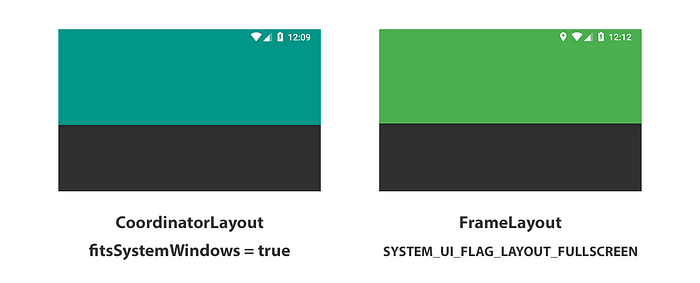
Here are two examples. I’ve added fitsSystemWindows = true to CoordinatorLayout and FrameLayout

Let’s check why fitsSystemWindows = true works for CoordinatorLayout and doesn’t work for FrameLayout and how to fix it.
The first thing you need to know that fitsSystemWindows = true doesn’t move your content under the status bar. However, it works though for some layouts like CoordinatorLayout, DrawerLayout because they override the default behavior. Here is a part of its source code:
From this, you can see that it checks if “fitsSystemWindows= true” inside the constructor and then set
setSystemUiVisibility(View.SYSTEM_UI_FLAG_LAYOUT_STABLE
        | View.SYSTEM_UI_FLAG_LAYOUT_FULLSCREEN)
This line does all magic. Let’s check our FrameLayout after applying flags above:
Coming back to the question of how fitsSystemWindows = true can help to draw under the status bar?
fitsSystemWindows = true sets the padding to your view (if needed) to prevent your content from being obscured by the system status bar or navigation bar.
Let’s come back to our example. Applying flags to our root layout
moviesRootLayout.systemUiVisibility =
SYSTEM_UI_FLAG_LAYOUT_STABLE or SYSTEM_UI_FLAG_LAYOUT_FULLSCREEN
SYSTEM_UI_FLAG_LAYOUT_FULLSCREEN — moves the content under the status bar
SYSTEM_UI_FLAG_LAYOUT_STABLE — ensures to apply the biggest possible system insets (see below) even if the current ones are smaller than that
Now our screen looks like that:

How to avoid content obscure and add necessary paddings? To do so, Android provides WindowInsets.

Android passes WindowInsets through the view tree: from parent to each of the child. We can use it by the view to add some padding or margin. If we wanna stop “view pass” we can “consume” insets by a view.
Note: we can still use insets in our view without “consumption.” This behavior let other views to receive the same insets.
To handle WindowInsets by the view we can use onApplyWindowInsets or setOnApplyWindowInsetsListener methods
- View.onApplyWindowInsets — applies WindowInsets based on the view’s default behavior. For most views that means set view paddingTop = systemWindowInsetTop, paddingLeft = systemWindowInsetLeft and so on. To override it usually easier to use setOnApplyWindowInsetsListener
- View.setOnApplyWindowInsetsListener — overrides that default behavior above. The main reason to use it: we can apply it to any view without creating a custom one.
Sometimes you need to change the default insets pass flow. For example, pass WindowInsets only to some child avoiding another one. To do that you can override parent behavior using setOnApplyWindowInsetsListener and then call View.dispatchApplyWindowInsets only for a required view.
- View.dispatchApplyWindowInsets — calls view’s listener (setOnApplyWindowInsetsListener) if we set it or uses the default implementation onApplyWindowInsets.
Any view can consume the whole insets or just some part of them. It depends on the onApplyWindowInsets behavior explained above. In OnApplyWindowInsetsListener you should return WindowInsets that you want to leave for other views after applying to yours.
For example,
- if we don’t want to let other views to consume insets (No other views receive insets after that):
- If we want to consume only top insets (Other views will receive left, right and bottom insets only):
- If we want to pass insets further unchanged return the same “insets” object as we did in our example.
Continue with our app. Using methods mentioned above move our Toolbar below the status bar and RecyclerView below Toolbar
Important: don’t add insets to an existing padding (for example set from XML):
paddingTop+=systemWindowInsetsTop — Wrong!
onApplyWindowInsets can be called many times during initialization so your padding can be added multiple times. Instead use:
paddingTop=20dp+systemWindowInsetsTop — Correct!
Now our RecyclerView appears below Toolbar and still can be scrolled under the status bar.
The last step to finish our example is to add a translucent navigation bar:
- update theme
<style name="AppTheme" parent="Theme.AppCompat.NoActionBar">
    <item name="colorPrimaryDark">@android:color/transparent</item>
    <item name="android:navigationBarColor">#80000000</item>
</style>- add one more flag to layout
moviesRootLayout.systemUiVisibility =
SYSTEM_UI_FLAG_LAYOUT_STABLE or SYSTEM_UI_FLAG_LAYOUT_FULLSCREEN or SYSTEM_UI_FLAG_LAYOUT_HIDE_NAVIGATION
SYSTEM_UI_FLAG_LAYOUT_HIDE_NAVIGATION — moves the content under the navigation bar
- set RecyclerView paddingBottom = Navigation Bar height
so the navigation bar now:
You can find the full source code on my GitHub. Please press “Clap” if you find it useful and follow me not to miss the next post :)