
[Dagger 2] — Custom Scopes
If you are a beginner to Dagger and have just started learning it, then this blog is not meant for you. You can checkout Dagger for Dummies to get a basic idea of what dagger is? But if you have implemented Dagger once or twice in your application then you are good to go. Here, I have discussed about how you can make your App more efficient and my experiences with Dagger 2,
Now, as stated, let’s understand why custom scopes are needed,
@Singleton has Its Overheads
When I first started using Dagger, I usually start with a single AppComponent and a single AppModule and mark everything in the AppModule as @Singleton scope, so as long as my application lives, my dependencies also exist in the memory. Although I am using a few dependencies in one Activity and not in the whole application. Therefore this is not efficient and also not required in this use case.
This is where custom scopes have come to rescue me. So it is clear, that I have to give some dependencies as its custom scopes based on the Activity for which I have been using them. So that whenever the activity gets destroyed the dependencies are also removed from the memory.
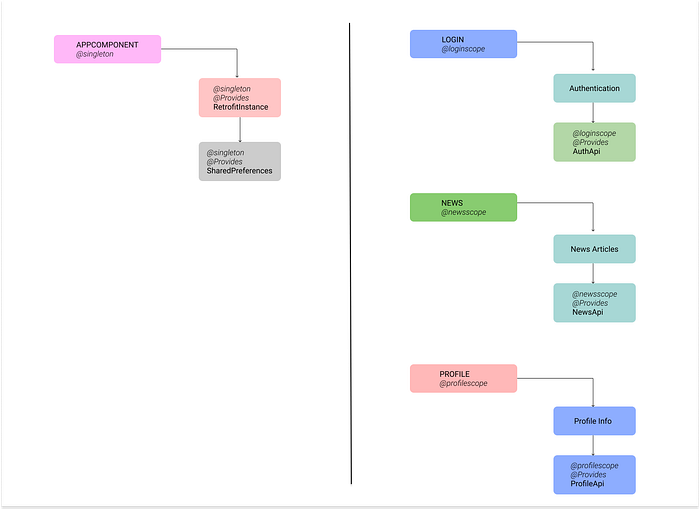
Let’s consider an example to understand this

One more problem with this approach is that as the size of your app grows, you will realize that AppModule is starting to turn into a God module(one big module) with all sorts of dependencies.
To solve these problems I have divided three different modules with different scopes as well.

Now we have one AppComponent and three other modules and their scope according to their respective activities.
We can mark dependencies with their respective scopes. So that whenever particular activity is destroyed, their dependencies are also removed from the memory.
Note- to solve the above problems you can also follow one more apporoch, you can create three separate sub-components and annotate them with
@Subcomponent.
@Subcomponent(modules = LoginModule.class)
interface LoginComponent {
  LoginHandler loginHandler();@Subcomponent.Builder
  interface Builder {
    Builder loginModule(LoginModule module);
    LoginComponent build();
  }
}
ok now if everything makes sense to you then let’s understand how we can create custom scopes.
How You Can Create a Custom Scopes.
create custom scopes with Dagger is pretty easy, you just have to follow these steps.
Step 1) declare your annotation.
@Scope
@Documented
@Retention(RUNTIME)
public @interface LoginScope {
}
Step 2) annotate the dependencies with this annotation in the module.
@Module
public class LoginModule {

             @LoginScope
             @Provides
             static LoginApi provideLoginApi(Retrofit retrofit){
                   return retrofit.create(LoginApi.class);
  }
}
Step 3) create one ActivityBuildersModule.class which includes you all activities @ContributesAndroidInjector
@Module
public abstract class ActivityBuildersModule {
     @LoginScope
     @ContributesAndroidInjector()
     abstract LoginActivity contributeLoginActivity();
 }
Step 4) define your modules in AppComponent.
@Singleton
@Component(
        modules = {
                AndroidSupportInjectionModule.class,
                ActivityBuildersModule.class,
                AppModule.class,
                ViewModelFactoryModule.class,
        })
public interface AppComponent extends AndroidInjector<BaseApplication> {@Component.Builder
     interface Builder{@BindsInstance
         Builder application(Application application);AppComponent build();
    }
}
that’s it you are done.
If you like this blog post then leave a clap,🙌
