
Create Android Studio plugin to toggle “Show layout bounds” (Part 1)
This post was created alongside the video that I posted on my YouTube channel 🎥
This article is part one of the two-article series, in which I’ll show you how to create a very simple Android Studio plugin that interacts with connected devices and toggles one of the developer options — Show layout bounds.

In this article, you’ll learn how to write the simple plugin that shows a notification in Android Studio and how to get a list of connected devices using Android Debug Bridge.
And in the second article (which will be available in a few days), I’ll show you how to enable layout bounds using the ADB shell command and how to execute this command in the plugin to show and toggle the Layout Bounds option from Android Studio.
So let’s start coding!
1. Setup IDE
The first thing we need to do is to download IntelliJ IDEA. And the really important thing here: the version of your IntelliJ have to have the same IntelliJ Platform version as used in Android Studio. If those versions do not match your plugin will fail to run.

We can find the version of the IntelliJ Platform used to build Android Studio in the “About” screen.
And as you can see in my case IntelliJ Platform version is 201.8743.12.
So, on the IntelliJ download page, I don’t download the latest version but look for a version with the specific build version.

After you install IntelliJ you can check in the “About” dialogue that your build matches the one used in Android Studio. And after that, we can move to create a new project.
2. Create an empty plugin project
That part is pretty straight forward.
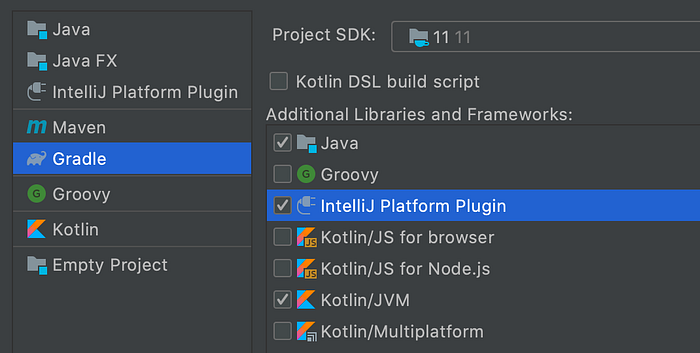
Click “Create New Project”, in the wizard select the IntelliJ platform plugin option and Kotlin JVM like showed on the screenshot.
Then hit next, specify the name and location of a project. After we clicked finish a new project is created and we’re ready to start creating our own plugin! 🚀
3. Define it is an Android Studio plugin
The first thing that we need to do is to specify that our plugin is an Android Studio plugin and uses API from the android plugin. To do it we have to modify build.gradle file and set intellij.plugins attribute value to android:
We also need to specify our Android Studio directory. Since I won't be publishing this plugin anywhere I just hardcode the Android Studio path for simplicity sake:
After this, we can synchronize gradle to apply our changes and move to the next step, which is…
4. Create an action that shows a notification
To create an action we need to create a new Kotlin class. This class needs to inherit from AnAction class and declare performAction function. Here we will specify what will happen after the action it’s triggered.
First, to warm up, we will just display “Hello Word!” notification when the action is triggered:
To do this I used NotificationGroup class and chose NotificationDisplayType.BALLOON so the notification will dismiss automatically after few seconds. In createNotification function I specified notification title, message and type.
Finally, to show a notification we have to pass an instance of a project which can be obtained from an action event that is passed to performAction function.
5. Register the action
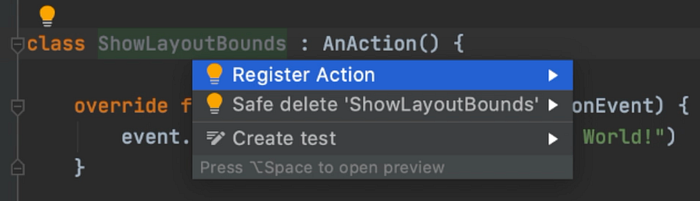
Okay so now we can register our action and specify what will trigger it. We can do it manually in plugins.xml file but we can also use the wizard in IntelliJ which can be triggered using the ”Register Action” option like displayed on the screenshot.
After we click it the dialogue will appear where we have to specify action id, name, description and select where to display our action. As you can see the list is pretty long and we can, for example, select to display our action in the main menu. We can also optionally specify a keyboard shortcut for this action. Everything as shown on the screenshot below:
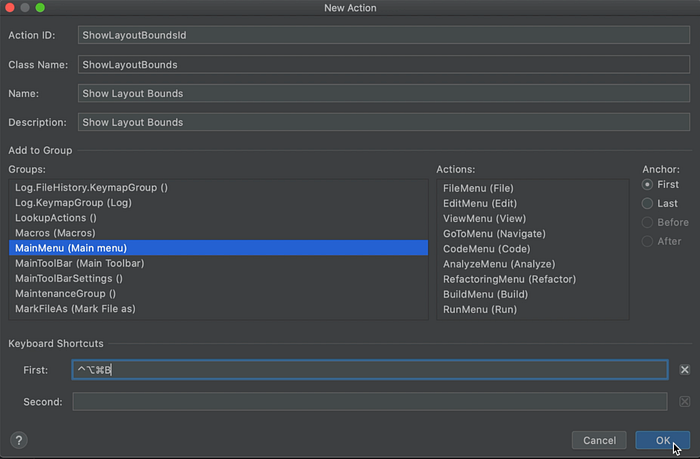
After we click “OK” the action will be added to plugin.xml file. We can, of course, change the previously selected options. I decided that I want my action to be displayed in the tools menu instead of the main menu and at the very bottom of the list.
So my modified action declaration looks like this:
In this file, at the very top, we can also edit the description, name and other information about the plugin which will be visible once we install the plugin in Android Studio.
After this is done we can build our plugin to create a .jar file which will be used to install our plugin in Android Studio.
6. Install the plugin from .jar in Android Studio
To install our plugin in Android Studio we open preferences and in the plugins section: select the “Install Plugin from Disk…” option.

The jar that we build will be in the build -> libs directory:

Once we install the plugin Android Studio may notify you that it needs to restart to apply changes in the plugin.
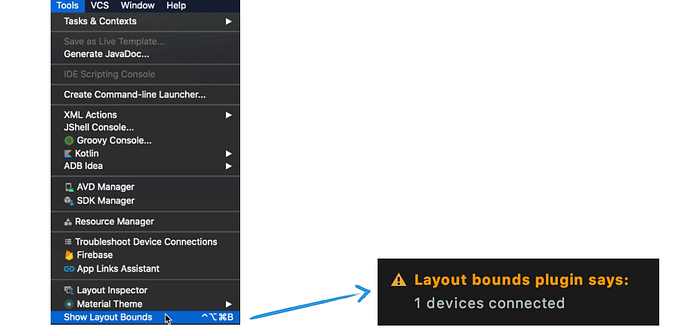
And after installing the plugin and restarting Android Studio in the tools section there is a new option: “Show layout bounds” which after clicked, shows a notification that we wrote 🎉.

We can of course also trigger this action using the keyboard shortcut that we specified earlier, or search for the name of the action in Android Studio.
7. Get the list of all connected devices using ADB.
We have a basic plugin that displays a notification. Now let’s add another element.
To enable the “Show layout bounds” option the first thing that we will need to do is to get a list of connected devices that we want to interact with.
But before we do it, we have to specify plugin dependency in plugins.xml file to be able to use API from the android plugin:
It’s crucial to add this dependency if you want to use API from the android plugin. Without this dependency, you might be able to import and use classes that I’ll show you on the following snippets but the plugin will crash at runtime (trust me, I tried 🙈)
Ok, so once we have our dependency, now we’ll modify ShowLayoutBounds class to fetch connected devices and display how many devices are connected.
To do it we will use AndroidSdkUtils class, call getDebugBridge function and then obtain a connected devices list:
Once all it’s done we build our plugin once more. Then go into Android Studio and install the plugin from the disc.
And voila, we’re done! 🎉
What’s next?
In the next article, we will finish this plugin. You’ll learn how to show layout bounds using the ADB command and how to execute this command in the plugin to toggle the “Show layout bounds” option.
PART 2 is available here:
Github
When in doubt you can also see my Github repository which contains everything we covered in this article:
