How to configure Bitbucket Pipelines for an Android project
Time to consider using Bitbucket Pipeline as your primary CI and CD tool.

One day I got a huge pull request with a lot of refactoring, renaming and moving files all around the project. That day we didn’t have any CI tool set up. I asked my colleague who made a PR:
“How am I supposed to know that it works?”
“I tested it!” he said.
“Did you just build it? Did you run tests? Did you check lint warnings?”- I had so many questions, and that time we had no way to verify it except for me to fetch changes and build it myself. That day I realized that we couldn’t postpone any longer, and I would have to set up Continuous Integration for our Android project ASAP.
Why not Jenkins?
Jenkins has been around for so long that you can do everything you can imagine with it. But for me, it’s like Java Enterprise — too big, too heavy, too complex, too much boring work. Why would you use it when you have Kotlin? Frankly speaking, I’m just getting tired of Jenkins and I wanted to try something new, something we could easily integrate with a Bitbucket. I revealed Bitbucket Pipelines and so far I love it.
Before we go
Doing initial research, I found very few articles about Bitbucket Pipelines. Most of them were for beginners, but what to do when I need something bigger than just “assembleDebug”?
In this article, I want to cover some mid/advanced level stuff. The article might grow to be quite long, so I will avoid telling you how great Bitbucket Pipelines is, how to configure it from the beginning, etc. Instead, I will jump directly into the cool stuff. But before we go, please take a few minutes and read those great articles: “Setup Android CI for Bitbucket in 1 minute” and “Build your Android app with Bitbucket Pipeline and HockeyApp”. These will help you to understand the basics.
After reading them you should get the next configuration:
This should be enough, to begin with.
Note: I prefer to use Uber’s Docker Image because it takes care of Android SDK for me, but feel free to change it if you need to.
What we want to achieve
- For each pull request, CI should fetch repo, build debug build, run tests, lint, etc.
- For master/develop, CI should fetch repo, build a release build, run tests, lint and publish it on Google Play “internal” track.
Develop vs Pull Request branches
In an example above, I use pipelines:default: as a configuration which means this configuration will be triggered after every commit in any branch. If we want to be more specific when to trigger a build, you have to specify a branch or a wildcard pattern which will match a branch name.
This is what Bitbucket documentation says about pull requests and branches:

Key concepts
A pipeline is made up of a set of steps.
Each step in your pipeline runs a separate Docker container. If you want, you can use different types of container for each step, by selecting different images.
The step runs the commands you provide in the environment defined by the image.
A single pipeline can have up to 10 steps.
A commit signals that a pipeline should run. Which pipeline runs depends on which section it’s in:
default — All commits trigger this pipeline, unless they match one of the other sections
branches — Specify the name of a branch, or use a glob pattern.
tags (Git only) or bookmarks (Mercurial only) — Specify the name of a tag or bookmark, or use a glob pattern.
custom — will only run when manually triggered.
pull-requests — Specify the name of a branch, or use a glob pattern, and the pipeline will only run when there is a pull request on this branch.
With the next configuration, you will be able to run different scripts for your pull requests and develop branch. The API is very flexible, so you can specify many different scenarios.
Be aware! Pull request pipelines run in addition to any branch and default pipelines that are defined, so if the definitions overlap you may get 2 pipelines running at the same time!
Steps, Caches, Artifacts
There are some definitions of Bitbucket Pipelines DSL which will be used later.
Step: each step starts a new Docker container that includes a clone of your repository and then runs the contents of your script section inside it.
From my point of view, it makes sense to use steps if you want to run a few steps in parallel, but if you don’t, it will be much easier to just use one step and put all commands under the script section for this step.
Caches: Define dependencies to cache on Bitbucket servers to reduce load time.
For an Android project, it makes sense to cache gradle folder to avoid downloading it every time from the internet and load it from Bitbucket servers instead.
Artifacts: Defines files that are produced by a step, such as reports or JAR, AAR or APK files, that you want to share with the following step.
As the first step in my project, I fetch a git submodule and provide it to the next steps to not fetch it again.
Parallel running
Parallel steps enable you to build and test faster by running a set of steps at the same time. There is a limit of 10 total steps you can run in a pipeline, regardless of whether they are running in parallel or serial.
I found it very helpful to run build and tests in parallel. Having them in parallel doesn’t just reduce a CI build time, but also has each of the steps in a new Docker container which makes it run “clean”.
In the example above, you see that the artifact made by the first step will be provided to the next two steps, which will be run in parallel. The first step will be doing some verification (tests + lint), and the second step is building a project and providing a debug apk as an outcome.
Be aware! The downside of parallel running is that the total sum of build time will be more than in sequential case because, for example, it will take extra time to download and unpack caches. As a result, Bitbucket will charge you more for that.
Assemble Release APK, release certificate, credentials, etc.
Here is a tricky part of a Bitbucket configuration.
As you know, to build a release build and sign it you have to use a release signing key, which you have to store privately with very limited access. This is becoming an issue when you need to use this private signing key on a CI.
To solve this, Jenkins has a plugin which allows you to upload the release signing key and keep it protected and secure on a build machine. Sadly, there is no such tool for Bitbucket Pipelines.
I spent many hours trying to find an acceptable solution. The most obvious approach is to put the signing key next to the project and upload it to the Bitbucket, then use the file directly from the script and hope nobody will steal it. But when it comes to enterprise product development, there is no place for hope.
Instead, I want to have a way where only a repository admin or a person with specific privileges could access — it or even better, once it is saved nobody should be able to access it except a build machine.
Digging a bit deeper, I found that backend developers have a similar problem with AWS keys and they have an elegant approach to solve it.
Bitbucket has a way to store some data as Repository variables, which take a string as a parameter. However, we need to store a file.
We can solve it by encoding a file into a base64 string, storing it and decoding back when we need it.
- The first thing you need to do is to encode the entire keystore file into base64
$ base64 appkey.keystore2. Then create a new variable in Bitbucket >Settings > Pipelines > Repository variables.
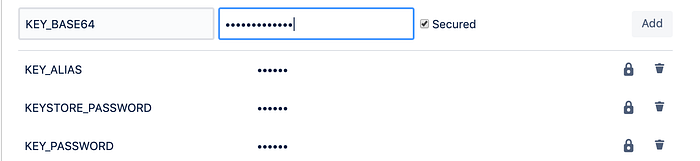
3. If you mark it as “Secured” the real value will be used only at the time of operation and can never be accessed from outside of the CI script. Even if you will try to echo the value, the variable name will be printed instead. This is exactly what I wanted to achieve by storing my file on a CI.
4. Then the build script can easily access an encoded string from bitbucket-pipeline.yml or build.sh by using a specific syntax $KEY_BASE64
5. As one of the commands in the script, I read variables and decode it back to create a keystore file, which will be used by Gradle to sign an apk.
echo “$KEY_BASE64” | base64 — decode > app/$KEYSTORE_FILE_PATHSimilarly, you can store key alias names, key passwords, alias passwords and whatever else you need.
Incrementing a build number
When you are building a release app, you probably will want to increment a patch version with each build. The dirty workaround is to write a script to increment a version number and commit changes using git… but I’m glad that Bitbucket Pipelines can count! Instead, just provide $BITBUCKET_BUILD_NUMBER as an argument to a Gradle build task and it is done.
Providing Gradle task arguments from the command line and getting them from the project side
When you need to provide arguments to a Gradle task you have to use a specific Gradle command line API for that.
-P,--project-propSets a project property of the root project, for example-PBUILD_NUMBER=$BITBUCKET_BUILD_NUMBER. See Project Properties
Here you can see how I provide Project Properties for a Gradle task and then access them from the build.gradle.kts file as project.properties
Publishing on Google Play — how to store auth credentials
To publish the release build on a Google Play, I use Gradle Play Publisher (GPP) plugin.
I keep the Google Play credentials encoded in a base64 string the same way as in the example above with the signing key.
I see no reason to describe how to work with a GPP because you could find all required documentation in their GitHub repository, and there are many more than could be mentioned in one article.
Bonus: Solving Git Submodules
If you are using Git submodules in the project to manage dependencies, then you have a small problem.
Today (06.2019) Bitbucket Pipelines doesn’t know how to resolve access rights to another repository, even when they belong to the same team, company or user. I hope it will be solved one day on a Bitbucket side, but until then, we need to implement a workaround.
Bitbucket has a way to create an SSH key for the Pipeline. One of the use cases of doing that is when your build needs to authenticate with Bitbucket or other hosting services to fetch private dependencies.
When you have an SSH key associated with your Bitbucket Pipeline you can use it to provide access Pipelines to fetch another repository. It sounds a bit confusing so I will try to give you an example.
For example. I want to clone repo2 into a build from repo1
To use SSH to clone another repository from Bitbucket, you need to do the following.
1. In repo1, generate a Pipelines SSH key to be injected into your build container. Follow Step 1 here.
Note that the known host’s information for bitbucket.org and github.com are injected by default. If you are using any other site you will need to configure Known Hosts by following Step 2 in the above documentation.
2. Add an Access Key to repo2. Paste in the public key that was generated in the previous step.
Summary
I spent about a week trying to combine and sort out all this information and I hope the article will help you a lot with Bitbucket. Once you have done this you will pretty much understand how everything works and do even more complicated scenarios.
From my point of view, Bitbucket Pipelines is a really promising cloud build server. There are still many things which could be improved by the Bitbucket team to make whole integration even easier, and I hope they will improve them in the future.
One of the most disappointing things is that Pipelines are not free or cheap. By our calculation, for a repository with 2–5 developers actively working, you will pay around $10–30 per month just for a CI. If you have 10–15 active repositories in your company, you might think to switch back on a private machine with Jenkins on it.
UPD:
Half-year past the article written and we moved from Bitbucket to Github. https://medium.com/profoto/why-you-need-to-move-from-bitbucket-to-github-b958d3fbd408 here you can read why.

