Best Practices for Compose Navigation in Multi-Module Project
The story will elaborate and implement best practices for Compose Navigation.

This is the 2nd story in the series for Jetpack Compose Navigation. The first story shows how to implement Drawer Navigation using Material3 Apis. The link of that story is below
In this story we will take the same project, extend it to implement Best Practices, the story provides a quick recap in the end.
The project has Drawer navigation with Articles, Settings and About screens. The output of the project is shown below as gif.

When you have a multi screen Project then at least every screen must have its own separate module. In our example I have created three separate modules for each screen and used them in app module to implement basic Navigation.
1. Preparation
1.1 Starter Project
I have created a starter project at Github link, you can download the code from the repository and get the project from starter folder. The Github repo also contains final folder which is the final project after implementing Best Practices for Navigation Compose, which we will see step by step in this story.
1.2 Project Structure
To get an overview of the starter project module structure: It has a separate module per screen and all of those modules are added as dependencies in app module. The below diagram illustrates it.

feature_articles is module for showing a list of articles and feature_article is module for showing details about only one article.
Arrow in the diagram above shows dependency usage which means app module adds dependency for feature_settings , feature_articles , feature_about and feature_article modules in order to implement Navigation.
1.3 Basic Compose Navigation
Let’s see implementation of the Compose Navigation in starter project.
To implement Navigation as shown above, we have to expose each screen Composable and ViewModel from individual screen modules in order to use them in app module. e.g taking example of feature_articles module ArticlesScreen and ArticlesViewModel must be accessible to app module in order to build NavGraph as above, similar for other modules.
2. Best Practices
Let’s go step by step elaborating and implementing Best Practices using the above starter project as baseline.
2.1 Screen Composables State in and Events out.
Every screen composable must take a state object and events as parameters. Events could be handled internally by the screen composable within the module and those events which could not be handled inside screen must be omitted outside the screen composable to outer/higher NavGraph to handle.
Below is an example for ArticleScreen.
viewModelcontains state for ui, it’s recommended to use a separatestateclass as screen composable parameter but it’s not the scope of this story, I will create a separate story about it.onNavigationBackis event omitted fromArticleScreenwhich will be handle by higherNavGraph
2.1 Split up your navigation graph per screen
Create navigation graph per screen. We can achieve it by creating an extension method on NavGraphBuilder .
To use NavGraphBuilder in our screen module, we need to add the following gradle dependency.
implementation("androidx.navigation:navigation-compose:2.5.3")Let’s take an example of feature_article module and create ArticleNavigation.kt file in feature_article module which adds an extension method on NavGraphBuilder as shown below.
Following points to note
ArticleNavigation.ktfile and extension method separates theNavigationlogic fromScreenlogic.- It encapsulates
Navigationspecific code which doesn't need to be exposed to the other part of the code. ViewModelinstance and UI state instances will be created in this extension method.- Events which can not be handled by screen inside
ViewModelwill be passed to the upper layer ofNavGraphBuildersuch asonNavigateBackevent in this case. - Extension method on
NavGraphBuilderwill be exposed out of themoduleandArticleViewModel,ArticleScreenno longer need to be exposed outside the module. - We must specify
internalaccess modifier forArticleScreenandArticleViewModelas these no longer need to be exposed outside the module.
2.2 Provide extension method for each screen destination
Each screen must expose NavController extension method
- to allow other destinations to navigate safely to it.
- to provide type safety for the arguments being passed during navigation.
- to encapsulate navigation specific code.
Creating NavController extension method for ArticleScreen inside ArticleNavigation.kt file.
The above extension method navigateToArticle is within ArticleNavigation.kt file which encapsulates how the navigation route and required argument is specified.
2.3 Create type safe argument wrappers
In order to ensure arguments are extracted of the correct type from SavedStateInstance inside ViewModel, we should create a wrapper around arguments.
Below is the wrapper ArticleArgs for the articleId for ArticleScreen.
Using internal access modifier for ArticleArgs and ArticleViewModel ensures that it will not expose out of the module.
Navigation Compose does not provide compile time type safe code but doing that we will ensure runtime type safe code.
2.4 Expose only public Apis which are required
As explained and implemented earlier , we have to ensure that only required APIs are exposed out of any module, internal access modifier comes handy here.
- Ensure
internalmodifier is provided for screen composable, viewModel and Args e.g forArticleViewModel,ArticlesScreenandArticleArgs - Extension methods on
NavGraphBuilderandNavControllerare only to exposed outsidemodule - Expose only first destination
routeoutside feature module so thatNavHostcan specify starting destination. - Add extension methods to
NavControllerfor each destination where we want to navigate.
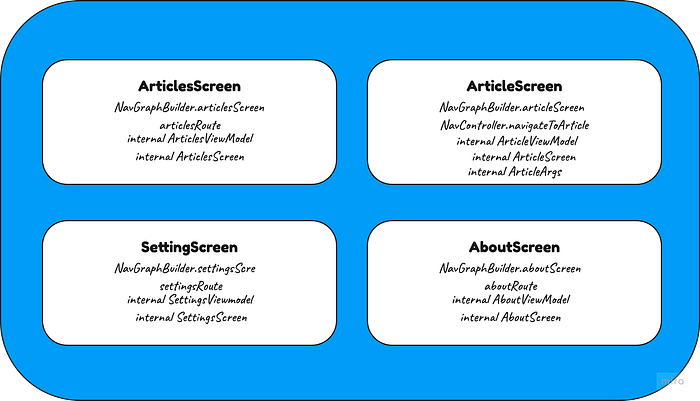
Below diagram gives an overview of each module, showing what is exposed out of the module and what is internal to the module.
2.5 Module structure to guid Graph structure
Make your module structure to guide the Graph structure.
We first need to create a home module which will encapsulate drawer navigation logic e.g In our case Articles, Settings and About screens are shown inside Drawer, so let’s create a feature_home module which contains such navigation logic and screens/modules dependencies.
After creating feature_home module, the project structure should look like as shown in image below.
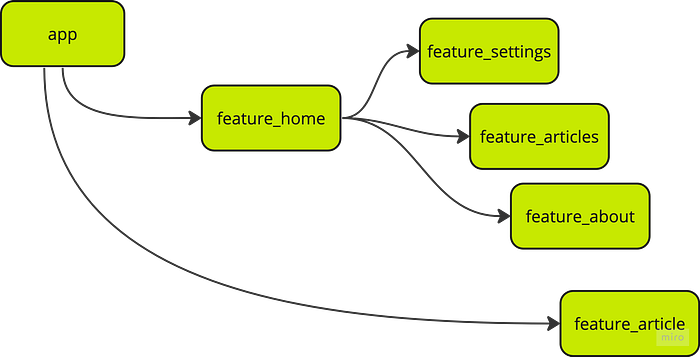
feature_home is using feature_settings, feature_articles, feature_about modules and is encapsulating drawer navigation logic, exposing only navigation APIs which are required outside the module.
app module using feature_home and feature_article modules, from feature_articles module we navigate to feature_article module so feature_home passes on that specific event back to the app module which eventually navigates the user to a particular article.
HomeScreen code from feature_home module shown below.
HomeScreen is specified as internal because we don’t need to expose it outside the module; rather we will create an extension method for NavGraphBuilder
Let’s see code for MainNavigation from app module project which is using homeScreen extension method.
Let’s recap and summarise.
Recap and Take-aways
- Each screen destination must provide a composable with
state/viewModelandeventsas parameters. - Each destination module must provide an extension method on
NavGraphBuilderwhich will separate navigation logic from code logic. - Extension method on
NavGraphBuildershould resolve state and pass events for that particular screen. - Each destination screen must also provide an extension method on
NavControllerspecifying how navigation to that particular destination will occur, encapsulating navigation specific code. - Use args wrappers to ensure arguments passed to the destination are of correct types, ensuring runtime type safety.
- Expose only required APIs outside the module keeping viewModel and screen composable
internalto the module. - Guide your module structure to build up your graph structure.
Thats it for now, you can get the final code from the repo below.
Github
Remember to follow and 👏 if you liked it :)