Basic implementation of Navigation Architecture Component — Jetpack 🧨(Part-02)

Navigation Lessons:
- Navigation Lesson 01: Welcome Navigation Architecture Component — Jetpack 🧨(Part-01)
- Navigation Lesson 02: Basic implementation of Navigation Architecture Component — Jetpack 🧨(Part-02) (present here)
- Navigation Lesson 03: Bottom navigation using Navigation Architecture Component — Jetpack 🧨(Part-03) (coming soon)
Android Jetpack is a collection of components and libraries (represent as X) to build a better application and the navigation architecture component is a part of it.
Navigation Architecture Component is a collection of libraries and plugins that provide its own set of classes to get rid of the complex Fragment Transition including the Bottom navigation → that we will discuss in our next part.
Read basis need of navigation architecture and it’s functionality in detail:
Implementation
Let’s have a look at the implementation of the navigation architecture component. Starting from gradle work.
“Make sure your project is migrated to Android X and your Android Studio is 3.3 or higher”
Migrate guide for AndroidX
Add dependencies in app.gradle:
dependencies {
    def nav_version = "2.3.2"
    implementation "androidx.navigation:navigation-fragment-ktx:$nav_version"
    implementation "androidx.navigation:navigation-ui-ktx:$nav_version"}
After adding dependencies sync the project
If you want to get the flavor of SafeArgs then, add its dependencies
In project.gradle:
dependencies {
    def nav_version = "2.3.2"
    classpath "androidx.navigation:navigation-safe-args-gradle-plugin:$nav_version"
}
In app.gradle:
If your code truly belongs or written in Kotlin including added modules then add this dependency code:
apply plugin: "androidx.navigation.safeargs.kotlin"And if your code or added modules are written in a mixed language like in java and kotlin then add this dependency code:
apply plugin: "androidx.navigation.safeargs"Dependencies work is done. Now, moving forward to deal with navigation architecture components. and for this tutorial, we’ll follow SafeArgs
In our previous article, we already discussed the navigation architecture component in detail. Now, moving forward to:
Implementation of Navigation Graph
Create a navigation graph by following these defined steps:
In project structure window → right click on res → new → Android Resource File, click on it you will see this window:
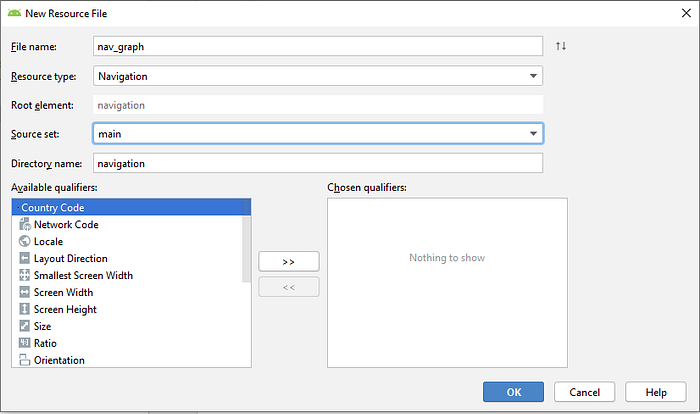
Give the filename and select Resource type = Navigation and press OK.
It’ll take a little bit of time in setup your project and if you haven’t added dependencies then it’ll prompt you to select OK for automatically add it.
Yeah!! you entered in Navigation Editor currently, it would be empty and we’ve to add destinations and create relationships (actions) in between of them.
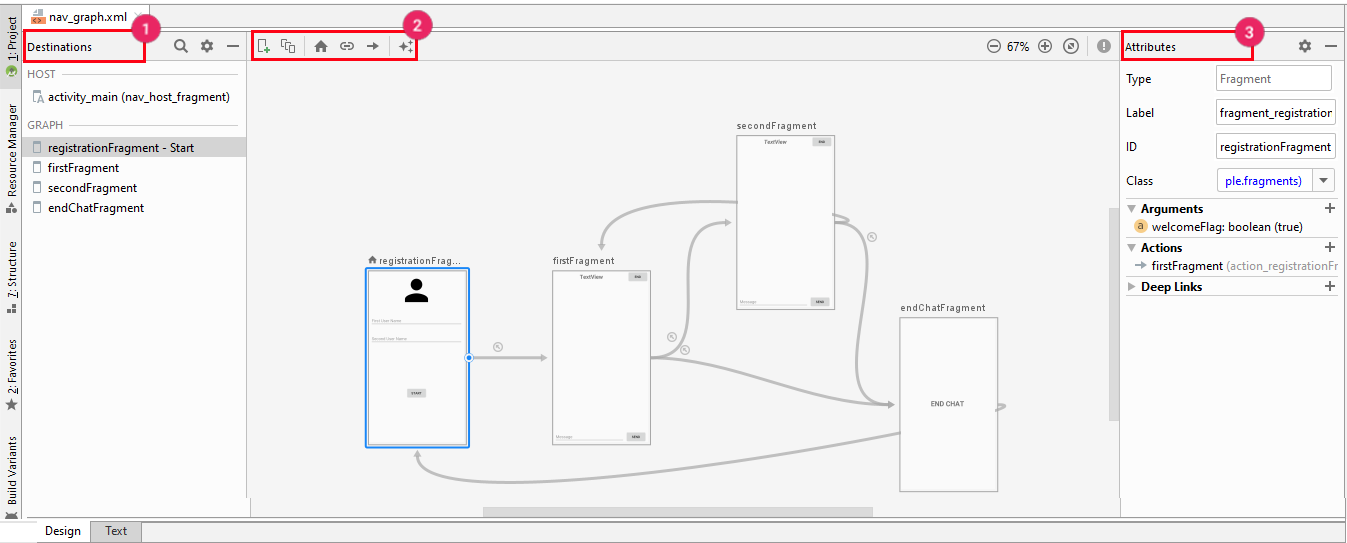
Highlighting some important points here:
- Destination → defines your host including all the destinations currently in the editor.
- Editor Window → it has multiple options like add a new destination, create a nested graph, assign home, insert the deep-link, and add actions.
- Attribute Window → shows all available options of the selected item whether it’s an action or destination.
The actions are created in between the destinations through this way:

All of the visualizations above are also available in XML, switch to the Text tab that is beside the Design tab.
Adding Navigation Host in host activity
In this example we are working on fragments so, add fragment view (named NavHostFragment) in host activity that displays fragment destinations.
Adding code for Controlling the navigation using NavController
We already discussed controller snippet in our previous tutorial Navigation — Part 01, check the Navigation Controller heading. I also defined the main usage of the SafeArgs plugin, passing the data between destinations using a general method and safeargs method.
RegistrationActivity.kt snippet is here that defines both the navigation and receiving arguments.
Get the whole project code from here:
Waooo!!! All our implementation done👍 Let’s run the project and see the output.
Output

Do you want to HELP this Lesson?
I need your help to build this project much more productive. Give Star ⭐ ️and Fork this project to contribute to it. I would appreciate your contribution.
In the next lesson, we’ll talk about the Bottom navigation using Navigation Architecture Component — Jetpack 🧨(Part-03)(coming soon).
I hope this article was useful to cover the questions regarding Navigation components and explore the benefits behind it. Follow me on Twitter for more updates.
Thanks for spending your time reading this article. 👏 and share if you’ve enjoyed it.
Connect with me on my socials and become my friend Medium, Github, and LinkedIn.