Annotation processor: Say less, mean more.

I’ve always been curious on what is behind an annotation. As much as they made my angry, believe me they are so fun. This is my experience as a beginner on the Annotation Processing.
I will give my own definition for an annotation:
An annotation is just a way to mark a class, field, another annotation, method etc. Why? It just tells that the marked component has a special attribute. But how do you handle it?
The way to handle an Annotation is through generating code at compile time. This has always intrigued me. Why? This depends on the use case. Have you ever thought how Dagger2 knows what dependencies you are using? Or perhaps how Butterknife knows how to bind views or set an onClickListener? Yep, generating code at compile time. The process of generating code at compile time to handle the annotations is called Annotation Processing . I will do a simple use case, explaining all what’s happening.
The use case:
I hate to type:
activity.getSupportFragmentManager()
.beginTransaction()
.replace(R.id.someId,SomeFragment.newInstance())
.commit()
for each fragment that I need to start. Someone here would be right to say that what do we need the annotations for, but this article is for “academical” reasons, not for providing some best practice or refactor.
Setup:
First of all, you must know that creating an annotation and handling it, you need separated modules. That’s because we need to tell gradle that there is some code that needs to be imported and the other code that works as a compiler. To create a new module in Android Studio go to File->New->Module and select Java Library.
Note, Android Library is not necessary in this case. Choose Android library when you are creating a custom view class or whatever.
So let’s go :

Let’s start with the easy one: Create the desired annotation:
There are 2 important things here: The @Target which does the check if I have annotated my desired component, in my case a CLASS . If I annotate a method or a filed it will show an error, and the @Retention which determines how an annotation is stored in binary output (from Kotlin documentation). There are 3 kinds of AnnotationRetention s:
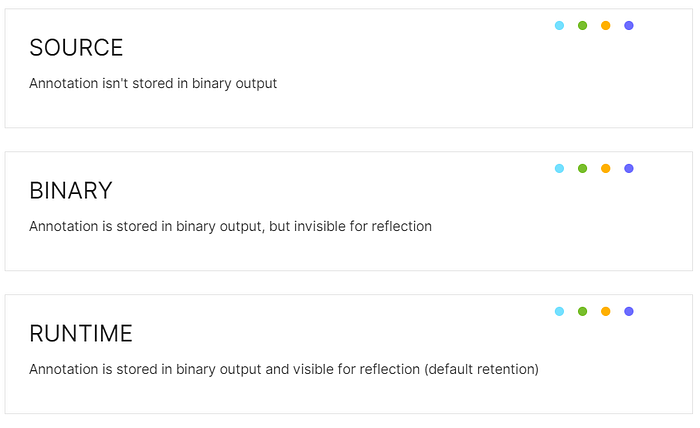
For the moment, I’m just letting it to source because I don’t need any of those other options.
Go to the browser_compiler and open its build.gradle to import these libraries:
Note: don’t forget to add the
apply plugin: ‘kotlin-kapt’,otherwise, forget about a successful build.
Create a class and extend AbstractProcessor (overriding the methods of course). Since I am using kotlin metadata library, I am extending the KotlinAbstractProcessor but there is no difference between them, except from accessing some fields directly on this case.
Work:
The work will happen in the process method. This is where the magic happens:
Our elementUtils.getPackageOf(annotatedElement).toString() will just provide us the annotated class package name, while the annotatedElement.simpleName().toString() will just provide us the annotated class name. Now let’s jump to the startClassGeneration method. I am using the KotlinPoet library to generate kotlin code on the compile time, but it is not mandatory, you can also type simple strings as long as it is correctly used without and without compile errors. This is the code:
Details are important:
We must annotate this generator class with the @AutoService(Processor::class) . It just creates a registration file for this custom processor. Not providing it will force you to include your processor manually in the META-INF directory. That way it can be accessed through all the project.
Full processor file:
The moment of truth:
Go to your build.gradle module app and import both your modules, the browser module as an implementation and the browser_compiler as the processor using kapt. Note to include kotlin-kapt here also.
Annotate your Fragments with your created annotation:
Annotate your second fragment, which you will navigate after a button click in the first fragment:
Hit BUILD on your IDE and go to main activity to open the FirstFragment
And the FirstFragment , on the button click will have this code:
Done!

Conclusion:
There is plenty to learn on generating code at compile time and this includes me too. I want to start creating a real library, once I feel confident on this.
Happy processing!
If you like the content, you can:
You can find me on my personal blog: