Animate it on React Native with OpenGL

What I really like about the mobile programming is an animation. I think it’s a quite important part of a successful product and I continuously research new approaches and ways to create amazing animations for the Android platform. Lately I’ve taken a fancy for React Native — a framework for the crossplatform mobile development (take a look at my previous article to get started with it). I’d like to share how to create animations on React Native using gl-react-native — a wrapper over the OpenGL API calls — and box2dweb — JavaScript port of the well-known physics engine written in C++(box2d).
How does it work
Fundamentally gl-react-native is an implementation of the gl-react and based on native modules for the Android and iOS, which are responsible for all low-level logic such as shaders compilations, textures binding, etc.
This library really simplifies the use of OpenGL API — a vertex shader is already implemented and you’re only required to create a fragment shader for your component, which will be compiled and attached at the runtime automatically.
Getting started
Let’s assume you’ve already created a React Native project. To install the gl-react and gl-react-native libraries use these commands:
npm i --save gl-reactnpm i --save gl-react-native
To complete the setup it’s needed to make few changes in the native modules of your project, and after that you’re ready to proceed.
‘Hello world!’ with OpenGL
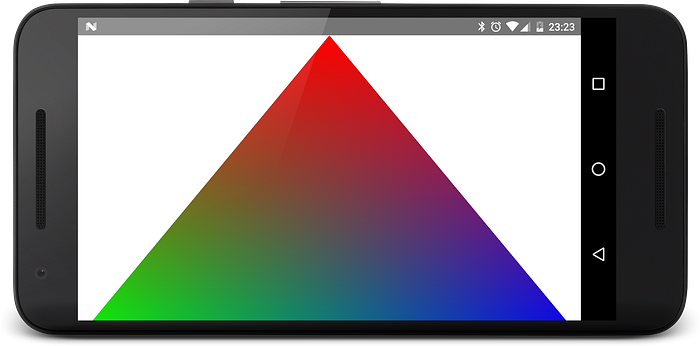
When you start learning a new programming language you probably write a small program to show the ‘Hello world!’ string in the console as a first application. An alternative of this for OpenGL is an application which renders a simple triangle with gradient filling.

Let’s implement it using gl-react-native. First, it’s necessary to create fragment shader to render a triangle(to find out more about shaders review this article). I created it in a separate .js file.
To draw a triangle I need to color the fragments which belongs to those shape. The insideTriangle() function checks whether the current fragment is inside the needed triangle or not.
The main idea is that if the sum of angles of the vectors created by the current point and the triangle vertices is equal to 2π then the point is inside the shape.
To solve this task we need to know the coordinates of the 4 points — the triangle vertices and the current sample. The uv variable contains the position of the current fragment. Its value vary for every fragment — it linearly interpolates from vec2(0.0, 0.0) to vec2(1.0, 1.0). So I assume the vertices coordinates of the triangle are (0.5, 1.0), (0.0, 0.0) and (1.0, 0.0) points and the current point is (x, y).
To find out the angle between vectors in GLSL, we need to use dot() function, which returns the cosine of the smallest angle between the normalized vectors and to inverse it using acos() function.
To avoid the floating point numbers equality issue, I created equal() function.
Now let’s import the created shader into our index.android.js or index.ios.js:
To use the fragment shader it’s necessary to set it to the frag field of the shader attribute.
Now we can run the application on a device.
Game loop creating
According to the definition of the animation term, it is the process of making the illusion of motion and the illusion of change by means of the rapid display of a sequence of images. Therefore we need to continuously re-render the component to create an animation, e.g force the component to update itself after the previous update.
How to find out when a component is updated? It’s about its lifecycle. componentDidMount() function gets called when a component is rendered at the first time. And componentDidUpdate() function obviously lets know when it re-rendered.
And to force the component to refresh, I use forceUpdate() function.
Let’s remake our previous js file to force calling render() function all the time.
I used setTimeout() function to avoid too often refreshing of the component, which can cause a crash. To check if all is working fine, we need to review the logs from the device.
As you see the component updates quite often, so it seems to be ok.
Stable fps count
The approach I described above doesn’t guarantee the stability of the rendered frames count per second. Its count can increase on quite simple animations and it can cause unreasonable spent of resources on a device. Moreover for a smooth animation it’s enough to draw no more than 60 frames every second or 1 frame per 16ms (1000 ms / 60 frames ≈ 16 fps). Let’s make a few changes to limit fps.
Physics engine
As an engine of the animation I decided to use box2dweb — a js port of box2d physics engine. As an example let’s make a volleyball ball, which reacts on user’s touches.

First, it’s necessary to install it to the project:
npm install box2dwebTo access the engine API we need to import it:
const Box2D = require('box2dweb');To separate the logic of building a ball in the world I created a BallBody class.
If you’re already familiar with box2d engine, the code snippet above is pretty easy to understand. To make an object exist in the World it’s necessary to define its fixture, shape, density, body type and position in the world. Since we want to make it move, I defined the body type as dynamic.
Also I created applyImpulse(), position() and angle() functions to ease the control of the ball from the index.android.js file.
And it’s needed to hold the ball visible, so let’s create a wall to prevent it from the going out of the screen.
Its setup is quite similar, except of the body type and its shape. Wall is to be static body since we don’t want it to move.
To render the ball let’s create a new fragment shader.
So I pass ratio, radius of the ball, its location, rotation angle and its image to the fragment shader. The ratio variable will contain the screen width-to-height ratio and it’s needed to prevent the circle from becoming an oval.
Since we’re only able to edit the fragment shader, it’s necessary to rotate the texture inside it, without vertex shader.
And now it’s time to create the World! Let’s get back to our index.android.js file and implement its setup and update.
The start() will be called only once after the component creates, so it’s the right place to initialize the world, the ball and the walls. Meanwhile the move() function will be called after each component update in order to move the World.
Handling user touches
The majority of animations require the interaction with user. To implement it I use the PanResponder, which allows to handle motion events of any type.
So on user’s touch I check whether it placed within the radius of the ball using the distance() function. In that case I call applyImpulse() function to make the ball bounce off. To make the bouncing more realistic I change the x value of the impulse dependently on the position of the touch.
The final part
It’s time to combine all the code snippets I shared above and to launch the application!
You can review the source code on GitHub.