Android NDK: Interaction of Kotlin and C/C++

Kotlin is a modern language that have already been deserving the trust and loyalty of many developers from different industries. But especially liked it Android Developers cause it provide ability to use different modern languages' features. To find out how Kotlin deals with NDK, I decided to write this article and create the sample project.

This post for developers who want to get started with Android NDK or find out how Kotlin deals with it. The readers who are already familiar with the theoretical part can skip the first paragraphs. In the second article we find out how to call Kotlin from native code.
What’s Android NDK?
The Native Development Kit (NDK) is a toolset that allows you to use C and C++ code with Android, and provides platform libraries which you can use to manage native activities and access physical device components, such as sensors and touch input. The NDK may not be appropriate for most novice Android programmers who need to use only Java code and framework APIs to develop their apps.
What’s JNI?
NDK is a just set of tools such as debugger or CMake and JNI (Java Native Interface) does all work on the interaction between Java and native code. It is an interface between Java, applications and libraries that are written in other languages. The mostly interaction with native code is calling functions written in C/C++ from Java and vice versa and thanks to JNI we can do it.
Why do we need Android NDK?
NDK may improve application performance. This is usually true for many processor-bound applications. Many multimedia applications and video games use native code for processor-intensive tasks. The performance improvements can come from three sources:
- The native code is compiled to a binary code and run directly on OS, while Java code is translated into Java byte-code and interpreted by Virtual Machine.
- Native code allows developers to make use of some processor features that are not accessible at Android SDK.
- The opportunity to optimize the critical code at an assembly level.
A lot of libraries such as ffmpeg written in C/C++ which you can use in your project thanks to NDK.
Let’s look how to bundled their in one project.
Get started
Let’s create a new project. At the time of writing, the current version of Android Studio is 2.3.2. You have to do the next:
- Download NDK, LLDB(software debugger) and CMake using SDK Manager.
- Include C++ support using appropriate check-box on the New project screen.

- If you want to use some features like: lambda or delegating constructors you have to use C++11. For this choose appropriate item from the drop down list on the Customize C++ support screen.

Otherwise, the process of creation the same as always. To adjust your project to use Kotlin you have to install Kotlin plugin. After this press Ctrl+Shift+a and begin input the name of the command “Configure Kotlin in project”. To convert any Java file to Kotlin you have to open it and use command “Convert Java file to Kotlin”.
Exploring of Project Structure
After doing steps which described before you have project with structure such as:
You can put your C/C++ source code to cpp folder. CMake also generates .externalNativeBuild folder.
CMake
CMake is a tool that control and manage the compilation process using configuration file that called CMakeList.txt.
You can set minimum required version of CMake:
Function add_library creates and names a library, sets it as either STATIC or SHARED, and provides the relative paths to its source code. You can define multiple libraries, and CMake builds them for you. Gradle automatically packages shared libraries with your APK.
Function find_library searches for a specified prebuilt library and stores the path as a variable. Because CMake includes system libraries in the search path by default, you only need to specify the name of the public NDK library you want to add. CMake verifies that the library exists before completing its build. In the next code snippet this function is used to add the library for logs.
And now we can use function target_link_libraries to specifies libraries CMake should link to your target libraries that were created by add_library. You can link multiple libraries, such as libraries you define in this build script, prebuilt third-party libraries, or system libraries.
Gradle Configuration
In build.gradle file we can specify extra cppFlags flags and path to CMakeLists.txt for CMake. It’s just result of Create Project Wizard. So, we don’t have to do it by ourself.
Header files
To add header file that is provided with compiler you have to use #include <file> and #include “file” for your own headers. You can consider that content from header file will be just copied to your *.cpp file.
You can make mistake and include one header more than one time and in result you will receive error during compilation. To prevent this you can wrap content of header in #ifndef — #endif block.
You can use header file to create the new types of data.
You can also declarate functions in this files.
Primitive Types of JNI
As I have already said, to deal with native code we have to invoke functions which written in C/C++. To pass some arguments to native method or get some result in the form of the primitive type exists Native Types. Each java primitive has appropriate Native Type.
So, if you want to create some function that sum two values and returns the result you have to write something like this:
JNI functions
To call a native function from Java or Kotlin you have to add extern "C" keyword and JNIEXPORT macros. A macros is a fragment of code which has been given a name. Whenever the name is used, it is replaced by the contents of the macro. In our case, we have JNIEXPORT from jni.h file:
So, JNIEXPORT will be replaced by __attribute__ ((visibility (“default”))). Then you have to specify return type and JNICALL macros. Name of your function have to start with Java and fullname of your class that contains appropriate method in Java or Kotlin code:
Your native function also have to take at least two arguments: JNIEnv* pEnv and jobject pThis. The JNIEnv* essentially pointers to pointers to function tables. It provides most of the JNI functions which are defined in jni.h file. jobject pThis is a instance of class that contains this function in Java code. In our case it’s an object of Math class.
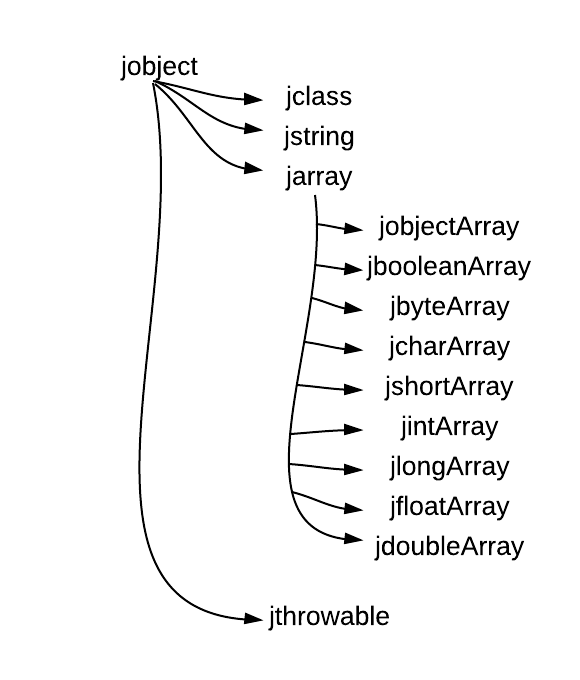
Reference Types of JNI
To pass or get an instance of Java’s class you have to use appropriate native type:
So, function that takes and returns some object can look like this:
Java strings are stored in memory as UTF-16 strings. When their content is extracted in native code, the returned buffer is encoded in Modified UTF-8. Modified UTF-8 is compatible with standard C String functions, which usually works on string buffers composed of 8 bits per characters. To convert Java String you can use something like this:
Enum, Union and Struct
An enumeration is a user-defined data type that consists of integral constants. To define an enumeration, keyword enum is used.
A union is a special data type available in C that allows to store different data types in the same memory location. You can define a union with many members, but only one member can contain a value at any given time. Unions provide an efficient way of using the same memory location for multiple-purpose.
A structure allows to combine data items of different kinds.
You can create instances of these data types in *.h or *.cpp file. If you want to use it in different places then header file is your choice otherwise, choose *.cpp for this.
What’s the Pointers?
In the computer science exists such term as hardware word. It’s a a fixed-sized piece of data handled as a unit by the hardware of the processor, which usually occupies 32 or 64 bits of memory.The RAM of a computer is like a succession of cells, each one hardware word in size.
The pointer in C/C++ is a variable that contains a unique address of each cell of the memory.
As you can see, to get pointer to some variable you have to use & and to declare pointer you have to use *.
Each pointer also occupies the cell and has a size that equals to the hardware word. So, you can also create a pointer to pointer.
Types of References
To work with jobject you have to create Local, Weak or Global reference to it.
As I have already said, JNIEnv* pEnv provides most of the JNI functions, including: jobject NewGlobalRef(JNIEnv *env, jobject obj);,jweak NewWeakGlobalRef(JNIEnv *env, jobject obj); and jobject NewLocalRef(JNIEnv *env, jobject ref); which create references of appropriate types.
Here we have the pointer to the structure JNIEnv* pEnv. If you want to refer to a member of this pointer, in case with the pointer, you have to use arrow operator ->.
Local references are valid for the duration of a native method call. They are freed automatically after the native method returns. Each local reference costs some amount of Java Virtual Machine resource. Programmers need to make sure that native methods do not excessively allocate local references. Although local references are automatically freed after the native method returns to Java, excessive allocation of local references may cause the VM to run out of memory during the execution of a native method.
Weak global references are a special kind of global reference. Unlike normal global references, a weak global reference allows the underlying Java object to be garbage collected. Weak global references may be used in any situation where global or local references are used. When the garbage collector runs, it frees the underlying object if the object is only referred to by weak references. A weak global reference pointing to a freed object is functionally equivalent to NULL. Programmers can detect whether a weak global reference points to a freed object by using IsSameObject to compare the weak reference against NULL.
Weak global references in JNI are a simplified version of the Java Weak References, available as part of the Java 2 Platform API ( java.lang.ref package and its classes).
Global references allow native code to promote a local reference into a form usable by native code in any thread attached to the JVM. References of this type are not automatically deleted, so the programmer must handle the memory management. Every global reference establishes a root for the referent and makes its entire subtree reachable. Therefore, every global reference created must be freed to prevent memory leaks.
There are appropriate functions to delete the reference: void DeleteLocalRef(JNIEnv *env, jobject localRef);, void DeleteGlobalRef(JNIEnv *env, jobject globalRef); and void DeleteWeakGlobalRef(JNIEnv *env, jweak obj);.
Sample project
Now you have some base theoretical info which is enough to start use C/C++ in your project. I decided to create the sample project that contains a simple in-memory storage written in native language.

To encapsulate all native functions I created Store class.
All this methods have appropriate native functions in Store.cpp file.
In CMake paragraph I showed how to use function add_library to create shared library. You can load native code from shared libraries with the standard System.loadLibrary call. In this time the method JNI_onLoad is invoked.
You can use it to initialize some variable.
Our CMakeLists.txt file also contains call of target_link_libraries to add the library for logging to the project. We can include this library #include <android/log.h> to *.cpp file and to log some event __android_log_print(ANDROID_LOG_INFO, __FUNCTION__, “onLoad”);.
Please note that in Kotlin we use init block of companion object instead of static block and external keyword instead of native.
As you have probably noticed, native methods can throw Java’s Exceptions. If you try to get some non-existent value from Store, it will throw an appropriate Exception. StoreUtil.cpp file contains throwNoKeyException function for this:
It’s a simple in-memory storage that can be used to pass some value from one Activity to another. IBinder works in the similar way: just created the Global Reference to Java’s object.
Please notice, that jobject is just pointer to Java’s object but not the direct reference. Java objects do not have a fixed location in memory on the opposite to C++ objects. They may be moved during their life me. Regardless, it would be a bad idea to mess with a Java object representation in the memory. The same is true for instances of IBinder.
You can find out the tests to better understand several nuances.
Conclusions
In this article, we saw how to make Kotlin communicate with C/C++. Kotlin can call C/C++ code with any type of data or object.
We found out a lot of theoretical material and based on it created the sample project. We converted Java Strings inside the native code, passed Kotlin objects to the native code, called functions and threw Exceptions of Java.
Kotlin is a new official tool for Android Development and this article demonstrates that this programming language works with Android NDK without any problems. In the second article we find out how call Kotlin from native code.