All about Hilt

Hilt is a dependency injection framework for Android that is built on top of Dagger 2. First of all, we have to understand the concept of injecting dependencies in order to understand any of the DI Frameworks.
✏️ Note: This is going to be a long article because I have covered almost everything about Dagger’s Hilt Framework in an interactive way to make everyone understand the concept easily. So don’t skip any of the points to understand the concept completely.
Dependency Injection:
Let’s assume the World Health Organization (WHO) is building an application to retrieve the characteristics and DNA structure of coronavirus. They have to follow any one of the following three ways.
1. Creating dependency within
They can create a class called Virology where they might need a reference to a class Corona. So they initialized the class Corona inside the class Virology, thus the Virology is completely dependent on Corona. It is clearly evident that the class Virology is not generic and can be used only to get information about the virus corona.
Later, if ‘WHO’ decides to add the same feature to get the details about other viruses then they have to create specific classes for each virus.
This will create more class files which leads to more boilerplate codes that make your code clumsy. Boilerplate codes are like a booby trap, no one knows when the application will malfunction.

This way of programming has other disadvantages too
👎🏻 Disadvantages
- Unnecessary class files created for the same feature.
- If the number of classes increases then maintaining the code is a headache.
- No reusability of code.
- If I want to add or remove any function then I have to do the change in all the classes thus code refactoring will be very painful.
- Finally, testing will be difficult.
To avoid these disadvantages ‘WHO’ has to follow the second way.
2. Injecting dependency manually from outside
Instead of creating the dependency inside the class Virology, it can be created outside of the class and passed through the constructor. Passing dependencies through the constructor is called manual injection.
But manual injection also has one disadvantage.
👎🏻 Disadvantage: If the class Virology has more dependencies like Corona then manual injection would be more tedious. In order to create an object for the class Virology, we have to provide all the dependencies of it in the constructor.
3. Injecting dependency using framework
Automating the process of creating and providing dependencies can be done by a few google frameworks such as Dagger, Dagger2 and now the recent addition is Hilt.
What is the need for a new framework when there is a framework already present for the same purpose?
Everything in this world starting from living creatures to non-living things are kept on evolving. If monkeys were not evolved then humans would not be in this world and if the communication was not evolved then the constant connection and the way people interact with one another at different places would be a dream. In the same way, Hilt is the evolved version of Dagger 2. Even though Dagger 2 is used for dependency injection, it is really confusing when you try to learn and implement it in the project. So the reason for building Hilt is to simplify Dagger-related infrastructure for Android apps.
In layman terms, the meaning of hilt is the handle of a knife and a dagger is nothing but a knife. So handle makes the handling of the knife very easy. In the same way, Hilt that is attached with Dagger 2 makes the handling of dependency injection very easy.
Understand the annotations
One more important point to be noted is Hilt supports Jetpack components like ViewModel and WorkManager. Dagger + Hilt + Jetpack enables Dependency Injection through annotations.

Let us implement a simple use-case to fetch the past SpaceX rocket launches from a remote server. With this use-case, we are going to use all the annotations of the Dagger + Hilt + Jetpack to handle the dependencies injection so that you can easily understand the actual purpose of these annotations.
1@HiltAndroidApp: This annotation enables member injection (i.e) field and method injection in your Application class. If you know how the Application class uses Dagger 2 to inject the dependencies then you will understand the need of @HiltAndroidApp annotation. A picture is worth a thousand words, yes the below picture depicts you how and what are all required to inject dependency from the Application class using Dagger 2.

@HiltAndroidApp will take care of creating the component class, linking all the module classes for you.
When you build your project with the above code snippet for the first time, the Hilt framework will create you a base class such as Hilt_SpaceXApplication that the annotated class SpaceXApplication should extend but it is not necessary for you to explicitly extend the base class Hilt_SpaceXApplication, which will be taken care of by the Hilt Gradle plugin. This base class will take care of injecting necessary dependencies to its children.
2@AndroidEntryPoint: This annotation is used to enable member injection in your Android Components such as activities, fragments, views, services, and broadcast receivers. If you are not annotating your Android Components with @AndroidEntryPoint then you cannot inject any field or method in it (i.e) cannot make use of @Inject annotation. You will learn more about @Inject annotation while scrolling down.

Like @HiltAndroidApp, this annotation will also generate a base class Hilt_SpaceXLaunchListActivity that the annotated class should extend but it is not necessary for you to explicitly extend the base class which will be taken care of by the Hilt Gradle plugin.
To enable this Hilt Plugin you have to add the dependencies in your root build.gradle and application’s build.gradle like below.
To know more about the Hilt Gradle Plugin’s release details Click here.
3@ViewModelInject: Next step is the creation of a ViewModel with a repository class object as an argument. Don’t get confused by the term repository class, it is just a placeholder class for handling network calls that will fetch you the list of SpaceX launches. @ViewModelInject is not from the Hilt Framework but from the Hilt supported Jetpack library which signals the Jetpack that the ViewModel is ready for injection. This annotation is specifically designed for the ViewModel component.
Injecting ViewModel in the Activity and Fragment is made so simple by using by viewModels() and by activityViewModels() kotlin property delegates that are included with Android Jetpack. To make use of @ViewModelInject and these kotlin property delegates you have to add few Jetpack Libraries in your application’s build.gradle file like below.
Let’s see how simple the SpaceXLaunchListViewModel is injected in our SpaceXLaunchListActivity by using by viewModels().
To know about the release details of Hilt supported Jetpack components Click here
4@Inject: This is the same as @ViewModelInject that is used to identify only the injectable constructor of the ViewModel. But the Dagger framework uses @Inject annotation to identify not only the injectable constructors but also injectable methods, and fields. In a very simple term, @ViewModelInject can be used only before ViewModel constructor but @Inject can be used before the constructor, fields, and methods of any class. I have used this annotation to make the SpaceXLaunchListRepository class ready for injection like below.
SpaceXLaunchListApi is an API interface that represents an API call to fetch the SpaceX launch list.
SpaceXLaunchListApi.ktIf we draw a dependency graph then SpaceXLaunchListApi is the final dependency that has to be provided from somewhere.
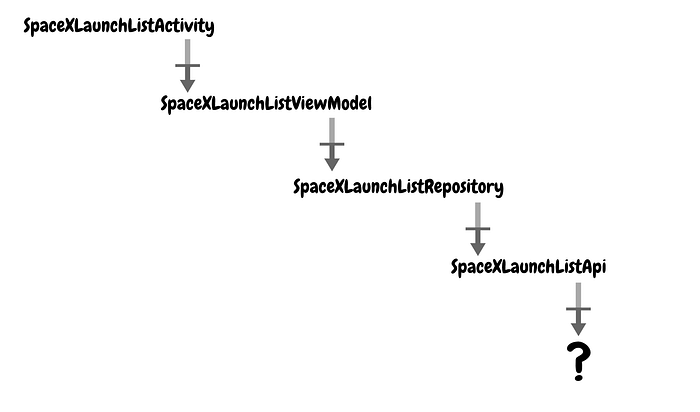
If it is a simple initialization just like initializing an object using the constructor with no argument (a = A()) then the framework itself can automatically create the object. But there are situations when the framework cannot create the dependent object by itself in such situations we have to help framework by providing the dependent object.
5@Module: Dagger provided us an annotation called @Module, using which we can create a class and put all the necessary objects needed by the framework in that class. In our example,SpaceXLaunchListApi is an interface thus the object cannot be provided by the Dagger automatically using constructor injection. And from the dependency graph, it is clear that the entire flow is dependent on this interface object. So, we should support Dagger by providing the necessary object by creating a class annotated by @Module.
6@Provide: We have created a class annotated by @Module but still it is not enough for the framework to retrieve the dependent object. So to be ready we have to write a method that returns the dependent object and this method should be annotated by @Provide annotation such that the framework will recognize this method as a dependency object provider.
In our case, SpaceXLaunchListApi is the required object, so we have created a method provideLaunchListApi that returns the SpaceXLaunchListApi object. But one twist over here is the method provideLaunchListApi in turn, requires a retrofit instance to build SpaceXLaunchListApi object. For this purpose, we have created another method named retrofit() that builds the retrofit instance for us. Don’t forget to add @Provides annotation for the methods inside the module classes.
7@InstallIn: You know that the class annotated with @Module is used to provide the dependency objects, so if we annotate the same module class with @InstallIn, then we are scoping the usage of the dependent objects provided by this module class to a specific android component. For example, everyone will need a database object across the application to insert, update, or delete the data. Let us take our own example where if I annotate the DBModule class with @InstallIn(ApplicationComponent::class) then the SpaceXDatabase object will be available for the lifetime of the application.
Even though the object present for the lifetime of the application, every time when the object is injected a new instance of the object will be created. To avoid creating multiple instances of the object and to create a single instance of the object we have to annotate the provider function with @Singleton annotation. So now a single instance of SpaceXDatabase and UserDao will be created while the application is launched and destroyed only when the application is closed.
Similarly, if I want SpaceXLaunchListApi to be injected and available only for the lifetime of the activity then I have to annotate the ApiModule class with @InstallIn(ActivityComponent::class) .
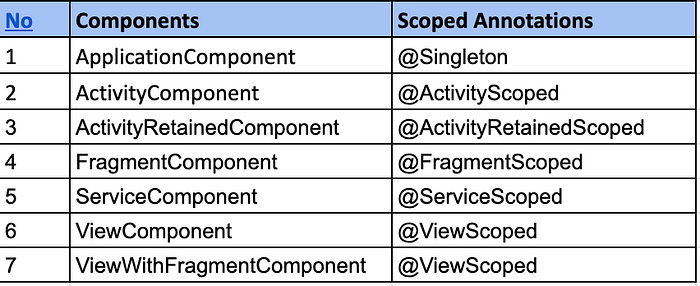
Currently, Hilt supports seven components that can be used with @InstallIn annotation. By specifying these components in the class annotated with @Module, we signal the hilt framework that the dependent object that is provided by the module class can be injected and made available only for the lifetime of the respective component that we have mentioned in @InstallIn annotation.
- @InstallIn(ApplicationComponent) - present for the lifetime of the application.
- @InstallIn(ActivityComponent) - present for the lifetime of the Activity.
- @InstallIn(ActivityRetainedComponent) - present for the lifetime of a configuration surviving activity (i.e) surviving orientation changes just like the ViewModel.
- @InstallIn(FragmentComponent) - present for the lifetime of the fragment.
- @InstallIn(ServiceComponent) - present for the lifetime of the service.
- @InstallIn(ViewComponent) - present for the lifetime of the view that is directly inside an activity.
- @InstallIn(ViewWithFragmentComponent) - present for the lifetime of the view inside a fragment.
And one more add-on is, these dependent objects can be scoped as we did for DBModule so that every time the same instance of the object is provided at the time of the injection. To be more clear, assume we have an Activity with many Fragments, all of which must use the same instance of SpaceXLaunchListApi instead of creating a separate instance for each fragment. To do that we have to annotate that dependency provider in ApiModule with @ActivityScope like below
However, if we change to a different Activity, a different instance will be created for it and its own Fragments. We do also have scoped annotations for other Hilt components.
8@EntryPoint: Just make it simple! In Hilt, if we are using @AndroidEntryPoint in android components such as Activities, Fragments, Views, Services, and Broadcast Receivers, injection happens while creating these components (i.e) when super.onCreate() is called. Let’s assume a use-case, where based on the environment type (production/development) we have to use different endpoints to fetch the list of SpaceX launches. Usually, we will inject both API interfaces life below.
In this case, both interface objects will be injected at the time of activity creation but they are mutually exclusive that both objects cannot be used simultaneously so any one of the API interface objects will be unused. To avoid these kinds of unnecessary field injections we can make use of @EntryPoint annotation to get the Dagger-Hilt object when required.
Step 1: Create an EntryPoint interface like below
Step 2: Use the ApiEntryPoint to fetch the result based on the environment.
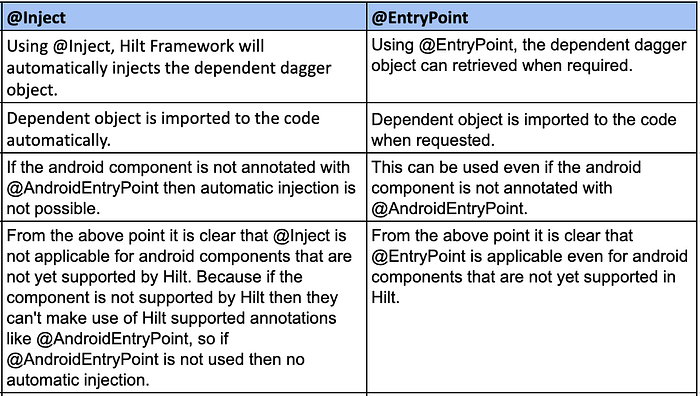
To make everyone easily understand what @EntryPoint annotation actually does, I have made the network calls directly inside the activity class instead of introducing a ViewModel and Repository class for handling network calls.
9@DefineComponent: I hope everyone now knows the use of the component(assign lifetime for dependencies). First, let’s be clear about the term lifetime. Lifetime is nothing but a duration of a thing’s existence or usefulness, for example, the time/duration between birth and death is the lifetime of the living creatures. Similarly, the lifetime of an Activity is between the creation (onCreate())and the destruction(onDestroy()) of the activity.
As we discussed earlier, the Dagger-Hilt framework provides us the standard components only for the android components such as Application, Activity, Fragment, Service, and View. This is because the lifetime of these android components is standardized (i.e) the lifecycle of these android components is not going to change based on the functionality or requirement, so the framework can easily scope the dependent objects within this lifetime.
But there might be situations where some features of your application might have a different lifetime based on the application’s requirement.
Example 1: Let’s assume I am creating an eBook application where the user can click a book from the bookshelf, read the content, bookmark the page, highlight the text and return back to the bookshelf. So the lifetime of reading a book in this application is between the opening and closing of the book.
Example 2: You can also use this Hilt provided feature of defining a custom component to maintain the user details for the duration between the user log-in and log-out. This duration is the lifetime of the user using the application and can be specific to a logged-in user.
These two examples have two different lifetimes that are defined based on the requirement and can vary from one application to another. So in these situations, we can define a custom component to scope the objects that are needed within these lifetimes.
Possible objects that can be scoped for example 1: API Interface object to hit any book-related service or book details such as book id, book name, book description.
Possible objects that can be scoped for example 2: User details such as username, password, age, etc, or any API interface object which will be used across the login session.
Let us take the second example and explore how the custom component can be created and used.
Step 1 - Create a custom component by creating an interface named UserComponent and use the standard component as the parent. Only one parent can be included.
Step 2 - Create a handler for the custom component: The lifecycle methods (From onCreate() to onDestroy()) of the android components are standardized so hilt by itself can scope the objects when the android component is created and unscope when it is destroyed. But for the user-defined lifetimes like the above examples, we should define a handler class to handle the lifetime of the custom component which means we have to define a handler class that knows when to initialize and destroy the custom component.
Let’s create UserComponentHandler class that creates and destroys the UserComponent when required.
This handler class should extend GeneratedComponentManager of the hilt framework and annotated with @Singleton such that only one instance of the handler will be created. In the above snippet, we can notice the two methods login() and logout() where the instance of UserComponent object is initialized and nullified respectively.
Step 3 - Create a model class:
Step 4 - Create a module class with InstallIn(CustomComponent): Now it is time to use the custom component that we have created to scope the object/objects. My plan is to scope UserDetail object within the lifetime of the logged-in user so that this object can be accessible throughout the user session until the user logs-out. I have created a class annotated with @Module that provides me the UserDetail object and to scope this object within the user session, I have annotated this module class with @IntstallIn(UserComponent::class) annotation.
Step 5 - Create a custom scope annotation: Hope now everyone knows that scope annotation is used to maintain the same instance of the object within the respective component’s lifetime. And we also know that the Hilt has provided scope annotations for the standard components. But for the custom component, we have to create our own scope annotation like below.
The creation of the custom scope annotation is done but it is really important to know where to use this annotation. Custom scoped annotations should be used in two places, in the Component and Module classes. So I am updating UserComponent and UserModule with LoggedInUserScoped.
Step 6- Create a class annotated with @EntryPoint to fetch the scoped dependent object whenever required: We already set to go but before that, we have to create some way to get the provided UserDetails object right?. We already know that you can get the provided dependent object by using @Inject annotation or @EntryPoint. In this case, I have used @EntryPoint to retrieve the UserDetails instead of using@Inject because UserDetails is a model class, so in order to inject this model class I have to inject the arguments inside it and which is a bit complex task.
Step 7- Use the handler: Now it is in our hand to handle the lifetime of UserComponent gracefully using UserComponentHandler. As per our example, we have to scope the dependent object within the lifetime of the logged-in user (i.e) within the duration between log-in and log-out of the user. So when the user logs-in login() method inside UserComponentHandler is invoked thus the UserComponent is initialized and at the same time SpaceXLaunchListActivity is launched.
Step 8- Retrieve the dependent object using EntryPoint: This step shows how do I get UserDetail object in the SpaceXLaunchListActivity.
As I said before UserComponentHandler is a singleton so only one instance of the object will be created and the same instance will be used in all the other activities whenever we inject it. The fetched UserDetail object is set to SpaceXLaunchListViewModel, where the SpaceX Launches is fetched from the server if the user details are valid.
To make you all understand the concept easily I have directly fetched the UserDetails object in the activity itself but you can move this part of code inside the repository class where the actual service call to fetch the launch list is performed.
Step 9 - Logout and Unscope: If I logout from the user session then userComponentHandler.logout() method is invoked thus the UserComponent is made null. If the UserComponent is null then the UserDetail object that is scoped to the UserComponent will be unscoped. So after logout, If you try to access UserDetail object using UserComponentHandler, an exception will be thrown and you cannot access the object.
Flow diagram:
This diagram is to connect all the points that we have seen above, so don’t see this flow diagram if you have not gone through all the above points.

Hope everyone has understood the Hilt Framework. Hilt is currently in the alpha stage so it is the right time to learn and understand it so that you can apply dependency injection using Hilt to your real-time projects as soon as the framework is made stable.
Below are my recent articles you might be interested in
If you found this post useful, it would help others to find it if you could click on the 👏 icon below and also consider sharing it with your friends via social media. Do follow for more articles like this — thanks!