Adapting Your RecyclerView - The 2019 Approach
Many things have changed in the Android ecosystem over the years, but one thing remains constant - the need to display data to our users in the most convenient way. Since 2014, the recommended way of displaying data in our Android application is with RecyclerView.
In this article, I will start with an overview of multiple pains I’ve experienced over the years from different parts of the RecyclerView; from the basic use and up to the complying with the latest guidelines and best practices from Google for building new Android applications.
Finally, I will introduce an open-source library I wrote in order to address these pains and make your life a little bit easier. 😉
The Adapter Pattern
Every RecyclerView has a corresponding Adapter. 🤜🤛
The Adapter is responsible to take our models and map them each to their corresponding View components (ViewHolders), thus complying with the classical Adapter design pattern definition:
The adapter pattern is a software design pattern that allows the interface of an existing class to be used as another interface. It is often used to make existing classes work with others without modifying their source code.
With this definition in mind, we can understand that specific business logic has no place inside an Adapter; yet a common mistake I’ve seen is developers writing their business logic straight inside the Adapter, making it less reusable and modularized.
Moreover, mixing the View layer with the Business logic layer will break the separation of concerns principle.

The Adapter is part of the View layer and thus should know nothing of our business logic; its sole purpose is to act as a bridge between the output of the logical layer and the View layer components.
Focus On What Matters
After cleaning out unwanted businesses logic, we are left with the code that every basic RecyclerView Adapter needs in order to function properly:
1️⃣ Set Data models in the constructor or a setter method.
2️⃣ Tell the Adapter how many items it has at any given time by overriding getItemCount.
3️⃣ Map the data model to the corresponding view type by overriding getItemViewType.
4️⃣ Based on the view type, create the corresponding ViewHolder by overriding onCreateViewHolder.
5️⃣ Bind ViewHolder with the data model by overriding onBindViewHolder.
6️⃣ Create multiple ViewHolders and implement the View logic for each use case using the data model provided.
Wow! so much code for such a simple example 😓
How would an example with +15 view types will look like?😨
What if we need some extra utility like selection state management or infinite scrolling capabilities? 😱
After writing a couple of Adapters you realize that this code repeats each and every time! of course, you can copy-paste implementations or use templates for quick code generation but neither of these solutions is ideal.
Jumping to 2017, Google introduced the awesome Architecture Components and the guide to app architecture. 🥳
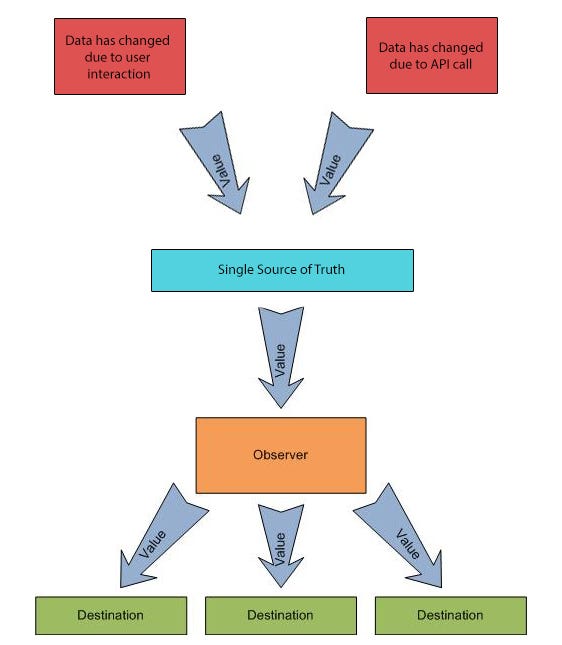
One of the many recommendations in this guide was to follow the Single Source Of Truth principle.
In short, this principle states that:
- Every component that wants to receive data will receive it from one single source.
- Every component that wants to update data will update it to one single source.
One of the easiest ways to follow this principle is by using data observables.
Each destination that wants to receive data will observe it and when the data updates it will be automatically notified.
In order to implement this principle seamlessly using Architecture Components, Room was introduced with LiveData and RxJava support.
Room knows when the database is modified and automatically notifies all active observers when the data changes.
On each insert, update or delete action performed on the table above, Room will generate a new list with all the models in the table and notify all active observers with that list.
Let’s say we have ViewModel that holds a list of MessageModels that the View is currently displaying and the ViewModel is observing the MessageModel table for future updates. When an update occurs the ViewModel’s observer will get notified with the new MessageModel list. Then, it will be up to us to
decide how to perform the update on the View:
1. By calling NotifyDataSetChanged on the Adapter with the new list, which will re-render the whole list. Please do not pick this option, it will result in poor performance and poor UX❗
2. By calculating the difference between the old list and the new list and only sending the delta to the View to render. Luckily for us, we can implement DiffUtil in our Adapter to solve this exact issue:
DiffUtil is a utility class that can calculate the difference between two lists and output a list of update operations that converts the first list into the second one.
It can be used to calculate updates for a RecyclerView Adapter.
Sounds awesome! let’s look at a naive implementation of a single DiffUtil:
Doesn’t look that bad until you realize that a real-life use case will have a much longer areContentsTheSame implementation. Most importantly, we will need to write this class and implement the equals method for each data model in our Adapter. 🤦♂️
Do you even remember what was our goal?
All we wanted was to display our models in some form or another in the view… It is very easy to get lost and forget what the intention was in the first place.
As developers, we need to strive to focus on what brings us the most business value and not waste our time writing boilerplate repetitive code.

So what’s the solution?
After experiencing these pains in multiple projects and tried several solutions (like the new ListAdapter) and libraries (a couple of the highest rated Adapters on GitHub) I decided a few months ago its time to give it a shot and write my own solution. 💪
My goals were:
1️⃣ Introduce a fast and easy way of building modular adapters with built-in support for multiple view types.
2️⃣ Introduce built-in support for DiffUtil using a concise API.
3️⃣ Add new enhancements to the original Adapter in a modular way that will result in one feature API won’t affect other features API, kind of plug & play approach.
4️⃣ Better understand the RecyclerView & Adapter internals and mechanisms.
Introducing OneAdapter 🤘

OneAdapter is composed of different modules you can easily define to fit your needs.
Each module can be divided into 2 parts:
- Configuration: ProvideModuleConfig is a mandatory method in which the relevant module config class should be created. This class holds key information to be used by the Adapter while constructing and performing its internal logic.
- Utility: each module comes with a set of optional overridable methods for you to use.
Item Module
Item Modules are used for the creation and binding of all ViewHolders for you. In the onBind method, you will receive as a parameter the model associated with this view and a ViewBinder class that lets you find (and cache) the views defined in the associated layout file.
Multiple Item Modules
Have more than one view type? not a problem, just create another ItemModule and attach it to OneAdapter in the same way.
Item Module’s Event Hooks
Item Modules can easily be enhanced with event hooks, for instance, ClickEventHook which let you bind a click listener for the entire view.
Paging Module
Paging Module is used for creating and binding a specific ViewHolder at the end of the list when the Adapter reaches a load more state. The visible threshold configuration is used to indicate how many items before the end of the list the onLoadMore callback should be invoked.
Emptiness Module
Emptiness Module is used for creating and binding a specific ViewHolder when the Adapter has no data to render.
This modular approach makes the reuse of modules in different Adapters very easy. Moreover, modules are more testable than the traditional Adapter implementation due to the fact that each module is isolated from the rest of the modules and handle only its associated model type business logic.
Putting It All Together
Every request to change the data is using DiffUtil internally. 💥
The Adapter is calculating the difference between its current data and the modified data on a background thread and posting the result to the main thread. In order for this magic to work without writing tons of DiffUtil.Callback, your models need to implement one simple interface:
Note: you do not need to sync the unique identifier between different model types, just make sure that every two models of the same type will not have the same identifier.
Demo
Wrapping Up
If you reached here, give your self a round of applause! 👏
Link to the repository is attached below. In there you will find extra features and a full Java and Kotlin examples implementing simple and advanced use cases using MVVM, Room, and RxJava.
I really hope you enjoyed reading my first article, feel free to clap and share!

Thanks to Ezra Erani, Dor Sakal and Tal Kanel for providing great feedback for this post.